
Account Preferences & Personalisation
Set up your Scope Wiser account: profile, timezone, application language, live chat translation and signature message — every field on the Account page and which to set first.
This page walks through every field on the Account page — profile, timezone, language, live chat translation and signature message — and which ones to set first. The timezone decides when every scheduled broadcast and sequence sends, so set it before anything else.
Getting there
Click your avatar at the top right.
Choose Account from the profile menu (which also lists Security, Renew / Upgrade, Transactions, Rate Us, API Developer and Logout).
Note: Control Panel → Settings & Integration is a different screen (workspace security), not your account.
What the page shows
Three cards run along the top: Package with its name and a Renew / Upgrade link, Price & Validity, and Account Expiry. Beneath them sits the two-factor authentication card, showing "2FA Disabled — Two-Factor Authentication is not enabled on your account." with an Enable 2FA button until you turn it on.
The left column carries the Update Account form. The right column holds four collapsible panels — Addons, AI Token Usage Log, Usage Log and API Usage Log — which show what your plan allows and what you have used. Billing, Plan Limits & the Usage Log covers those.
At the bottom, Delete Your Account with a Delete Account button. It does what it says.
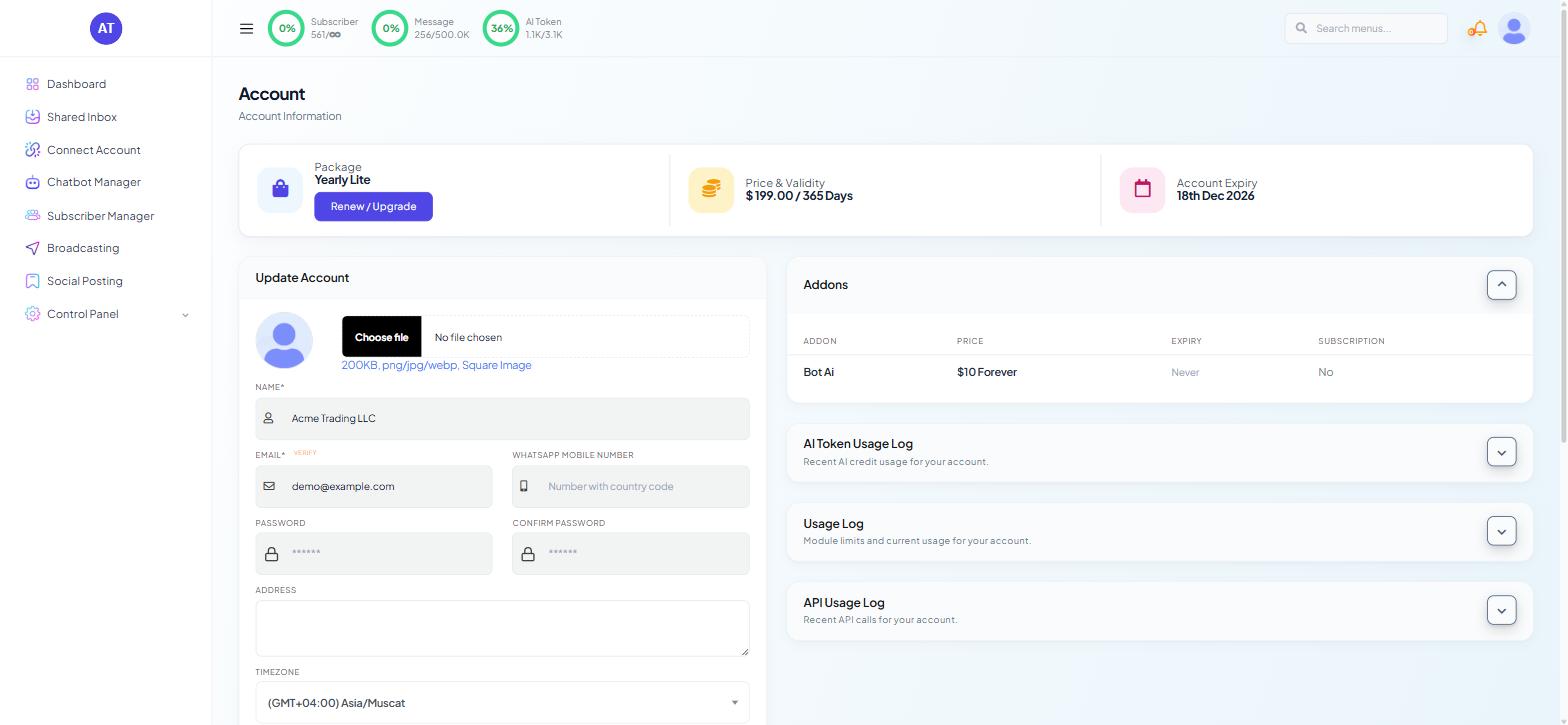
The Update Account form
The fields, in order:
Profile picture. A Choose file control; the requirement is shown beneath it: 200KB, png/jpg/webp, Square Image. A non-square image is cropped to a square. This picture identifies you to teammates in the Shared Inbox.
NAME * — your display name.
EMAIL * — the address that receives alerts and the one you recover the account with. A VERIFY link sits beside the field; use it if your email is not yet verified, or notifications will not arrive.
WHATSAPP MOBILE NUMBER — enter it with the country code, for example +968 9000 0001. This is your own contact number, not your bot's.
PASSWORD and CONFIRM PASSWORD — leave them alone unless you are changing your password. Account Security: 2FA, Passwords & Email Verification covers this.
ADDRESS — your business address. Optional.
TIMEZONE — the setting that matters most. Scheduled broadcasts, sequence timings and business hours all follow it. Set it to where your customers are if that differs from where you are.
APPLICATION LANGUAGE — the language of the Scope Wiser interface for your login. It is per user, so a teammate can work in a different language.
LIVECHAT TRANSLATION LANGUAGE — the language incoming chats are translated into for you. The translate icon only appears if your role has LIVE CHAT - TRANSLATOR on (Control Panel → User Permission).
SIGNATURE MESSAGE — a default sign-off for live chat replies. Keep it short: a first name and a role, such as "— Sam, Acme Trading support".
Click Update to save. Nothing on this form saves on its own.
A sensible order to do this in
Timezone first. Everything scheduled afterwards follows it.
Verify your email. It is needed for alerts and account recovery.
Name and profile picture, so teammates can tell who replied to a customer.
Signature message, before your first live chat.
Enable 2FA, once the rest is done.
Things worth revisiting
Check the timezone after a seasonal clock change if scheduling looks an hour out.
Keep the email and mobile number current — they are your recovery path.
Update the signature when someone joins or leaves the team.
What to do next
Account Security: 2FA, Passwords & Email Verification covers the security controls on this page. If you are setting up for a team, Adding Team Members & Access Control explains how to give colleagues their own logins instead of sharing this one.