
Introduction to Flow Builder: How Scope Wiser Flows Are Built
A plain tour of the Scope Wiser Flow Builder — the block palette, the Start Bot Flow node, trigger keywords, connecting blocks and saving your first working flow.
Flow Builder is the screen where you build what your bot says. This article shows you the parts of the screen, how to set the word that starts a flow, how to add and connect blocks, and how to save your work.
A flow is a set of blocks joined by lines. Each block does one thing: send a message, ask a question, check a value, look something up in another system. The line between two blocks says what happens next.
Opening the builder
Flow Builder opens when you create or edit something that needs a flow:
Chatbot Manager → Automation → Keyword Replies → + Create — the usual starting point for a bot that answers a keyword.
Chatbot Manager → Automation → Quick Actions — click a card (Get-started, No Match and so on) to open its flow.
Chatbot Manager → Automation → Follow-up Sequences → + Create.
Chatbot Manager → Data Collection → User Input Flows → + Create.
Broadcasting → Broadcast Center → + Create Campaign — opens Flow Builder in a new tab.
Dashboard → Create Flow.
The three parts of the screen
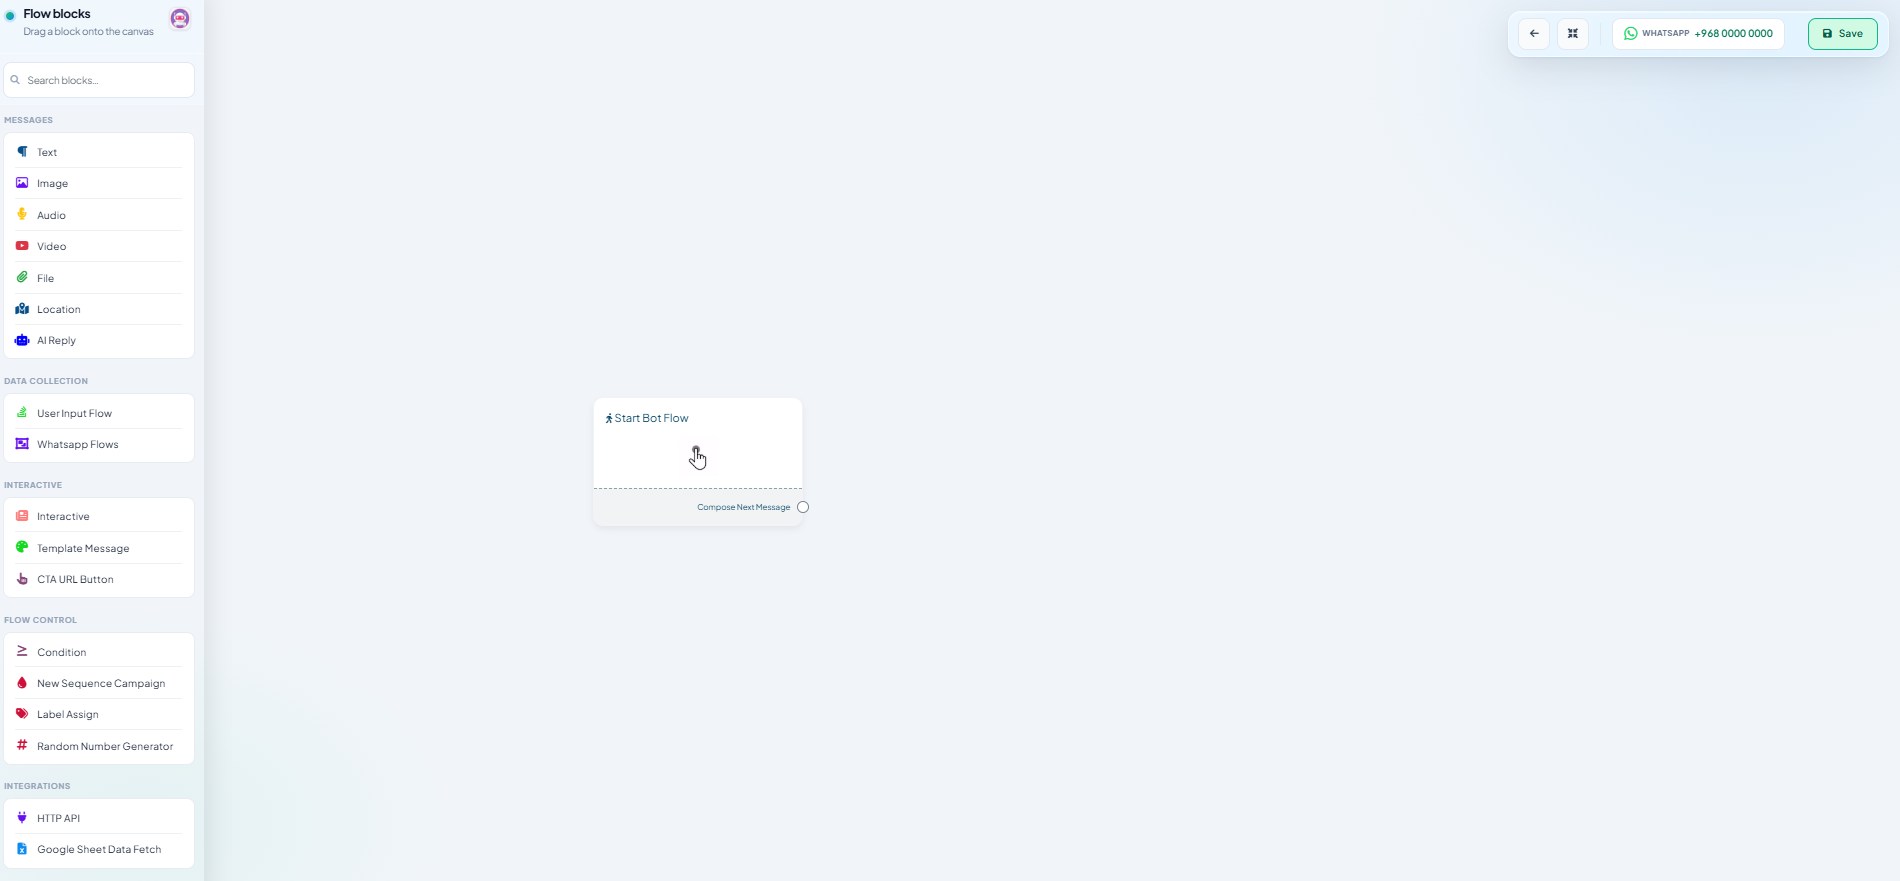
Left: the palette. Headed Flow blocks, with a Search blocks... box above the list. Blocks are grouped under MESSAGES, DATA COLLECTION, INTERACTIVE, FLOW CONTROL and INTEGRATIONS. Scroll down to see the whole list.
Middle: the canvas. A new flow starts with one node, Start Bot Flow. Its output port is labelled Compose Next Message.
Top right: the toolbar. A back arrow, a fit-to-screen icon, a chip showing which account you are editing (for example WHATSAPP +968 9000 0001 or WEBSITE Help Desk), and the blue Save button.
The palette is different on every channel
The block list depends on the channel of the bot you opened, not on your plan.
Group | Webchat | |||
|---|---|---|---|---|
MESSAGES | Text, Image, Audio, Video, File, Location, AI Reply | Text, Image, Audio, Video, File, Facebook Media, Generic Template, Carousel, AI Reply | Text, Image, Audio, Video, Generic Template, Carousel, AI Reply | Text, Image, Audio, Video, File, Generic Template, Carousel, AI Reply |
DATA COLLECTION | User Input Flow, Whatsapp Flows | User Input Flow | User Input Flow | User Input Flow |
INTERACTIVE | Interactive, Template Message, CTA URL Button | — | — | — |
FLOW CONTROL | Condition, New Sequence Campaign, Label Assign, Random Number Generator | Condition, New Sequence Campaign, Label Assign, RCN | Condition, New Sequence Campaign, Label Assign | Condition |
INTEGRATIONS | HTTP API, Google Sheet Data Fetch | HTTP API, Google Sheet Data Fetch | HTTP API, Google Sheet Data Fetch | HTTP API, Google Sheet Data Fetch |
Two things follow. Webchat has only Condition under FLOW CONTROL, so a webchat flow cannot subscribe a visitor to a sequence. WhatsApp is the only channel with the INTERACTIVE group, so a flow built on WhatsApp buttons and lists will not move to Instagram unchanged.
Start Bot Flow: setting the trigger
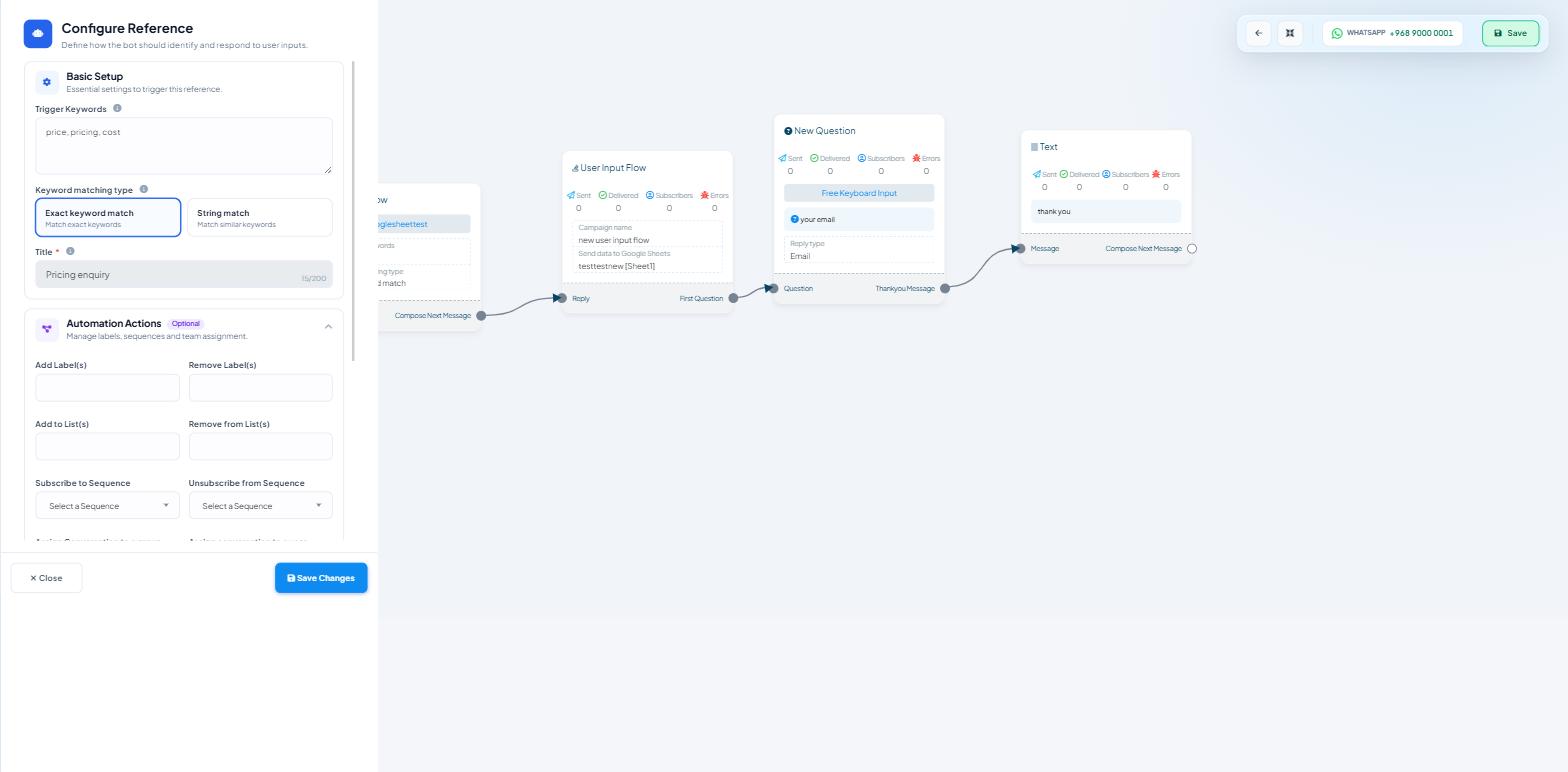
Click the Start Bot Flow node. The Configure Reference panel opens on the left.
Under Basic Setup, type your Trigger Keywords. Separate several keywords with commas.
Choose the Keyword matching type: Exact keyword match (selected by default) or String match.
Type a Title (required, up to 200 characters). This is the name you will see in the Keyword Replies list, so make it descriptive.
Click Save Changes.
Exact match fires only when the whole message is one of your keywords. String match fires when a keyword appears anywhere in the message. Keyword Replies and Postbacks explains when to use each.
The panel has two optional sections.
Automation Actions — things the bot does when the flow starts:
Add Label(s)
Remove Label(s)
Add to List(s)
Remove from List(s)
Subscribe to Sequence
Unsubscribe from Sequence
Assign Conversation to a group
Assign conversation to a user
The two Assign dropdowns stay empty until you create a role under Control Panel → User Permission and a person under Control Panel → User Manager.
Data & Integrations — Save to Custom Field (with a + Add new field link beside it), Forward Data to Webhook and Sync Data to Google Sheets.
Close the panel with ✕ Close, or save it with Save Changes. The saved title, keywords and matching type then show on the node itself.
Adding the next block
There are two ways.
Drag from the palette. Pick up a block, drop it on the canvas, then drag a line from a port on the previous block to the new block.
Drag from a port. Pull a line out of Compose Next Message into empty canvas and let go. A menu lists the blocks you can add at that point. New Sequence Campaign is not in that menu; drag it from the palette instead.
Some blocks have several output ports; the port you drag from decides the branch.
Configuring a block
Click any block to open its panel. A Text block, for example, opens Configure Text Message:
Reply message (required) — the text the customer receives, up to 4096 characters.
Above the box: a Custom dropdown, a Name button and an emoji picker. Use Custom to insert a personalisation field such as the customer's first name instead of typing it.
Delivery Options (optional) — Delay in reply, a Typing on display switch, and Hours and Minutes sliders. See Delaying Bot Replies with Delivery Options.
Every block panel has the same shape: a required section, optional sections, then ✕ Close and Save Changes at the bottom.
Reading a live flow
Once a flow has run, each message node shows Sent, Delivered, Subscribers and Errors. These counters build up over time, so judge a test by what arrives on your phone, not by the numbers. Bot Error Logs and Custom Fields explains how to read them.
Saving
There are two saves and you need both:
Save Changes at the bottom of a panel saves that block.
The blue Save in the top-right toolbar saves the whole flow.
Closing a panel with Save Changes does not save the flow. Forgetting the second save is the most common way to lose work.
What to do next
Read Conditions, Triggers & Branching Logic next. It shows how to send different people down different paths.