
Calling External APIs From a Flow
Define an HTTP API in Scope Wiser, test it, map the response, then call it from a flow — plus Google Sheet Data Fetch as the no-code alternative, and the failure path every call needs.
An API connection lets a flow look something up in another system — an order, a booking, a stock level — and use the answer in its reply.
The work splits in two. You define the API once in Chatbot Manager, where you can test it on its own, then drop an HTTP API block into as many flows as you like. Almost every integration problem is in the first half.
Step 1: define the API
Go to Chatbot Manager → Integrations → HTTP API. The screen is headed HTTP API — "Connect and manage outbound HTTP APIs for flows and automations."
The table lists what already exists, with columns API NAME, VERIFIED, ACTIONS, TOTAL CALL, TOTAL SUCCESS, TOTAL ERROR, CREATED AT and LAST CALLED AT. Those success and error counters are the fastest health check you have once a flow is live.
Click Create. The Add HTTP API wizard opens — "Connect and manage your WhatsApp HTTP APIs" — as a full page with four numbered steps:
API Details — "Basic connection info"
Request Data — "Headers, body & more"
Test & Verify — "Test your API request"
Response Mapping — "Map response fields"
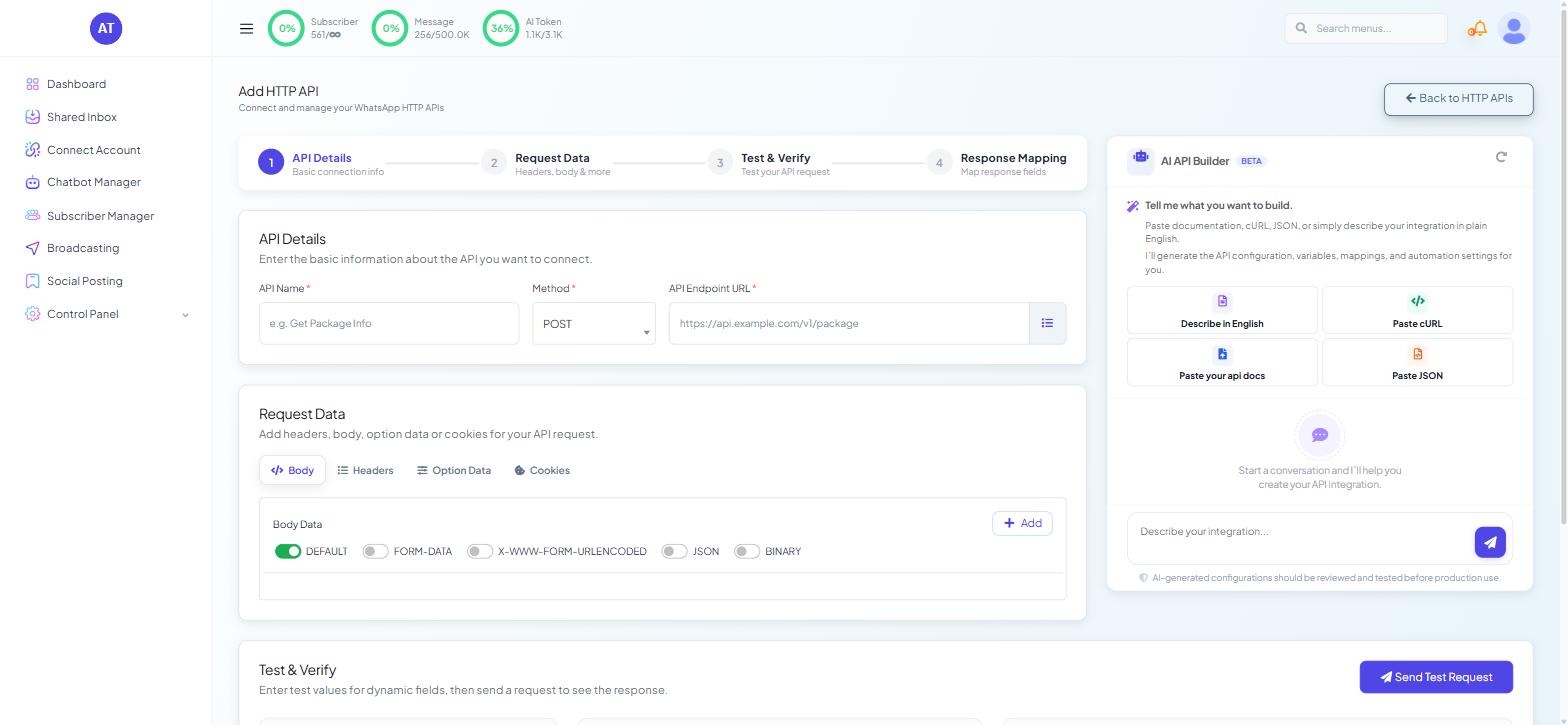
API Details
API Name — placeholder
e.g. Get Package Info. Name it for what it returns, not for the system it hits; you will pick it from a dropdown later.Method — a dropdown, defaulting to
POST.API Endpoint URL — placeholder
https://api.example.com/v1/package.
Request Data
"Add headers, body, option data or cookies for your API request." Four tabs: Body, Headers, Option Data and Cookies, with + Add for new rows.
Copy the header and body format from your API provider's instructions. If a field has to change per customer — an order number, a phone number — set it as a dynamic field so the same saved API works for everybody.
For developers
Headers is where authentication goes. A Content-Type of application/json and an Authorization header carrying a bearer token or basic credentials cover most cases.
Body Data offers five formats: DEFAULT (on by default), FORM-DATA, X-WWW-FORM-URLENCODED, JSON and BINARY. Match whatever the receiving API documents. Sending JSON as form data is a common cause of a 400 that looks like an authentication failure.
Send only the headers the endpoint needs and only the body fields it reads, and use the method it expects rather than the preselected one. Keep credentials in a header, never in the URL.
Test & Verify
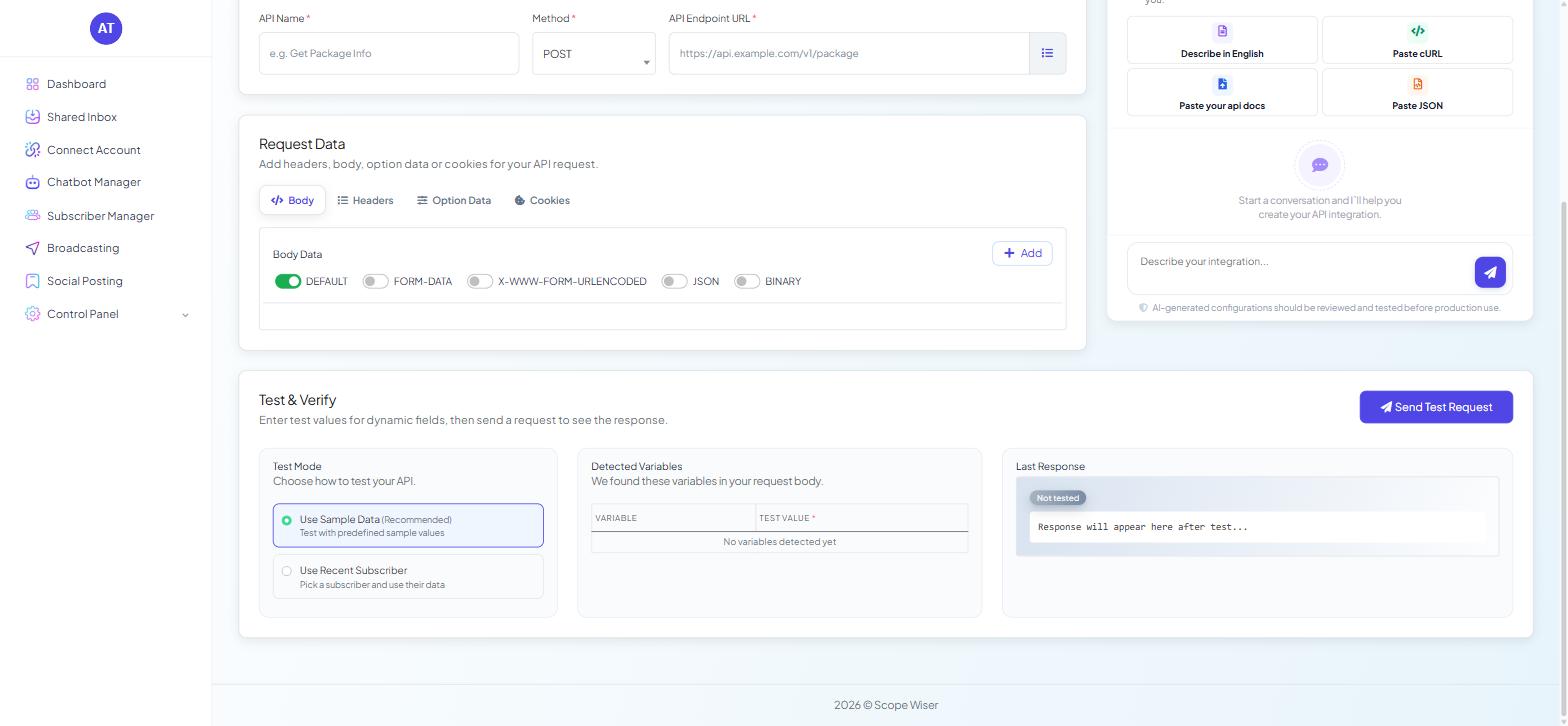
"Enter test values for dynamic fields, then send a request to see the response."
Test Mode offers two options: Use Sample Data (Recommended) — "Test with predefined sample values" — and Use Recent Subscriber — "Pick a subscriber and use their data." Start with sample data. Move to a real subscriber only once the request shape is right, and use your own subscriber record rather than a customer's.
Detected Variables — "We found these variables in your request body." — lists what the wizard found, in a table with columns VARIABLE and **TEST VALUE ***. Empty, it reads "No variables detected yet", which is your signal that a dynamic field is not being recognised as one.
Send Test Request fires the call. Last Response shows the result and carries a badge that reads Not tested until you do; before then it shows "Response will appear here after test...".
If a response takes two seconds here, it takes two seconds in every conversation.
Response Mapping
Step 4 — "Map response fields" — becomes available after a successful test. It is where you decide which parts of the answer Scope Wiser keeps: a returned user ID or email onto the subscriber's record, or a whole returned list saved into one custom field so a later block can render it as a tappable list.
The AI API Builder
The wizard has an assistant panel headed AI API Builder with a BETA badge — "Tell me what you want to build." Use Describe in English and it fills the fields in for you. Its own warning is the right instruction: "AI-generated configurations should be reviewed and tested before production use."
For developers
The same panel takes Paste cURL, Paste your api docs and Paste JSON.
Step 2: call it from a flow
Open Flow Builder and add the HTTP API block from the INTEGRATIONS group — either by dragging it from the palette or by pulling a connector out of a port and choosing HTTP API from the picker menu. It is available on all four channels.
Place it at the point in the conversation where you actually have the inputs the call needs. An API that looks up an order by number has to sit after the block that collected the order number, not before it.
The block's drawer is headed Configure HTTP API — "Link this step to an HTTP API integration to call external services."
Pick the connection from the HTTP API dropdown. It lists everything saved under Chatbot Manager → Integrations → HTTP API.
Manage APIs opens the place to create a new API or refresh the list, with Create and Refresh buttons.
The node has one input, Message, and one output, Compose Next Message. There is no success or failure port, so branch on the result afterwards with a Condition block.
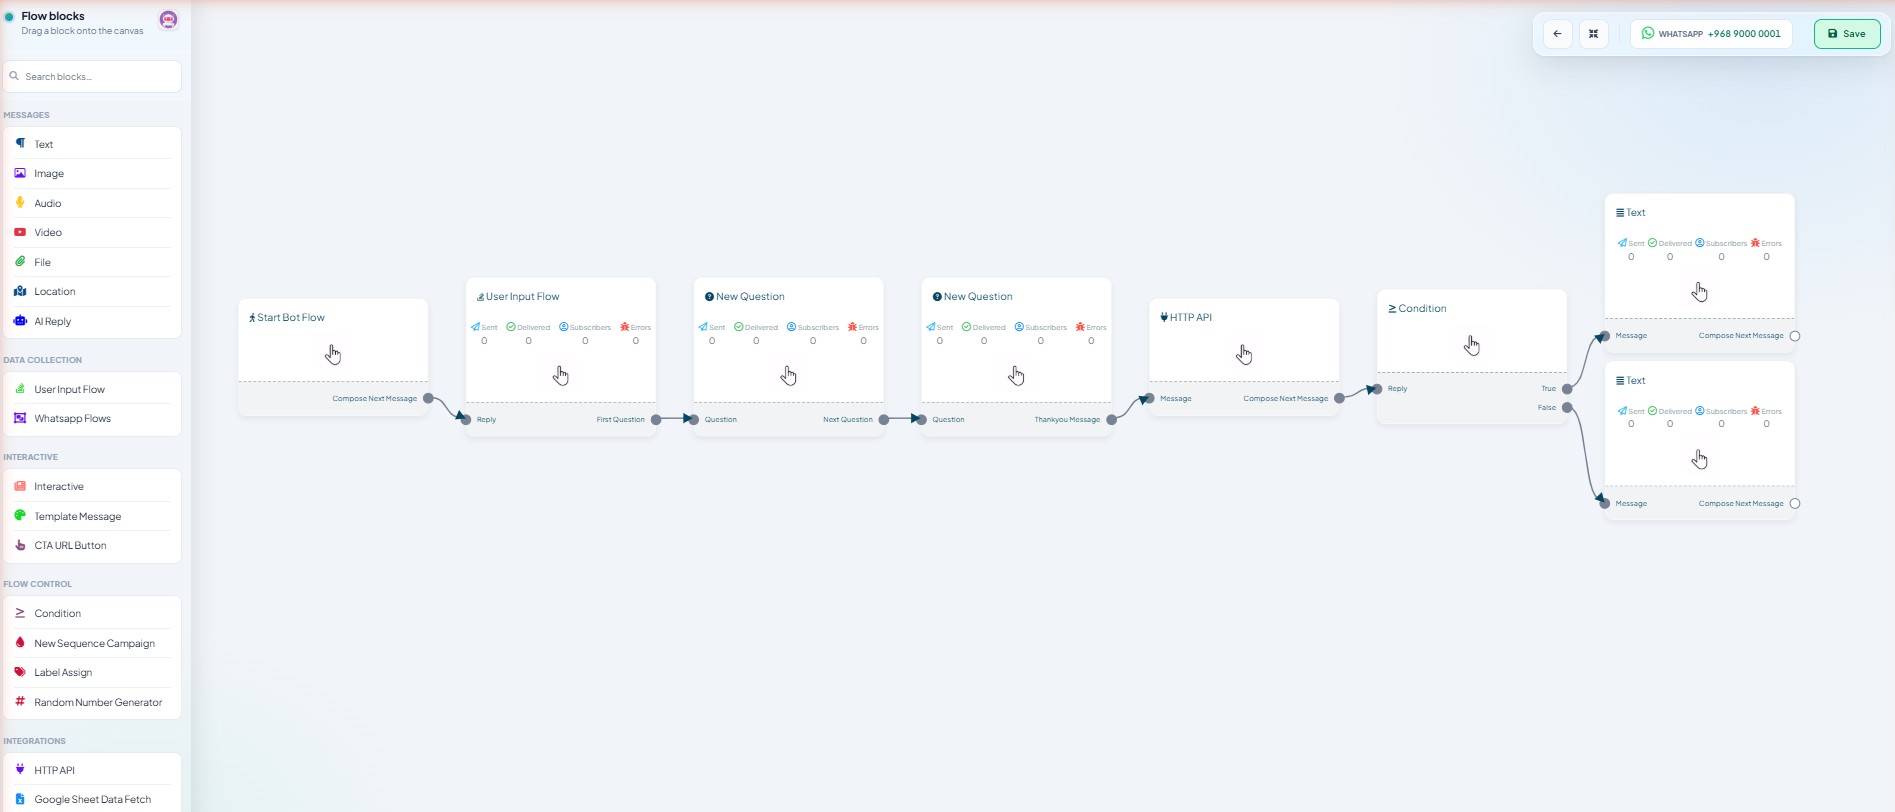
A typical shape on WhatsApp:
Start Bot Flow with a trigger keyword and a title.
User Input Flow to collect whatever the call needs, saved to a custom field.
HTTP API to make the call.
Condition to branch on what came back — found or not found.
Text or Interactive to present the result.
Build the failure path
Step 4 above is the one people skip, and it is the one that matters. External systems return empty results and errors as a matter of course, and a flow with no branch for "nothing came back" goes quiet at the worst moment.
Put a Condition on the field the call was supposed to fill, and send the empty case to a plain Text block with a way back in. Something like:
Sorry, we could not load that just now. Type "menu" to start again.
That is one extra block, and it is the difference between a stalled conversation and a recoverable one.
Fetch once, then reuse
Every HTTP API block is a round trip to somebody else's server, and the wait lands on your customer. Call the endpoint once, save the answer into a custom field, and read from that field for the rest of the flow. Custom fields are managed at Subscriber Manager → Manage → Custom Fields and stay on the subscriber, so a value fetched in one branch is still there three blocks later.
The exception is anything the customer will hold you to. Re-fetch prices and stock levels immediately before the message that quotes them.
Presenting the results
For a single value, a Text block with the saved value inserted is enough. For a set of results, the Interactive block's List Messages port renders them as a tappable WhatsApp list, with rows generated from the saved response rather than typed by hand — see Displaying Dynamic Lists From an API.
Google Sheet Data Fetch: the no-code alternative
Not every lookup needs an API. Google Sheet Data Fetch sits alongside HTTP API in the INTEGRATIONS group on all four channels and reads from a connected sheet — the right tool for a price list or an opening-hours grid that a colleague maintains by hand.
Connect the account at Connect Account → Connect Google, headed Google Integration. Click Sign in with Google, then Create New Sheet or Add Existing Sheet.
Go to Chatbot Manager → Integrations → Google Sheets, headed Google Sheet Data Fetch Campaigns.
On the Connect Your Google Sheet card — "Build & verify a Google Sheet connection" — fill in API Name, choose from Google Sheet List, then click Verify Connection and Create.
The block's own fields are covered in Google Sheets: Connect, Import and Use Data in Replies.
Sending data out
Two different mechanisms, and choosing the wrong one wastes a day.
Inside the flow. The Configure Reference panel on the Start Bot Flow node, and the Configure User-Input-Flow panel, both carry Forward Data to Webhook (placeholder https://your-webhook-url.com) and Sync Data to Google Sheets. For "post the answers somewhere when this runs", that is the whole job — no separate integration needed.
Across the bot. To push data out every time a chosen event happens rather than at one point in one flow, use Chatbot Manager → Automation → Outbound Actions — see Outbound Actions: Push Bot Data to Any CRM.
For inbound calls from a third party into Scope Wiser, the tool is Webhook Workflows (Chatbot Manager → Automation → Webhook Workflows). Different direction, different screen.
When it goes wrong
The test succeeds but the flow does nothing. Check the HTTP API screen's TOTAL CALL and TOTAL ERROR counters once the flow has been live for a while. No calls recorded by then means the block is never reached — a trigger or branching problem, not an API one. A zero immediately after a single test says nothing; the counters trail the traffic.
No variables detected. The dynamic field in your body is not being recognised. Re-check how it is written before touching anything else.
Works on sample data, fails on a real subscriber. A field you assumed is always populated is empty for some people. Add a Condition before the call.
Intermittent failures. Look at the endpoint's own rate limits. A broadcast that pushes hundreds of people into the same flow at once will hit them.
What to do next
Displaying Dynamic Lists From an API takes the response you just mapped and turns it into a tappable WhatsApp list — the most useful thing most flows do with API data.