
Website Chat Widget: Create, Embed & Manage
Add a live chat widget to your website with Scope Wiser. Create and style a webchat widget, embed the script, and set up a WhatsApp chat button — two different widgets, two different screens.
The website chat widget opens a chat window inside your page. The conversation runs on the Webchat channel, lands in your Shared Inbox, and the visitor never leaves your site. It lives under Connect Account.
The WhatsApp chat widget is a button that hands the visitor over to WhatsApp. The conversation runs on your WhatsApp number, so the person becomes a WhatsApp subscriber you can message later. It lives per-bot under Chatbot Manager.
Part 1 — The website chat widget
Where it lives
From the sidebar, open Connect Account. In Available Connections, find the Webchat card and click Connect Webchat →. An existing webchat connection has a Manage action in Connected Accounts that goes to the same place.
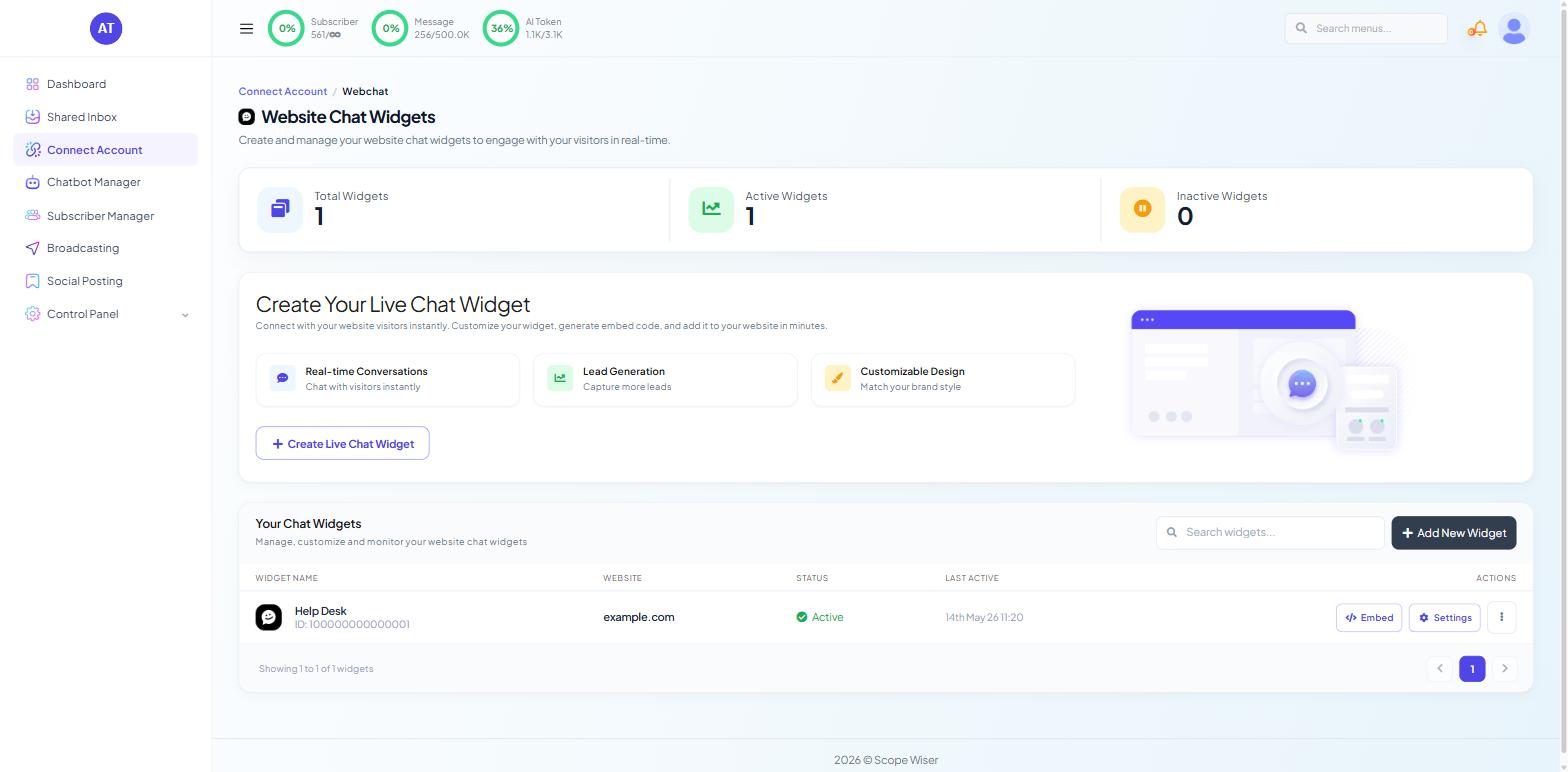
You land on Website Chat Widgets. Three counters sit at the top: Total Widgets, Active Widgets and Inactive Widgets. Below them a promo block, Create Your Live Chat Widget, carries the + Create Live Chat Widget button; under that the Your Chat Widgets table lists what you already have, with a Search widgets... box and + Add New Widget.
Both buttons do the same job: the promo block is the obvious target on an empty account, + Add New Widget the one you use afterwards.
Create and style the widget
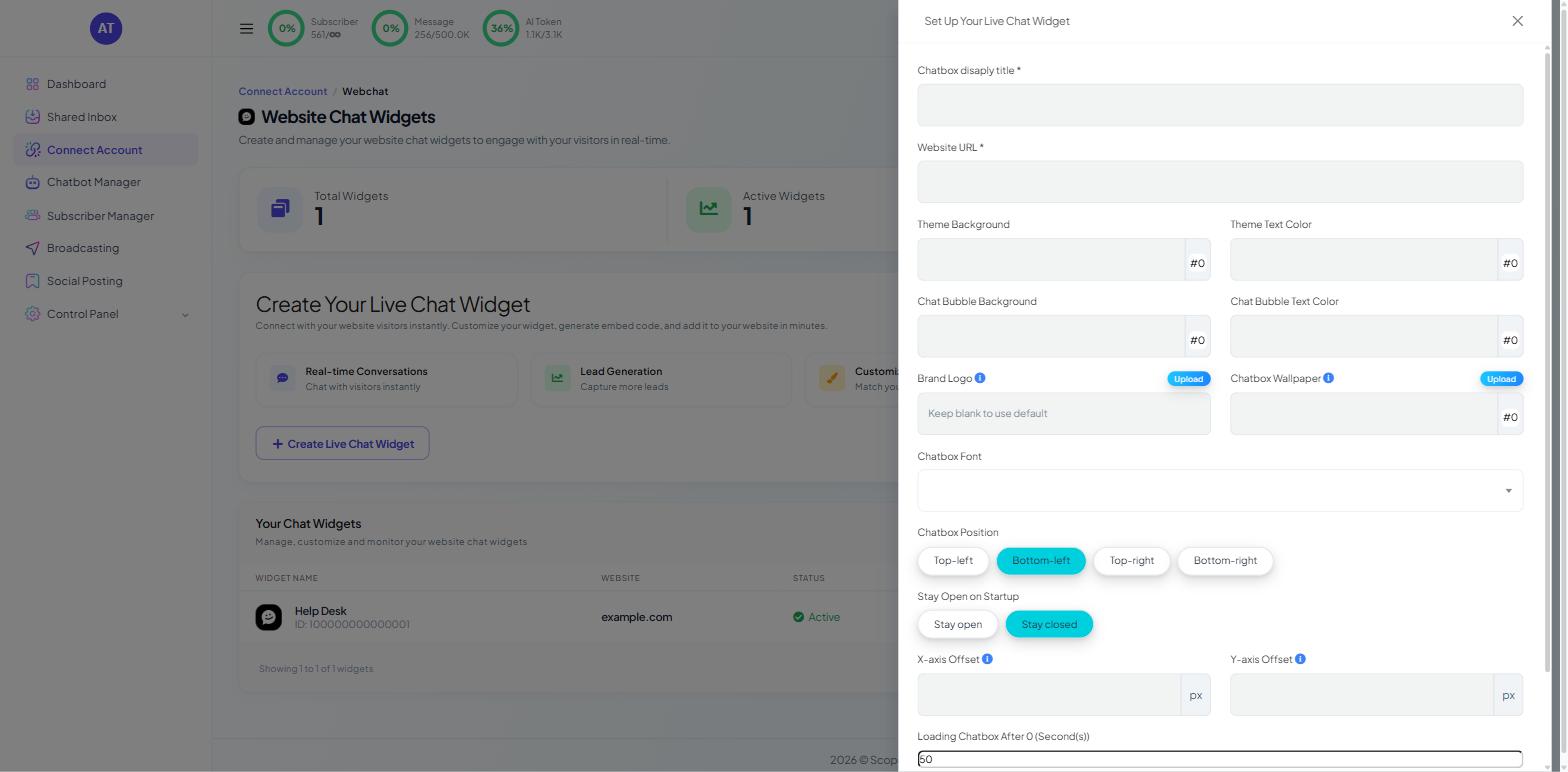
Creating a widget opens the Set Up Your Live Chat Widget drawer. The fields appear in this order:
Chatbox disaply title * (spelled this way on screen) — the heading the visitor sees at the top of the chat window. Something plain works best: "Acme Trading Support", not a slogan.
Website URL * — the site this widget belongs to. Get it right: it identifies the widget and it is what you will check first when a widget refuses to load.
Theme Background and Theme Text Color — hex values with a colour swatch each. These set the chat window itself.
Chat Bubble Background and Chat Bubble Text Color — the floating bubble that sits on the page before anyone opens it.
Brand Logo and Chatbox Wallpaper — each with an Upload control and an info icon.
Chatbox Font — a dropdown.
Chatbox Position — Top-left, Bottom-left, Top-right or Bottom-right.
Stay Open on Startup — Stay open or Stay closed.
X-axis Offset (px) and Y-axis Offset (px) — nudge the widget away from the corner so it does not sit on top of a cookie banner or a back-to-top button.
Loading Chatbox After N Second(s) — a slider. A short delay stops the widget covering your page before a visitor has read anything.
Upload Media — an Enable toggle that decides whether visitors can send files.
Click Save.
Two of these deserve more thought than the rest. Stay Open on Startup set to Stay open raises conversation volume and annoys people who came to read — on a content site, leave it closed. Upload Media is a support decision as much as a design one: on if you expect screenshots and receipts, off if you would rather not receive files.
Embed it on your site
Back on Your Chat Widgets, each row shows the WIDGET NAME with its ID, the WEBSITE, STATUS, LAST ACTIVE and ACTIONS. The row actions are Embed (a </> icon), Settings (a gear) and a kebab menu.
Embed gives you a single code snippet. Copy the code and paste it into your website's custom-code or footer-scripts setting (WordPress, Wix and Shopify all have one) so it loads on every page.
Once the snippet is on the page you do not need to touch it again. Changes made in the Settings drawer apply to the live widget without a re-embed. Reload your site to confirm the bubble appears in the corner you chose — and if you set a delay in Loading Chatbox After N Second(s), wait it out before deciding the embed failed.
For developers
The snippet is JavaScript. Place it immediately before the closing </body> tag of a template that renders on every page.
Manage widgets afterwards
Settings reopens the same drawer for editing. STATUS and LAST ACTIVE tell you whether a widget is live and whether anyone has used it recently — a widget silent for weeks usually lost its snippet in a site rebuild. Run one widget per site rather than one for the whole business, so each has its own styling, its own website URL and its own row to check.
Part 2 — The WhatsApp chat widget
Where it lives
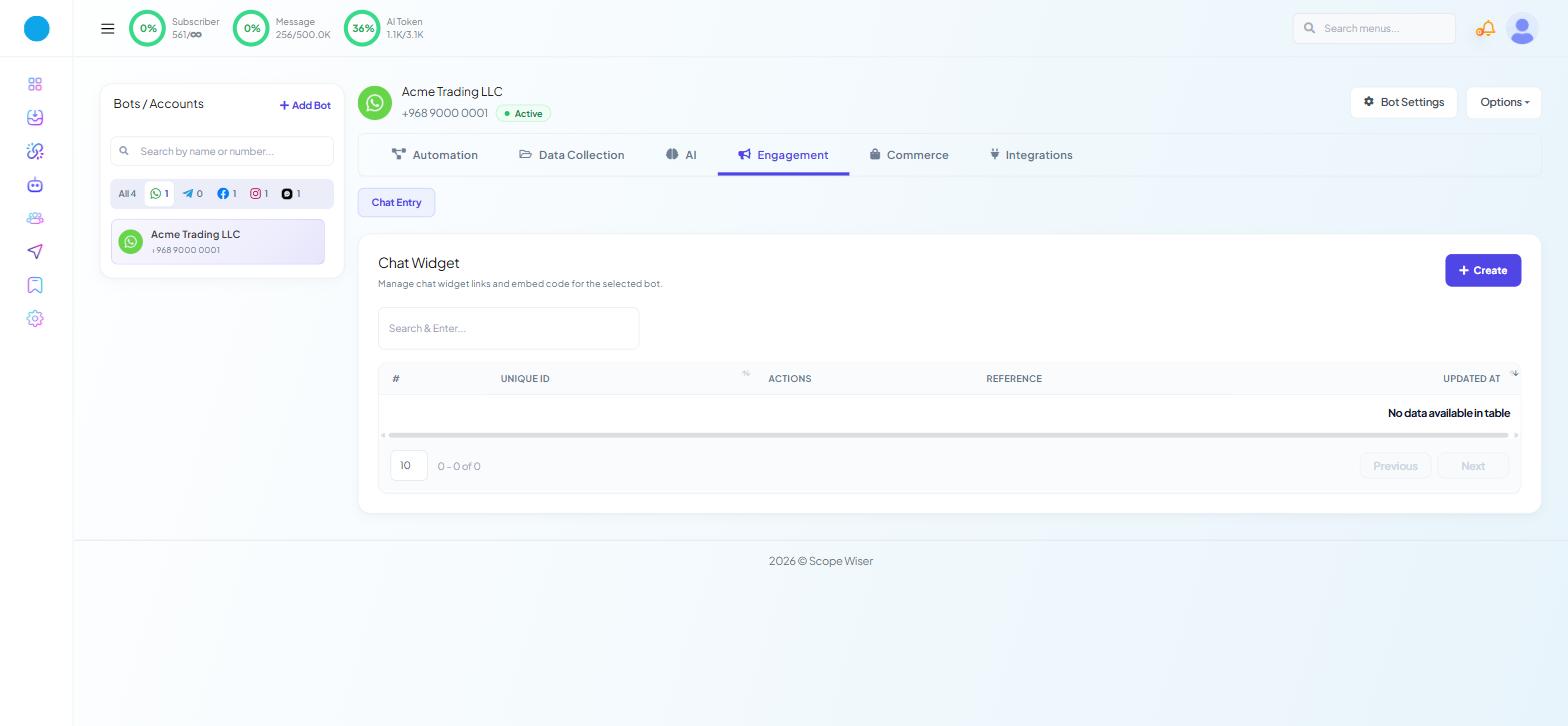
This one is built somewhere else entirely, and per bot. Open Chatbot Manager and select your WhatsApp bot in the left-hand Bots / Accounts panel. Go to the Engagement tab, then the Chat Entry sub-tab. The panel is headed Chat Widget.
Chat Entry is the only sub-tab under Engagement on a WhatsApp bot, and it needs a connected number to be useful, so finish channel setup first. Click + Create. Scope Wiser opens the Flow Builder with a configuration drawer titled Configure Action Button.
Configure the button
Under Action Type, set Actions * to Whatsapp short link. The Messenger Engagement Plugin card holds the rest:
Field | What it controls |
|---|---|
Please provide your Chatbox logo | The logo in the widget header. Upload a png or jpg |
Chatbox header bg / Chatbox header color | Header background and text, as hex values |
Display name | The business name the visitor sees |
Welcome message | The greeting shown inside the widget |
Pre-fill message | The text already typed into WhatsApp when the chat opens |
Chatbox position | Top-left, Bottom-left, Top-right, Bottom-right |
Open on startup | Stay open or Stay closed |
Offset X / Offset Y | Pixel nudges from the chosen corner |
Delaying chatbox initialization | Slider, in seconds |
Button text | The label on the button, e.g. "Start Chat" |
Button background / Button text color | Resting colours |
Button hover background / Button text hover color | Hover colours |
Button size | Medium, Large or Extra Large |
Reference | Your internal name for this widget |
If the logo field displays the word undefined before you have uploaded anything, that is the empty state showing through rather than a value you need to clear — upload your image and it is replaced.
Fill in Pre-fill message: a visitor who taps through with "Hi there, I need some information." already in the box sends it far more often than one facing an empty composer, and making the pre-fill specific to the page tells you where the chat started. Give Reference a real name too; it is how you tell three widgets apart later.
The flow behind this drawer is what replies after the visitor taps through — add a welcome message to Start Bot Flow before saving.
Click Save at the top right, then use the </> button for the embed code and paste it into your site the same way as the webchat snippet.
When the widget does not appear
Nothing renders. Check the code was saved in the site's custom-code box and that the site was republished.
It renders on one page only. It went into a single page's HTML rather than a site-wide footer.
It is hidden behind something. Adjust the X and Y offsets rather than fighting your site's CSS.
It appears but nobody replies. Website-widget conversations arrive in the Shared Inbox — check the Webchat filter. For WhatsApp, check that the bot's flow is published.
What to do next
If you run a Facebook Page, Facebook Engagement Widget covers the Messenger equivalent. If your WhatsApp button is live but the conversation after the tap is thin, Introduction to Flow Builder: How Scope Wiser Flows Are Built is where to improve it.