
Google Sheets: Connect, Import and Use Data in Replies
Connect a Google account, bring a sheet into Scope Wiser, build a data-fetch campaign and pull a row into a bot reply — with the difference between the three Google Sheets features made clear.
Scope Wiser can read from a spreadsheet mid-conversation. A customer asks about a plumber, the bot looks up the row, and the reply comes back with the right name and number in it. Nothing is duplicated, and changing the answer means editing a cell rather than editing a bot.
Three features with similar names
Google Sheets appears in three places and they do different jobs. Sorting them out first saves a lot of confusion.
Connect Account → Connect Google is the account-level connection. It authorises Scope Wiser against your Google account and holds the list of sheets it can see. Everything else depends on it.
Chatbot Manager → Integrations → Google Sheets is where you build a data-fetch campaign: a saved definition of which sheet to search, what to search on, and where to put what it finds. This is the reading-in feature, and the subject of this post.
Google Sheet Data Fetch is a block in the Flow Builder's INTEGRATIONS palette group. It runs a campaign you have already defined, at a chosen point in a conversation. It is available on all four channels.
There is a fourth thing that is not this post. Sync Data to Google Sheets — a field in flow configuration panels — and the GOOGLE SHEET LIST field on the Google tab of Bot Settings both write out to a sheet. If you want submissions saved into a spreadsheet, see Exporting Flow Data to Google Sheets.
Step 1: Connect the Google account
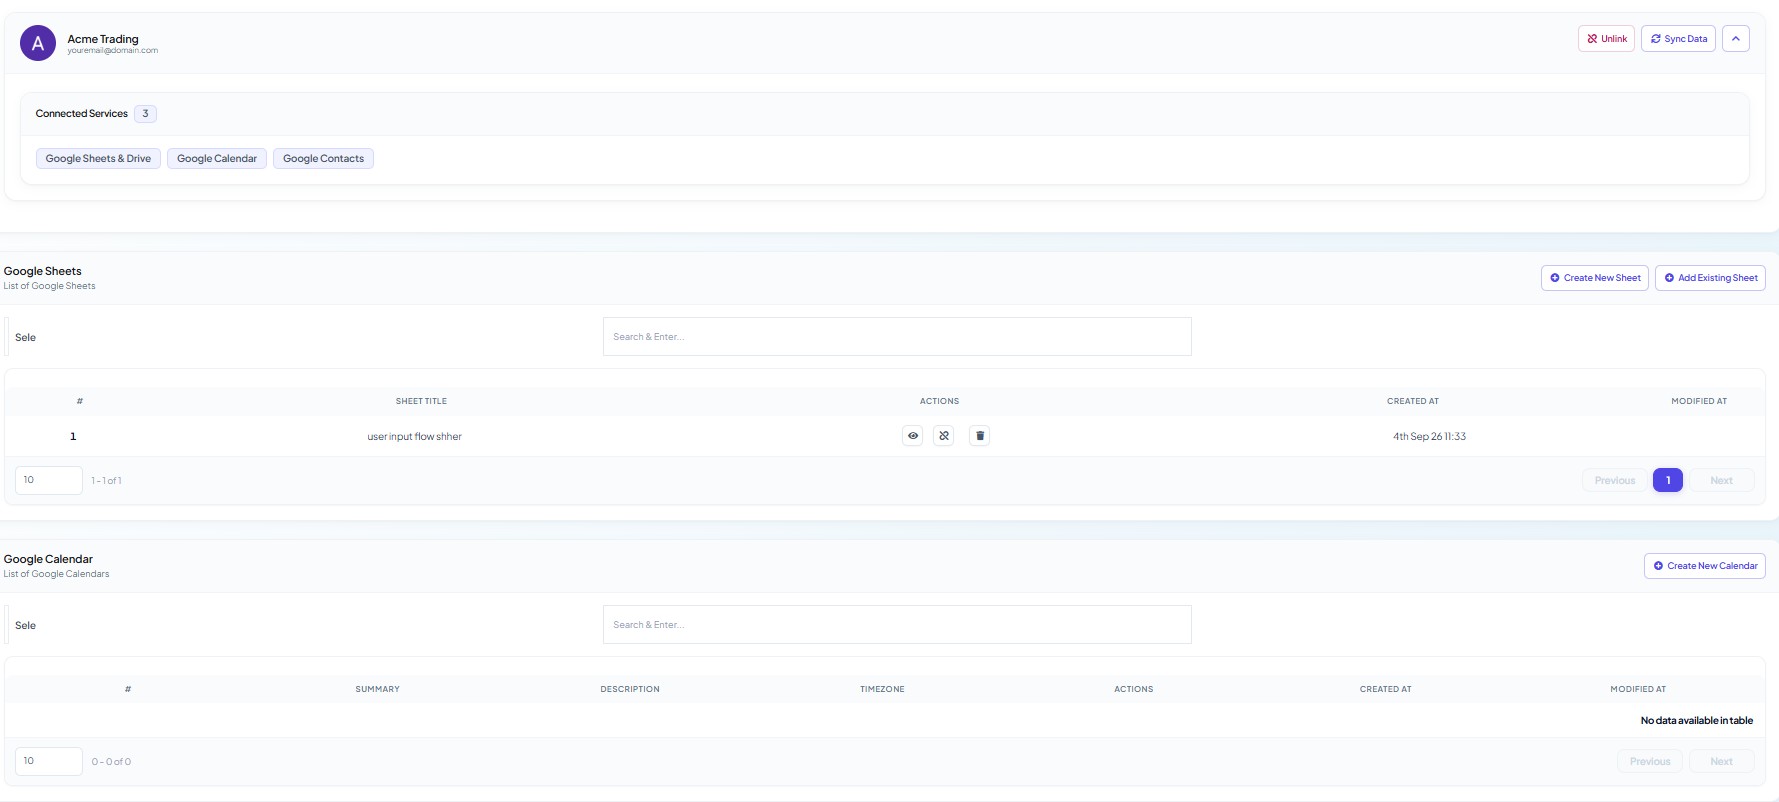
From the sidebar, open Connect Account, then choose Connect Google from Available Connections. You land on Google Integration — "Connect and manage your Google accounts, sheets, and calendars."
Four tiles across the top track what is connected: Google Accounts, Sheets Access, Calendar Access and Limited Access. All four read zero on a fresh account, with a card offering "Connect Google Account — Connect your Google account by simply clicking the button below".
Click Sign in with Google and pick the account.
On Google's permissions page, tick Select all, then continue.
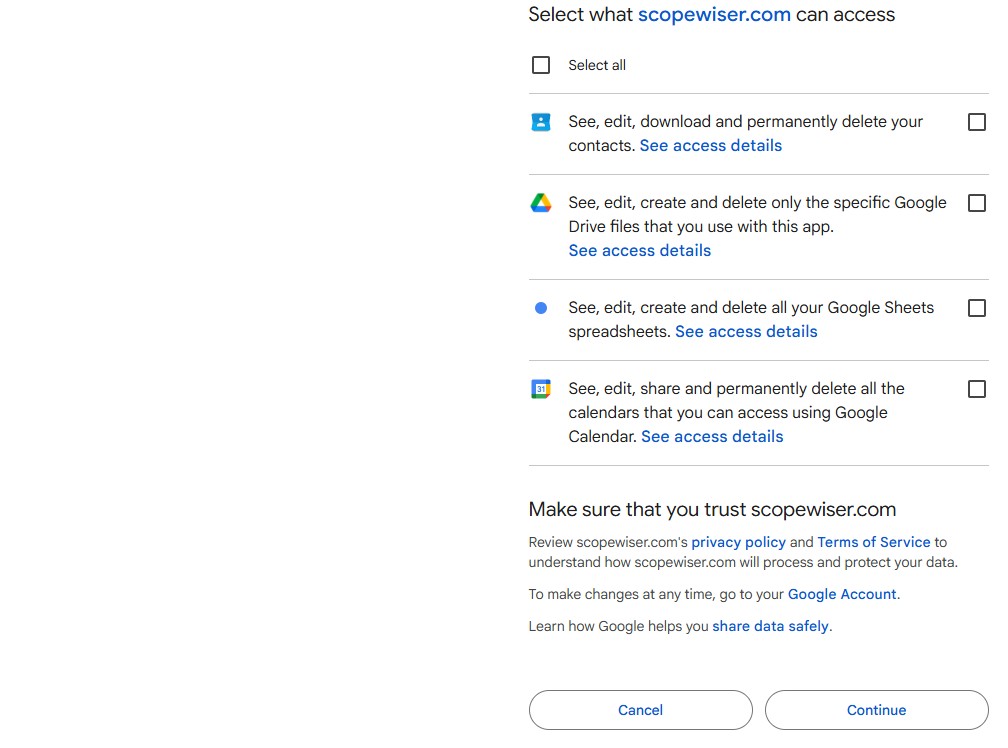
Withholding one permission produces the most confusing failure in this whole area: a connection that reports success and then shows an empty sheet list.
Below, the Google Sheets section — "List of Google Sheets" — has the columns #, SHEET TITLE, ACTIONS, CREATED AT and MODIFIED AT.
Step 2: Create or add a sheet
Two buttons sit above the list: Create New Sheet and Add Existing Sheet.
Create New Sheet builds a fresh spreadsheet in the connected account. Give it a title and define the column headers you want.
Add Existing Sheet brings in a spreadsheet you already have. It is identified by its sheet ID — the long string in the middle of the Google Sheets URL. In https://docs.google.com/spreadsheets/d/1AbcXYZ12345/edit, the ID is 1AbcXYZ12345.
Header rules matter more than they look. Column headers should use letters and numbers only — no spaces, no punctuation, no symbols. ServiceName and Phone_Number are safe; Service Name (Main) is not. Headers become the field names you map against later, and an unmappable header is only discovered after you have built the rest.
Also keep headers on the first row, with no blank rows above and no merged cells in the range you search.
Step 3: Create the custom fields the data will land in
Fetched values are stored against the subscriber in custom fields, so those have to exist first.
Open Subscriber Manager, click the Manage menu and choose Custom Fields. Create one field per value you intend to pull out of the sheet — a plumber's name and a plumber's phone number are two fields, not one.
Step 4: Build the data-fetch campaign
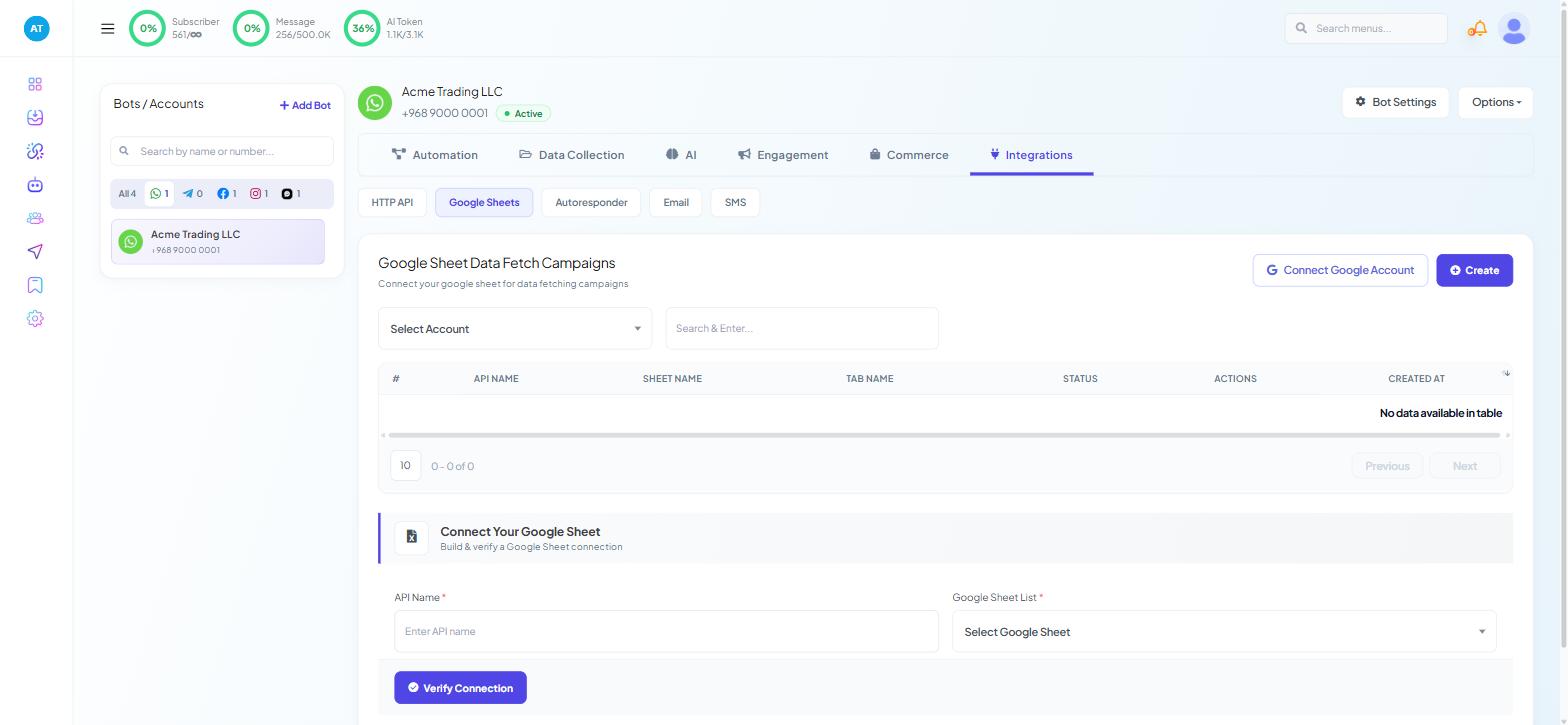
The screen is headed Google Sheet Data Fetch Campaigns — "Connect your google sheet for data fetching campaigns" — with a Connect Google Account button, a Create button and a Select Account dropdown naming the Google account in use. Campaigns you have already built are listed underneath with API NAME, SHEET NAME, TAB NAME, STATUS, ACTIONS and CREATED AT.
Create reveals the Connect Your Google Sheet panel — "Build & verify a Google Sheet connection" — which asks for just two things before it will go further:
API Name — your own name for this connection.
Google Sheet List — pick the sheet. The dropdown lists each sheet with its tab in square brackets, for example My orders [Sheet1], so a workbook with several tabs appears several times.
Click Verify Connection. The mapping fields appear only once that succeeds.
Open Chatbot Manager, select the bot, then the Integrations tab and the Google Sheets sub-tab. The page is headed Google Sheet Data Fetch Campaigns — "Connect your google sheet for data fetching campaigns".
Three controls sit at the top: Connect Google Account, Create and Verify Connection. Below them a table lists existing campaigns with the columns #, API NAME, SHEET NAME, TAB NAME, STATUS, ACTIONS and CREATED AT.
Click Create. Fill in API Name * — placeholder "Enter API name", and the name you will choose from inside the Flow Builder later — and Google Sheet List *, a dropdown reading "Select Google Sheet" that lists the sheets your connected account exposed in step 2.
If you have connected more than one Google account, pick the right one in Select Account.
Mapping: search, then assign
A campaign does two things, and both need setting up.
Search decides which row is used. You pick a column in the sheet, and the value to match it against — typically the subscriber's own message, so that a customer typing "Plumber" finds the row whose service column reads "Plumber". Matching on the subscriber's phone number or ID instead turns the sheet into a per-customer lookup: order status, membership level, outstanding balance.
Assign decides what is kept. For each column you want, you pair the sheet header with the custom field the value should be written to.
Finish with Verify Connection, which confirms Scope Wiser can actually read the sheet. Do not skip it — a campaign that saves without verifying fails silently at conversation time, and by then you are debugging a bot rather than a connection.
Step 5: Use the data in a reply
Open the bot's flow in the Flow Builder.
From the palette's INTEGRATIONS group, drag Google Sheet Data Fetch onto the canvas.
Double-click the node and choose the campaign you just created.
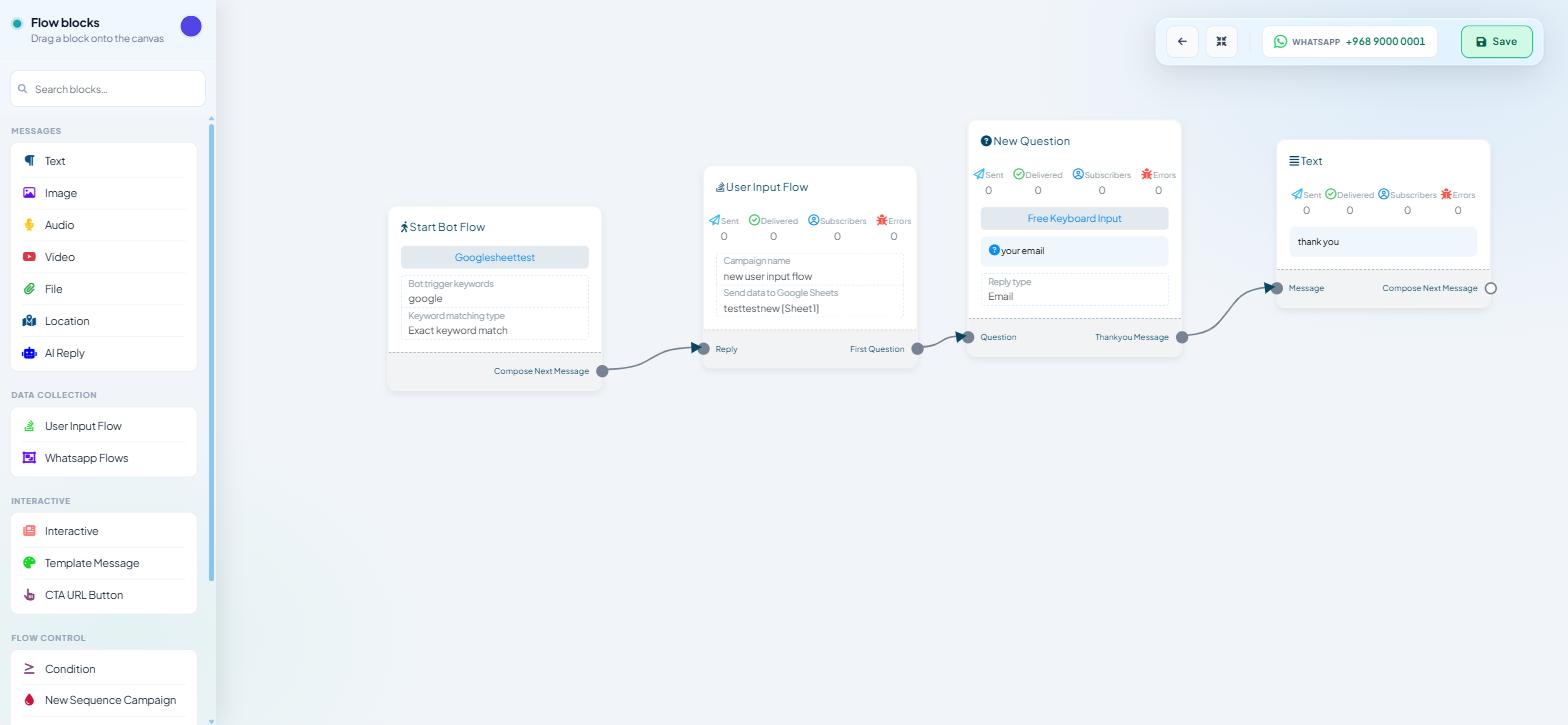
Order matters. The fetch block must run after the message that gives it something to search on and before the reply that uses the result. A common shape looks like this:
A message asking which service the customer wants, with Interactive buttons for each option. Button text behaves as a message from the subscriber, so the button label is what gets searched.
Google Sheet Data Fetch, running the campaign.
A Text block whose body contains the custom fields the campaign filled in.
To insert those fields, type a single # in the message body — the field reads "Type # for custom fields and name". One hash, not two.
The result: "Our plumber in your area is Sam, on +968 9000 0001." with both values pulled live from the sheet at the moment of asking.
Editing the answer afterwards
When the plumber changes, you edit the sheet. The flow, the buttons and the reply text stay exactly as they are, and the next customer gets the new answer.
Give whoever maintains the sheet two rules: do not rename the header row, and do not delete the column the campaign searches on. Both break the campaign silently.
What does not exist here
This does not import subscribers — use Subscriber Manager → Export/Import → Import from CSV.
When a fetch returns nothing
The reply arrives with blanks where fields should be. No row matched. Check for trailing spaces in the sheet, and for case differences between the button label and the cell value.
Every fetch fails. Run Verify Connection again. A revoked Google authorisation or a sheet moved to another Drive account both break it.
The right row is found but the wrong field is filled. Header-to-custom-field mapping. Two fields with similar names are easy to swap.
The sheet list is empty on the campaign form. The Google account connected without full permissions. Reconnect via Connect Account → Connect Google and tick Select all.
The Google Sheets sub-tab is missing. Ask the owner to enable GOOGLE - Sheets under Control Panel → User Permission. Step 1 needs GOOGLE - Connect Account in the same way.
What to do next
To send data the other way — writing what a flow collects into a spreadsheet as it arrives — read Exporting Flow Data to Google Sheets. For bringing an existing contact list into Subscriber Manager, Importing Contacts From Google Sheets and Google Contacts covers that path.