
Webhook Workflow: Complete Beginner's Guide
How to build a Webhook Workflow in Scope Wiser: name it and pick a template, load a sample payload, map the fields, add formatters, rules and a delay, and read the report when nothing arrives.
A Webhook Workflow sends a WhatsApp template message when something happens in another system — an order, a payment, a form. You can build it from a pasted sample and connect the store afterwards.
Every recipe in this module — order notifications, cash-on-delivery verification, abandoned carts — is a Webhook Workflow with different data mapped into a different template.
Three different things called "webhook"
Feature | Where | Direction |
|---|---|---|
Webhook Workflows | Chatbot Manager → Automation → Webhook Workflows | Inbound. An external system calls Scope Wiser, and Scope Wiser sends a WhatsApp message. |
Outbound Actions | Chatbot Manager → Automation → Outbound Actions | Outbound. A bot event calls your URL. |
Bot Settings → Webhook | Bot Settings button → Webhook tab | Outbound. Copies of messages sent to a URL you host. |
How a workflow runs
Five steps. A failure at any one of them looks the same from outside — nothing arrives.
Something happens in the external system. An order is created in Shopify, a cart is abandoned in WooCommerce, a form is submitted.
That system calls the workflow's Webhook Callback URL, sending the event as data. Scope Wiser creates this address once the workflow exists; you paste it into the other system.
Scope Wiser reads the data and picks out the fields you told it to: the phone number, the customer's name, the order total, the product list.
Rules decide whether to send. Only COD orders, only orders over a value, only a particular region.
A WhatsApp template message goes out, with the mapped values filling its variables, immediately or after a delay you set in minutes.
The message must be an approved WhatsApp template, because the customer has not messaged you and no session exists — see WhatsApp Rules You Must Know: 24-Hour Window & Template Messaging. And the phone number in the external system has to be one the customer actually uses on WhatsApp, in a format WhatsApp accepts.
Before you build anything
Create and get the template approved first. The workflow form asks for a template on its very first screen and will not proceed without one. Build it under Chatbot Manager → Automation → Message Templates, with a variable for each piece of order data you want to include, and wait for approval. Creating & Getting WhatsApp Templates Approved covers the rules that get templates rejected.
Get a sample of the data your store sends (called a payload). The easiest way: connect the store, place one test order and press Capture Webhook Response — or ask your developer for a sample.
Connect the store, if there is one. Shopify and WooCommerce connect from Connect Account — see Connecting Shopify and Connecting WooCommerce. That connection is separate from the workflow itself, and it is what the Callback APIs described further down need in order to write anything back.
Stage one: name it and pick a template
Webhook Workflows appears on WhatsApp bots only.
Open Chatbot Manager, select the WhatsApp bot, then Automation → Webhook Workflows.
Click Create. The screen splits in two: the workflow form on the left, the AI Workflow Assistant on the right. The form starts as a single card, Workflow Details, holding three things:
WORKFLOW NAME * — placeholder "Abandoned Cart Recovery", with a validate button beside it. Name it after the event and the store, not the feature:
Shopify — order createdtells you what it does when there are nine of them.MESSAGE TEMPLATE * — the approved template this workflow sends.
TEMPLATE INFO — a live preview showing the template's name, its category chips and its message body. The variables you can see here are exactly the ones you will have to supply data for.
Press Create Workflow.
The callback URL, mapping, rules and delay only appear after you press Create Workflow.
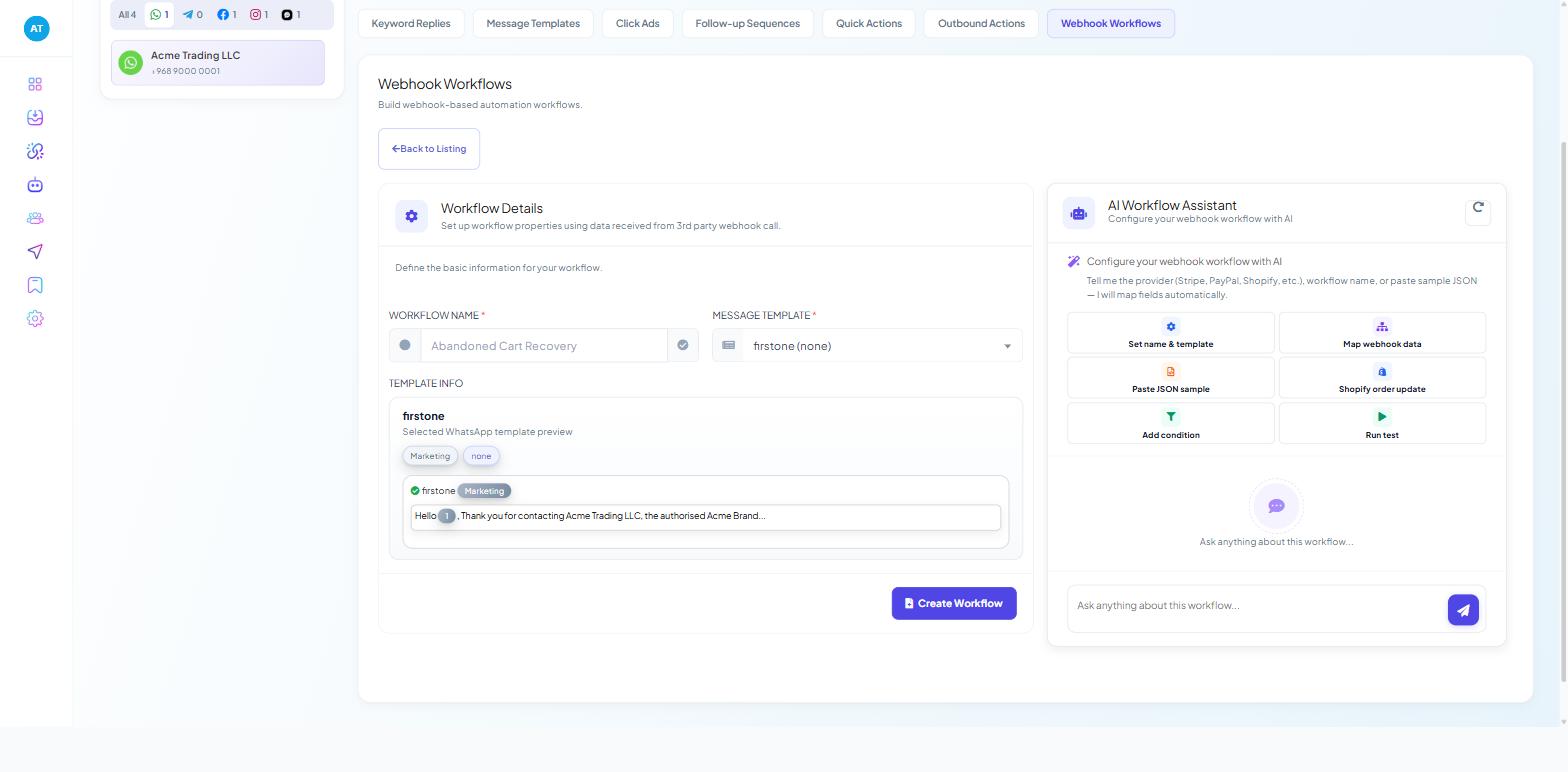
The AI Workflow Assistant
The panel on the right is AI Workflow Assistant — "Configure your webhook workflow with AI." Underneath its opening prompt is a free-text box labelled "Ask anything about this workflow…", a reset icon, and six quick actions:
Quick action | What to use it for |
|---|---|
Set name & template | Naming the workflow and choosing a template from a description |
Map webhook data | Working out which incoming field belongs in which template variable |
Paste JSON sample | Handing it a real payload so it can do the mapping for you |
Shopify order update | The Shopify order path as a starting point |
Add condition | Building the rule that decides whether to send |
Run test | Checking the workflow end to end before it faces a customer |
Paste JSON sample is the one that saves the most time: hand it a sample and let it propose the mapping. Then check its work with Run test. An assistant reading an order payload can pick the billing phone when you wanted the shipping phone, and both look plausible.
Stage two: Configure Webhook Data
With the workflow created, the rest of the form appears. The first new card is Configure Webhook Data — "Provide sample JSON, capture a real-time response, or use AI to map fields."
At the top sits the Webhook Callback URL, a read-only box holding this workflow's own web address, with the helper "Copy and paste into your external app to send data to this workflow." That address belongs to this workflow alone — one workflow, one address, one event. Beside it is a Google Sheet Instruction button, covered below.
Under that are two tabs:
Real-time Response captures what your live system actually sends. It shows a green Capture Webhook Response button and the helper "Send a test event from your app, then click Capture to load the real-time response." Paste the callback URL into your store, fire one real event, come back and press Capture.
Custom JSON Body builds without any of that. It gives you a text box, a Use JSON button and a Run Test button, with the helper "Click Run Test to load mapping fields without an external trigger."
Paste a sample payload, press Run Test, and the mapping fields below fill from it. No store, no plugin, no waiting. Every recipe in this module can be built this way and connected afterwards.
A Run Test counts as 1 in TARGETED.
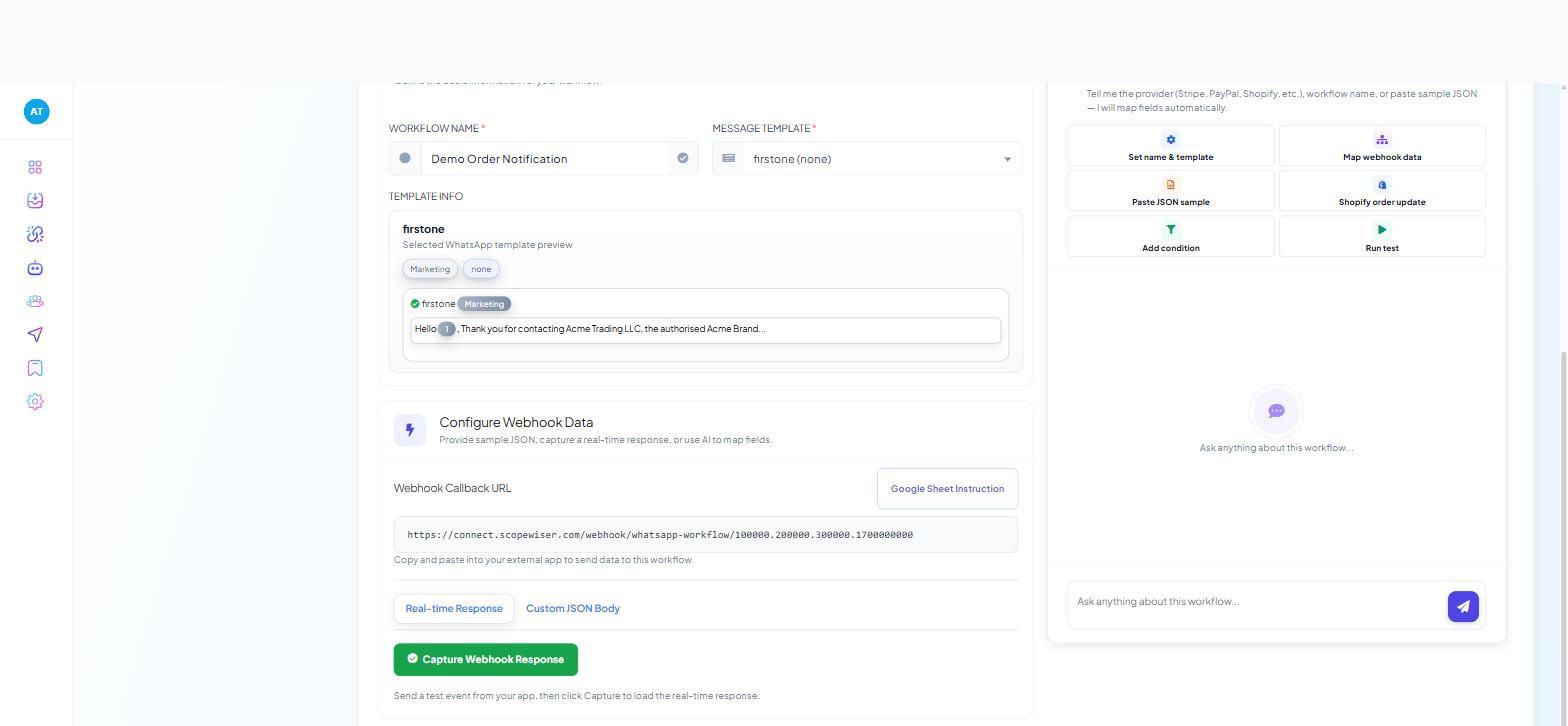
Where the callback URL goes
The callback URL is the address the external system sends to. Where you paste it depends on the platform:
WooCommerce — WooCommerce → Settings → Advanced → Webhooks in WordPress. Add a webhook with the topic you want and the callback URL as the delivery URL.
Shopify — Settings → Notifications → Webhooks in the Shopify admin, with the format set to JSON.
Anything else — any system that can send data to a web address, including form builders, payment providers and spreadsheet automations.
Once the workflow is saved you do not have to reopen it to get the address back: Copy Webhook URL sits in the three-dot (⋮) menu at the end of the row in the listing.
Triggering from a Google Sheet
To send from a Google Sheet, click Google Sheet Instruction and follow the four steps shown (the script step needs a developer).
For developers
Google Sheet Instruction opens a slide-over headed Google Sheet Trigger Instruction, containing the setup steps and a complete Apps Script with this workflow's own address already substituted, plus a Copy button. The steps as written are:
Go to the Apps Script Editor — open your Google Sheet, then Extensions → Apps Script.
Add the Code — paste the
onChangefunction into the script editor.Set Up a Trigger — in the Apps Script editor, click the Triggers (clock) icon, click Add Trigger, and set it up for the
onChangefunction with the event type On change.Test the Function — insert or delete rows to trigger the function.
Stage three: Webhook Response Mapping
Once a payload has been captured or tested, Webhook Response Mapping shows one row per field the template needs:
PHONE NUMBER *
VARIABLE :
<TEMPLATE VARIABLE NAME>* — one row for each variable in the template you chose in stage one.
Each row has a data-field dropdown and a Select Formatter dropdown.
The data-field dropdown lists every field in the sample data next to its value, so you are picking from real data rather than guessing. Each row is one field from the order. billing>phone means the phone inside the billing section; line_items at the bottom is the whole product list. << Static Value >> sits at the top of the list — use it when a template variable should always say the same thing, such as your shop name.
Mapping is auto-populated wherever Scope Wiser can work out the match. On a normal order payload the phone and name rows arrive already filled in correctly. Check them rather than retyping them.
Data Formatters
Raw values are rarely message-ready. The Data Formatters panel — "Format or manipulate webhook data" — is where you fix that. It carries a + New button, a search box, and a table of FORMATTER DEFINITION · ACTIONS. Once a formatter exists, attach it to a mapping row using that row's Select Formatter dropdown.
Creating one opens the Data Formatter drawer, which asks for:
Name * — how it appears in the Select Formatter list.
Global Formatter * — Yes or No, defaulting to No. Yes makes it reusable in every workflow, which is worth doing for the two you need on every store.
Action * — what it does, plus that action's own parameters.
Four actions do the work in this module.
Trim Left, with + as the Trim parameter, strips the leading plus from a phone number. Stores routinely save numbers as +96890000001; WhatsApp will not accept the plus. If you build one global formatter today, build this one.
Concat List Items joins a list into a single string. Point a mapping row at the bare list — line_items rather than an indexed item — attach this formatter with a Glue such as a comma, and a basket becomes readable text inside your template instead of a variable that renders as nothing.
Format Number makes a total look like money. Its parameters are Decimal *, Decimal Separator and Thousand Separator.
Default Value rescues a template from an empty variable by supplying wording when the payload has nothing for that row.
The drawer also carries a tip worth remembering when a formatter needs a space as its parameter: "How to use Whitespace? You can use whitespace as parameter value. Just type [space] as parameter value."
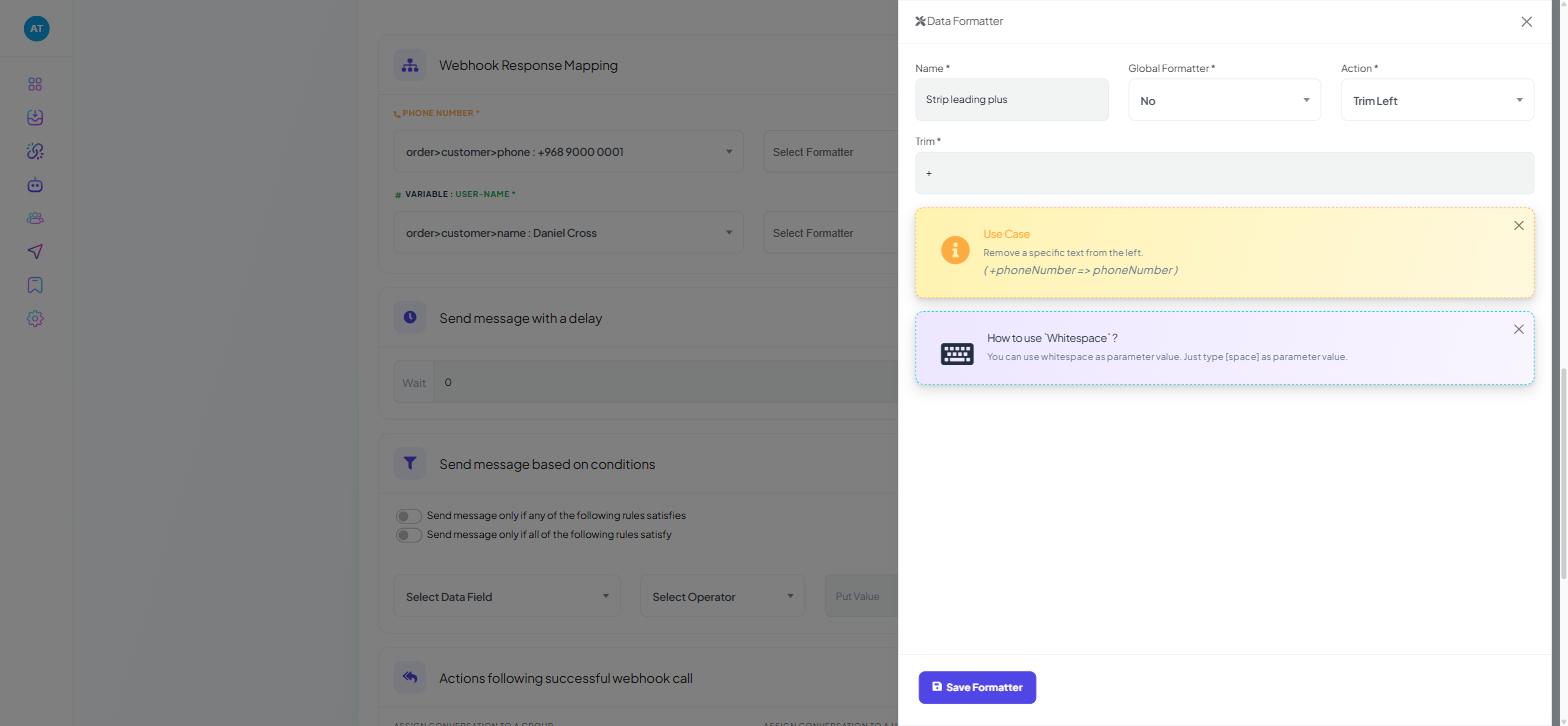
Reference: all Data Formatters
Sixteen actions are available in the Action * dropdown.
Action | Parameters |
|---|---|
Concat Left |
|
Concat List Items |
|
Concat Right |
|
Day Add |
|
Day Subtract |
|
Default Value |
|
Format Number |
|
Number Add |
|
Number Multiply |
|
Number Subtract |
|
Replace |
|
Shorten |
|
Split |
|
Static Value |
|
Trim Left |
|
Trim Right |
|
Callback APIs
The Callback APIs panel — "Trigger a third-party API based on webhook data after a WhatsApp message button is clicked" — is how a workflow writes something back into your store. It has + New, a search box, and a table of NAME · ACTIONS.
The Callback API drawer asks for Name * and API Action *. Four actions exist:
API Action | What it does in the store |
|---|---|
Shopify Order Cancel | Cancels the order in Shopify |
Shopify Order Tag Update | Writes a tag onto the Shopify order |
Woocommerce Order Cancel | Cancels the order in WooCommerce |
Woocommerce Order Note Update | Adds a note to the WooCommerce order |
Choosing an action reveals Select Store API *, with an Add New API link beside it for connecting a store you have not connected yet, plus whatever parameters that action needs. Woocommerce Order Note Update, for example, adds a Note * field and a "Read me" panel explaining that it adds a note to an order and updates the order.
This is the mechanism behind cash-on-delivery confirmation. The customer taps a button on the template, and the outcome is written straight into the order — cancelled, tagged, noted — without anyone in your team touching it. Verifying Cash-on-Delivery Orders Over WhatsApp builds exactly that.
Delay, conditions and post-send actions
Three short cards finish the workflow.
Send message with a delay is a single row: Wait 0 minutes after a webhook triggers. Minutes only, so anything measured in hours you write in minutes. Zero is right for an order confirmation; one or two minutes suits a COD verification, because the store needs a moment to finish writing the order.
Send message based on conditions is where "only" gets expressed. + Add Rule adds a row of Select Data Field · Select Operator · Put Value, with a red icon to remove it, and two toggles decide how the rules combine:
Send message only if any of the following rules satisfies
Send message only if all of the following rules satisfy
The operators are Equal (=), Not equal (≠), Less than (<), Less than or Equal (≤), Greater than (>), Greater than or Equal (≥), Contains, Start with and End with.
A message that a rule filters out is not an error. It is counted separately, under SKIPPED.
Actions following successful webhook call is the last card:
Field | Control |
|---|---|
ASSIGN CONVERSATION TO A GROUP |
|
ASSIGN CONVERSATION TO A USER |
|
ASSIGN LABEL | free text |
REMOVE LABEL | free text |
ASSIGN SEQUENCE | free text |
REMOVE SEQUENCE | free text |
SUBSCRIBER NAME | data-field dropdown |
ASSIGN SEQUENCE is the join between webhooks and follow-ups. It is how an external event enrols someone into a Follow-up Sequence — an unanswered COD verification chased two hours later, an abandoned cart followed up the next day. Setting SUBSCRIBER NAME from the payload is worth doing too, because it turns a row of phone numbers in the inbox into a list of people.
Then press Save Workflow. It confirms: "Workflow data has been mapped and saved successfully. You will be able to see it working from next webhook call."
There is no bot-flow field
A saved workflow has exactly these sections: Workflow Details, Configure Webhook Data, Webhook Response Mapping, Send message with a delay, Send message based on conditions and Actions following successful webhook call, alongside the AI Workflow Assistant, Data Formatters, Callback APIs and Raw Data panels. Nothing on that screen attaches a bot flow to the workflow. A workflow's job ends when the template goes out.
What the buttons on that template do afterwards is set up in two other places: the system flows under Automation → Quick Actions, for the conversation the customer sees, and Callback APIs, for anything that has to change in the store.
The Raw Data panel
Raw Data — "The original webhook data received in raw format" — shows the captured payload laid out line by line. Reopen the workflow and read this panel when a mapping stops matching and you need to see what actually arrived.
Reading the list, and its three failure modes
Back on Webhook Workflows, the list filters by Any Status (Active / Inactive), by Any Verification (Verified / Non-verified) and by search. Its columns are # · WORKFLOW · STATUS · VERIFIED · ACTIONS · TARGETED · PROCESSED · DELIVERED · OPENED · FAILED · SKIPPED · UNREACHED.
STATUS is a live toggle in the row, so a workflow can be paused without being deleted. VERIFIED turns to a green ✓ Yes once a sample payload has been captured — that is all "verified" means here.
Each metric shows as a labelled percentage over a count, and the labels do not match the column headings. Three of these columns are three different kinds of failure:
Column | Label on the metric | What it actually means |
|---|---|---|
FAILED |
| Something broke while sending. A bad phone number, a rejected or paused template, a platform error. |
SKIPPED |
| Your rules filtered the message out. Nothing is broken; the workflow decided not to send. |
UNREACHED |
| The message did not reach the recipient. |
A rising SKIPPED count usually means a rule points at the wrong data field or expects a value the payload spells differently. A rising FAILED count sends you to phone-number formatting and template approval. Check SKIPPED (a rule blocked it) against FAILED (sending broke) before fixing anything.
Row actions
The three-dot (⋮) menu at the end of each row carries six:
Action | What it does |
|---|---|
Copy Webhook URL | The quickest way back to the callback URL once the workflow is saved |
Report | Opens the workflow's report |
Resend All Failed Webhook | A bulk retry of everything that failed |
Download Report | Exports the report |
Edit Connection | Reopens the workflow for editing |
Delete | Removes it |
Resend All Failed Webhook re-sends a batch that failed for a reason you have since fixed — an expired store credential, a template that was paused and is now approved again — without asking the store to send everything a second time.
The Workflow Report
Workflow Report, top right of the listing, shows the same workflow table with an extra LAST CALLED AT column, and beneath it a per-recipient delivery log:
# · PHONE NUMBER · STATUS · SCHEDULED AT · DELIVERED AT · OPENED AT · FAILED AT · RESPONSE
That is one row per phone number, with the platform's own reply in the RESPONSE column. When a customer says they never got the message, this is the screen that settles it, and RESPONSE is usually where the reason is written.
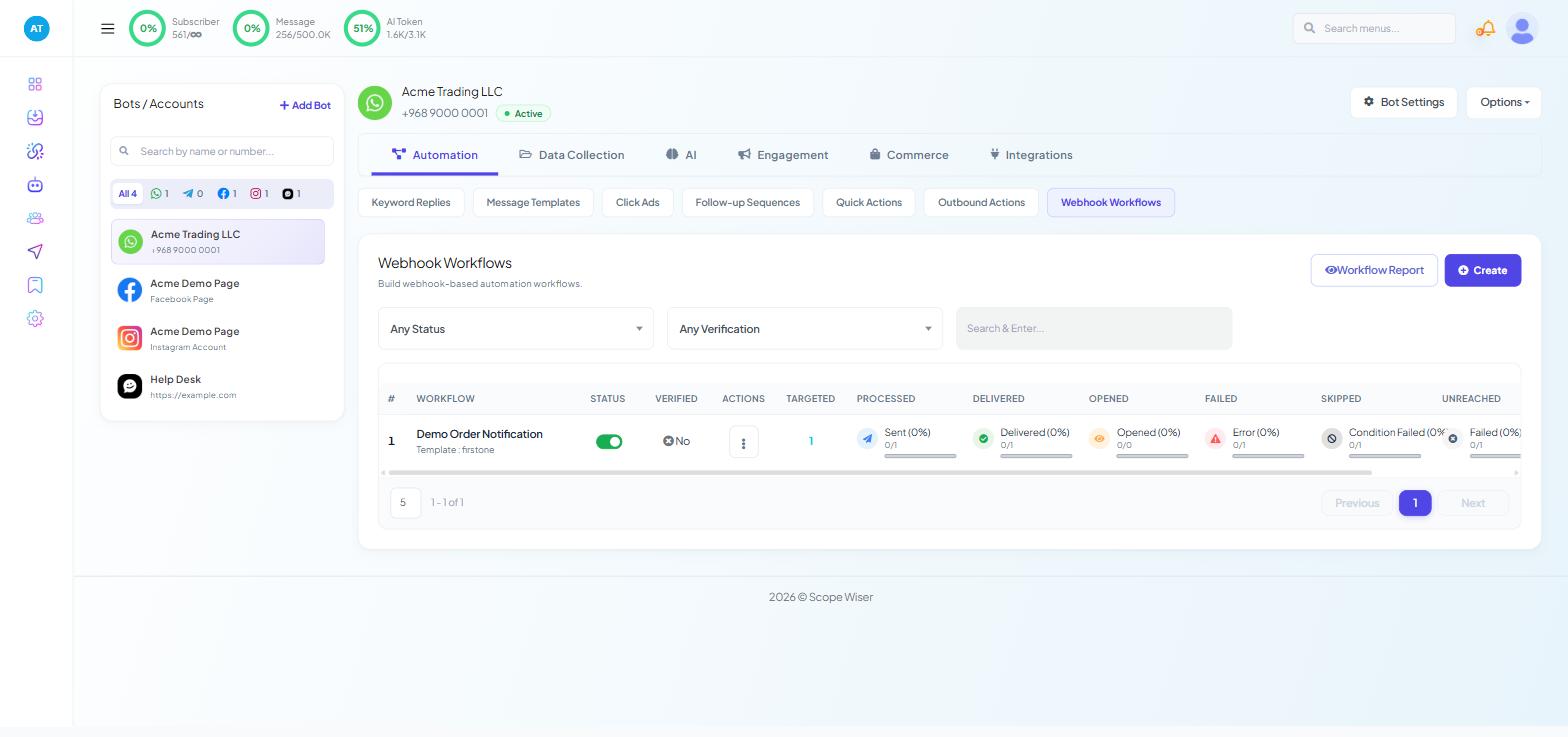
When nothing arrives
Work down the chain rather than guessing:
The external system never called. Check its own webhook log first, and check LAST CALLED AT on the Workflow Report. WooCommerce and Shopify both keep delivery records, and a 404 or a timeout there ends the investigation.
The call arrived but the message was skipped. A rule excluded it — look at SKIPPED, not FAILED. Open the Raw Data panel and compare the value that actually arrived against the value your rule expects.
The call arrived and the send errored. That is FAILED. Almost always the phone number: a
+prefix that no Trim Left formatter is stripping, a missing country code, or a number with no WhatsApp account. Check theRESPONSEcolumn on the report.The message went out but did not reach anyone. That is UNREACHED.
The template was rejected. An unapproved or paused template cannot send. Check its status under Message Templates.
A variable renders as nothing. A mapping row points at a field that is absent from this particular payload. A Default Value formatter covers the gap.
It worked and then stopped. Credentials were regenerated on the store side, or the template was edited and lost its approval. Once fixed, use Resend All Failed Webhook.
What to do next
Pick the recipe you need. Order Notifications: WooCommerce & Shopify is the gentlest one to build first, because a wrong message is merely a duplicate rather than a customer-facing mistake. Verifying Cash-on-Delivery Orders Over WhatsApp and Abandoned Cart Recovery build on the same foundation.