
Triggering a Flows Form From Your Website
Send a WhatsApp Flow automatically when someone submits a form on your site, using Webhook Workflows in Scope Wiser: where the callback URL lives, how to map a captured payload, the phone number format that breaks it, and how to test.
This is the most technical article in the module, and it needs a form tool that can call a webhook. When someone submits a form on your site, a WhatsApp template goes out to them with a button that opens your WhatsApp Flow.
What you are actually building
Website form submitted
   → webhook fires to Scope Wiser
      → Webhook Workflow matches it to an approved template
         → template sends to the submitter's WhatsApp number
            → they tap the button
               → your bot flow runs
                  → the WhatsApp Flow opens
The step people leave out is the template. Someone who has just filled in a web form has not messaged you, so the conversation has to start with an approved template — see WhatsApp Rules You Must Know: 24-Hour Window & Template Messaging. Its button is what hands control to your flow.
Before you start
A WhatsApp number connected to Scope Wiser and a working bot on it.
A published WhatsApp Flow. Build it first — see Creating a WhatsApp Flows Form.
A form on your site that collects a WhatsApp phone number. Without a number there is nobody to message.
A form tool that can call a webhook. Your form tool needs a "webhook" or "send to URL" option — WPForms, Elementor Pro, Zapier and Pabbly all have one.
Step 1: Publish the WhatsApp Flow
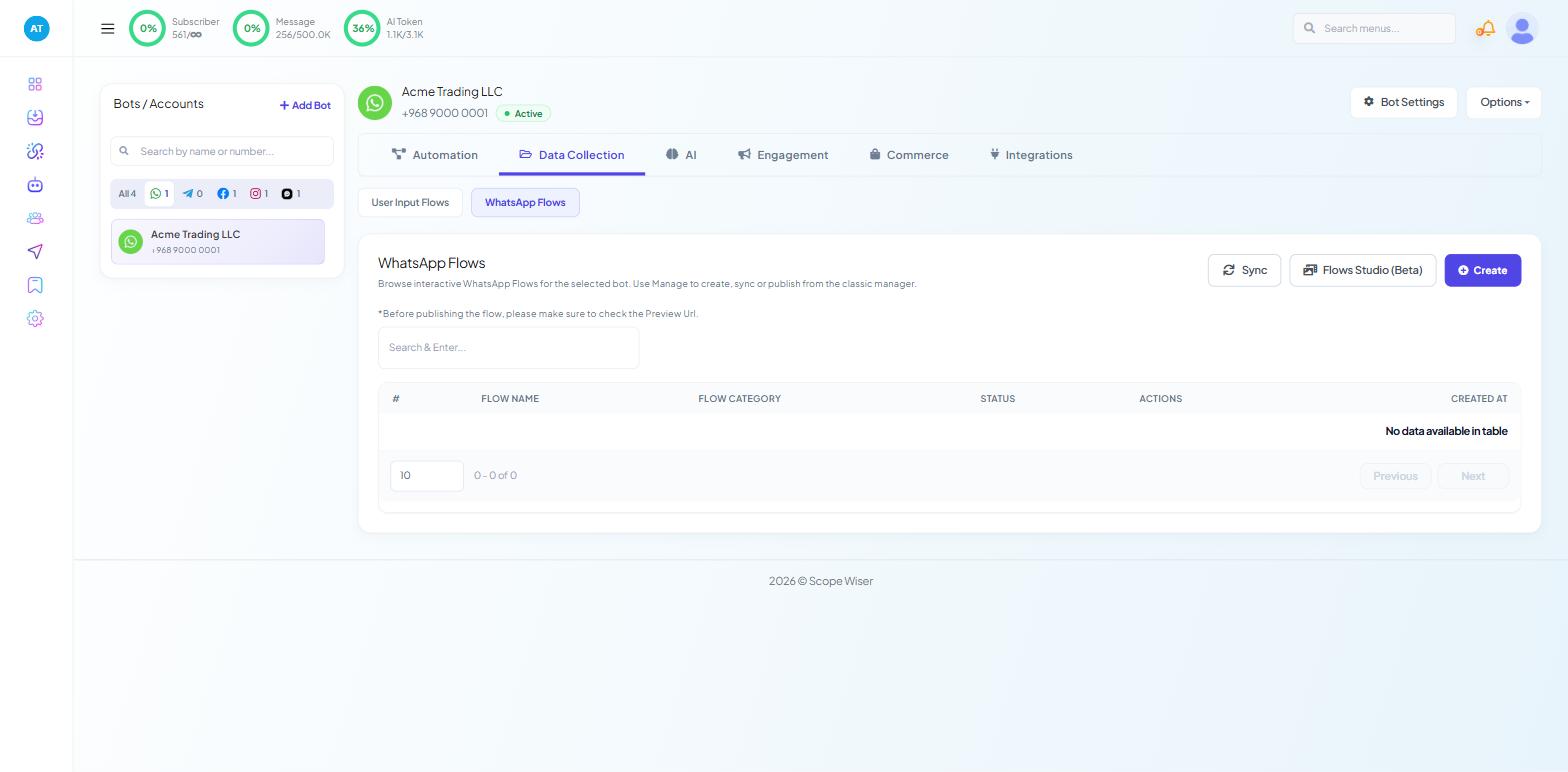
Under Chatbot Manager → Data Collection → WhatsApp Flows, confirm your flow is in the list and its STATUS shows it as published. A draft flow will not open, and that is the single most common cause of "the message arrived but nothing happens when I tap the button".
Note the field names you used — matching them up later is much harder than writing them down now.
Step 2: Create the message template
Go to Automation → Message Templates and click Create.
Keep the body short and specific. Someone receives it seconds after filling in a form, so name your business and what they just did: "Thanks for your enquiry about wholesale pricing — tap below and we will get you a quote today."
Add a button to the template and set it to start the bot flow you build in Step 3. A plain text template gives the recipient nothing to tap.
Submit it for approval. Templates carry a STATUS column and only approved ones can be sent. The rest of the build can be assembled while approval is pending.
Step 3: Build the bot flow that opens the form
In the Flow Builder for your WhatsApp bot, create the flow that runs when the button is tapped.
Drag the Whatsapp Flows block from the DATA COLLECTION group of the palette onto the canvas and connect it. Note the spelling in the palette — Whatsapp Flows, one capital.
For a pause before the form appears, use Delivery Options on the preceding message block: Delay in reply, with sliders for Hours 0–23, Minutes 0–59 and Sec 0–59. The maximum is 23 hours 59 minutes 59 seconds, not 24 hours.
Save the flow.
Step 4: Create the Webhook Workflow
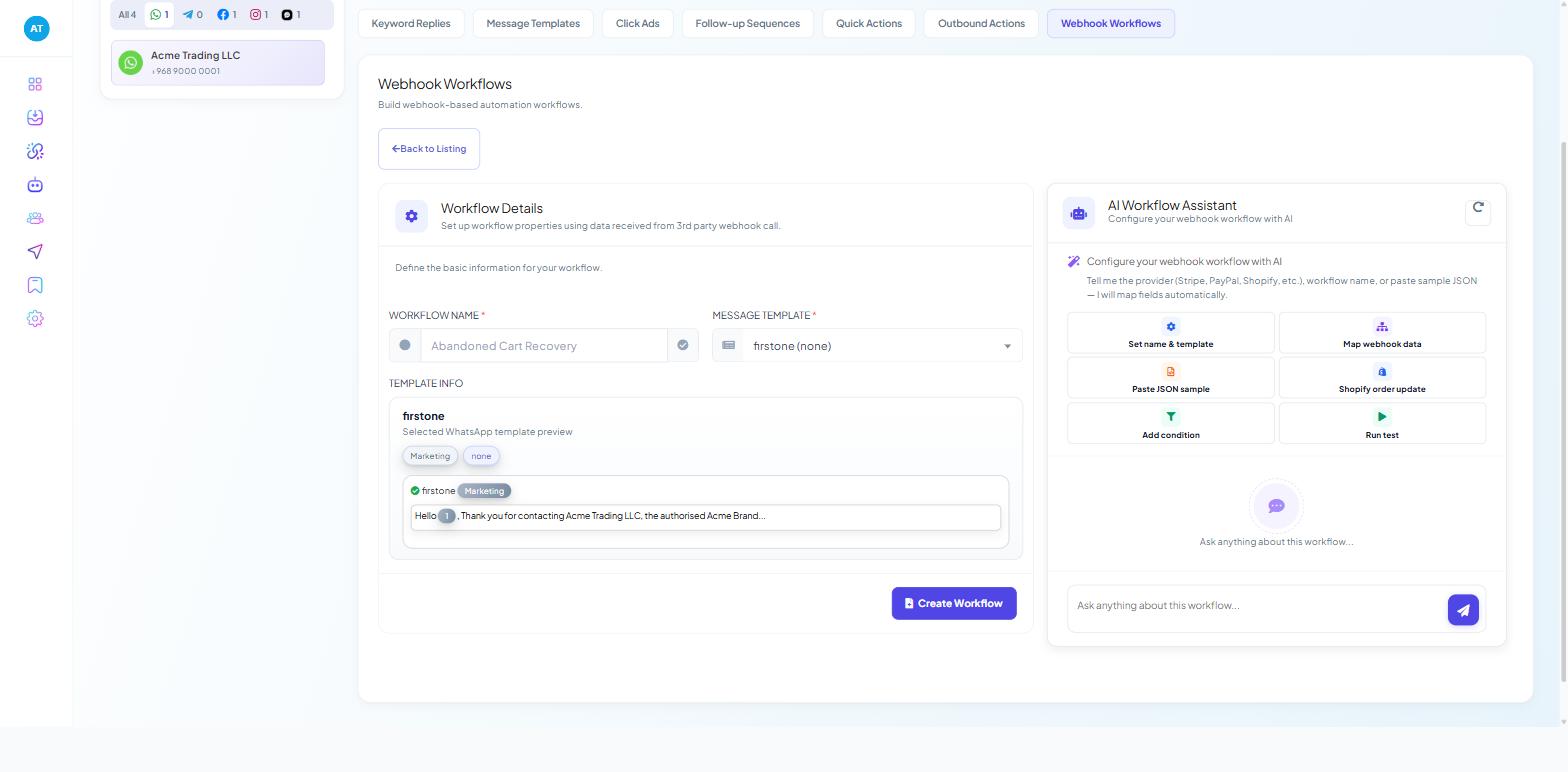
Go to Automation → Webhook Workflows — "Build webhook-based automation workflows." — and click Create. If Webhook Workflows is not under Automation for you, that is a role gate rather than a missing feature: WHATSAPP - WEBHOOK WORKFLOW is its own toggle under Control Panel → User Permission.
The Workflow Details card is headed "Set up workflow properties using data received from 3rd party webhook call."
WORKFLOW NAME * — placeholder "Abandoned Cart Recovery". Name it for the form it serves: "Website contact form", "Pricing page enquiry".
MESSAGE TEMPLATE * — the template from Step 2. A TEMPLATE INFO block below renders a read-only preview, tagged with its category, so you can confirm you picked the right one.
If your form tool gives you a sample, paste it into AI Workflow Assistant → Paste JSON sample to fill the mapping automatically.
Press Create Workflow. Nothing below those two fields exists until you do, which is why hunting for the webhook URL on an unsaved form gets you nowhere.
Where the URL lives
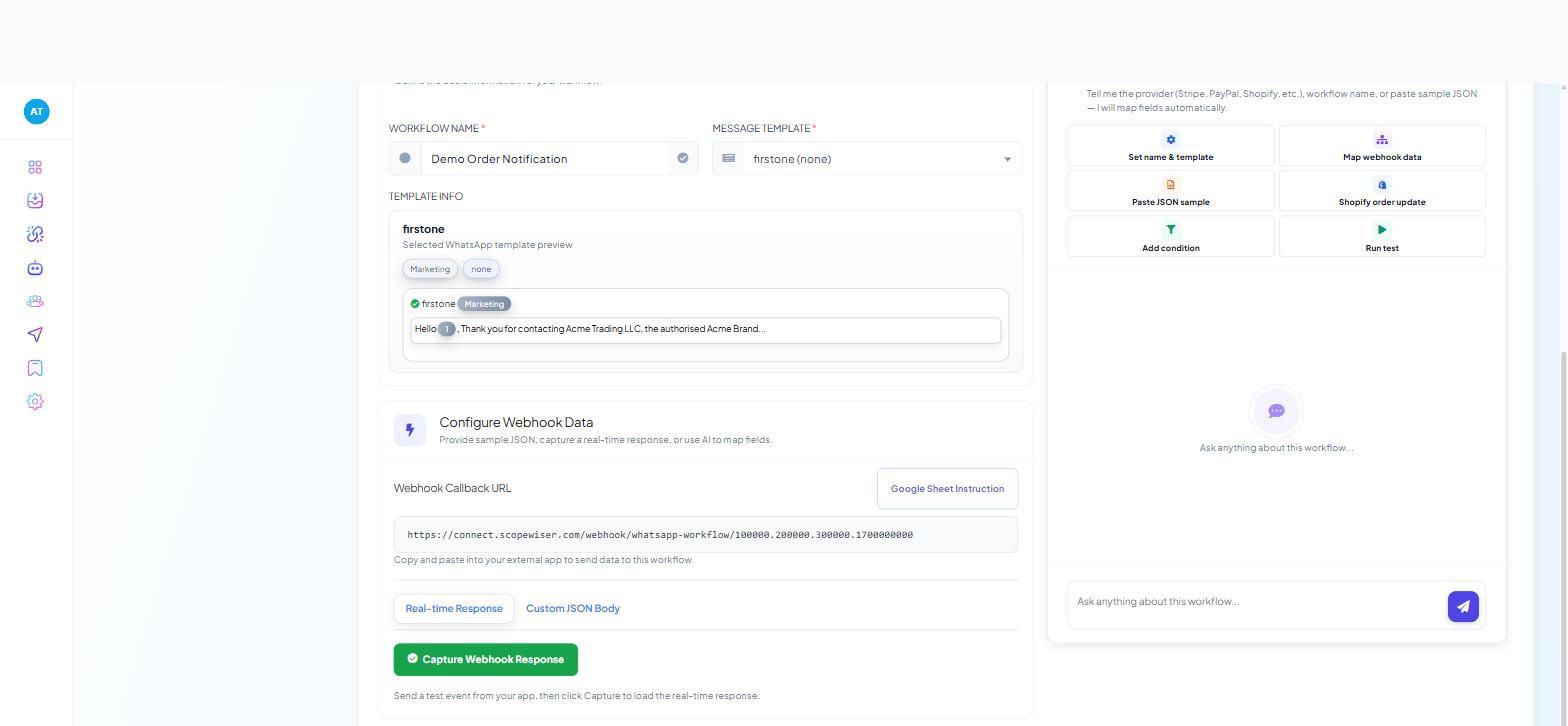
The saved workflow opens a Configure Webhook Data section — "Provide sample JSON, capture a real-time response, or use AI to map fields." — beginning with a read-only Webhook Callback URL box holding this workflow's own address, under the note "Copy and paste into your external app to send data to this workflow." That is the URL your form posts to.
To fetch it again later, use Copy Webhook URL in the kebab menu on the workflow's row in the list, alongside Report, Resend All Failed Webhook, Download Report, Edit Connection and Delete.
There is no flow to attach
The workflow only sends the template; what the button opens is set on the template button (Step 2).
The last section of the workflow is worth a look while you are here. Actions following successful webhook call can assign the conversation to a team role or member, add or remove a label, set the subscriber's name from a mapped field, and enrol the person in a follow-up sequence with ASSIGN SEQUENCE.
Step 5: Add the webhook to your site form
In your form tool, add a webhook or HTTP POST action that fires after submission, and paste the URL from Step 4 into it.
Two rules decide whether this works:
Field names must line up. Whatever your form calls the fields — name, phone, email — those names are what Scope Wiser receives, so renaming one on your website later breaks the mapping silently. Keep them boring and stable.
The phone number must be in full international format, including the country code, with no spaces or brackets — +96890000001 rather than 9000 0001. That single detail is the commonest cause of a workflow that captures data perfectly and sends nothing. Where a form lets people type freehand, add a country selector or validation.
Step 6: Capture a sample and map the fields
Submit your website form once as a test, then click Capture Webhook Response. In Webhook Response Mapping, pick which form field goes into PHONE NUMBER and each template variable.
Read the mapping even though it fills itself in — a wrong mapping is the failure that delivers flawlessly and says the wrong thing.
Once a payload has been captured the row's VERIFIED column shows a green Yes — that is what the list's Any Verification filter is reading. Nothing captured means nothing to map.
For developers
The Custom JSON Body tab takes a payload you paste, and Run Test loads the mapping fields from it with no external trigger, so a sample body from your form tool's documentation is enough to finish the workflow while the form itself is still being built.
Each mapping row also carries a Select Formatter dropdown. Trim Left with + as its parameter strips a leading plus from a phone number, and Concat List Items joins an array into the single string a variable can hold.
The Raw Data panel on the workflow — "The original webhook data received in raw format" — keeps the captured payload pretty-printed, and Edit Connection in the row's kebab menu reopens the workflow when a mapping needs changing.
Testing it end to end
Test as a stranger would, on a phone that is not your bot's number:
Submit the form with a real number you control.
The template message should arrive within seconds.
Tap the button. The WhatsApp Flow should open.
Complete and submit it.
Check the answers landed. Answers appear under Subscriber Manager → Custom Fields only for fields you mapped; in Google Sheets only if you set the sheet on the form.
If a step fails, stop there rather than changing three things at once. Flows Form Troubleshooting works through the causes in this same order, and covers the Workflow Report that shows what happened to each send.
What to do next
Once one form works, the second takes ten minutes. Collecting Data With Multi-Step Flows Forms covers the other delivery routes — keyword, broadcast, quick action — and most businesses end up running two or three side by side.