
Running a WhatsApp Broadcast Campaign
Create a WhatsApp broadcast in Scope Wiser end to end: Broadcast Center, the campaign drawer in the Flow Builder, audience filters, scheduling, and sending at scale without damaging your number.
A broadcast sends one message to many subscribers, each receiving it as a private one-to-one chat. Nobody sees who else got it, and replies come back to you individually.
One thing surprises most people on their first campaign: creating a broadcast opens the Flow Builder. Scope Wiser treats a campaign as a flow with an Actions node in front of it, which lets a broadcast be several messages with media, delays and branching rather than one block of text.
Before you start
Read WhatsApp Rules You Must Know first. The 24-hour window and template rules decide whether this campaign is delivered at all.
Have an approved template ready if you are messaging anyone outside their window — which, for most campaigns, is everyone.
Know which labels or subscriber lists identify your audience. A campaign to "everyone who bought last month" needs that label to exist before you start. See Labels, Lists & Segments.
Step 1: Open Broadcast Center
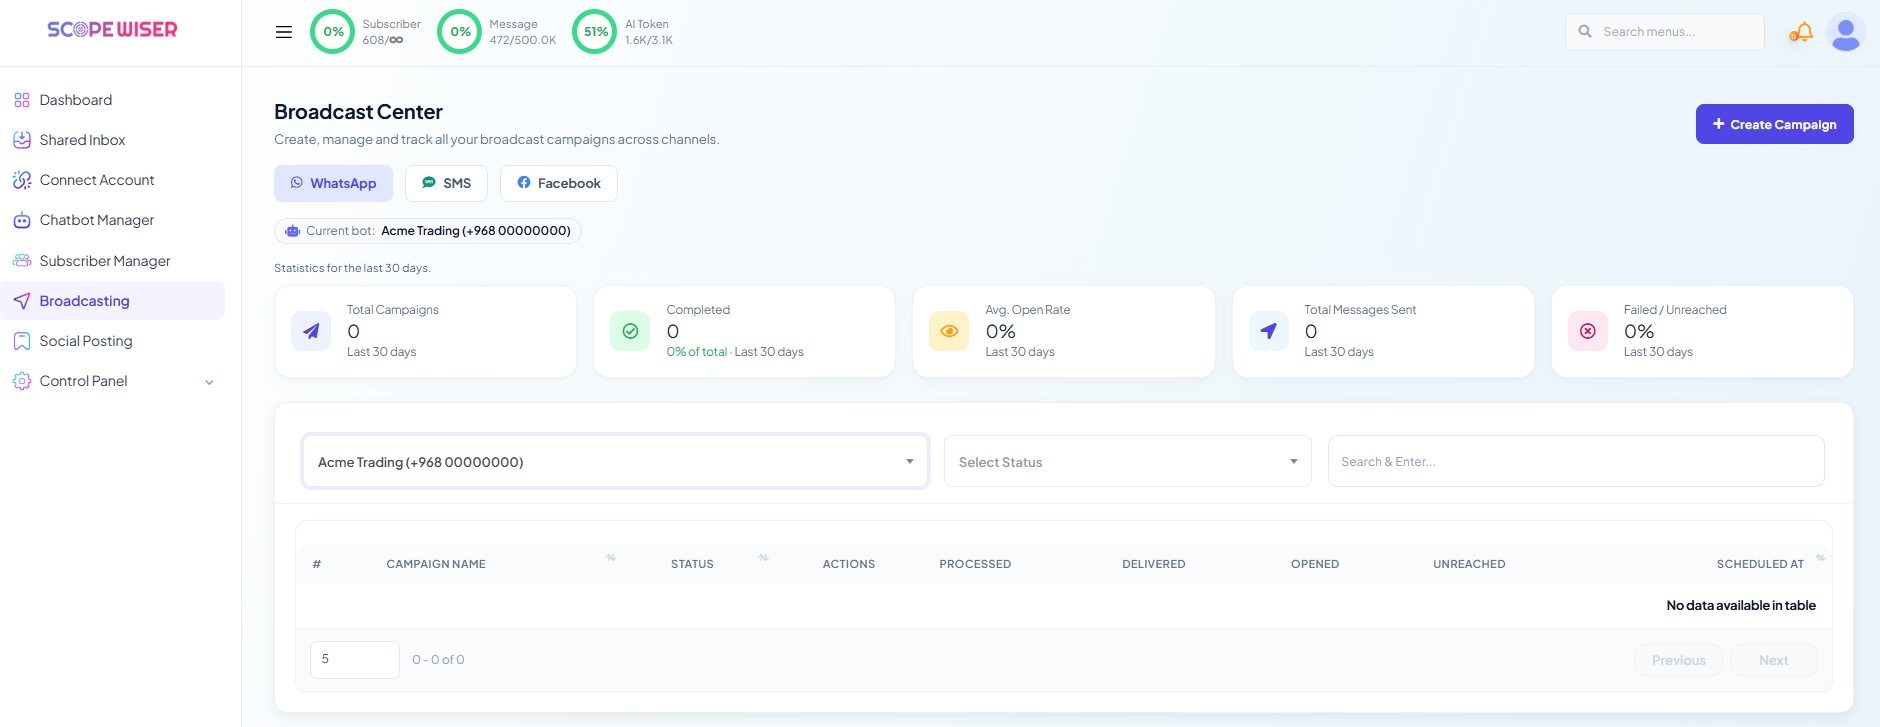
From the sidebar, open Broadcasting. The page is headed Broadcast Center — "Create, manage and track all your broadcast campaigns across channels."
Channel tabs run across the top — WhatsApp, SMS and Facebook. Stay on WhatsApp. Beneath them, a Current bot: chip names the account you are working in, with a dropdown to change it. Statistics, the campaign list and the campaign you are about to create all belong to that one bot, so check it before anything else.
Above the table are five summary cards, explained in WhatsApp Broadcast Analytics & Reporting.
Step 2: Create the campaign
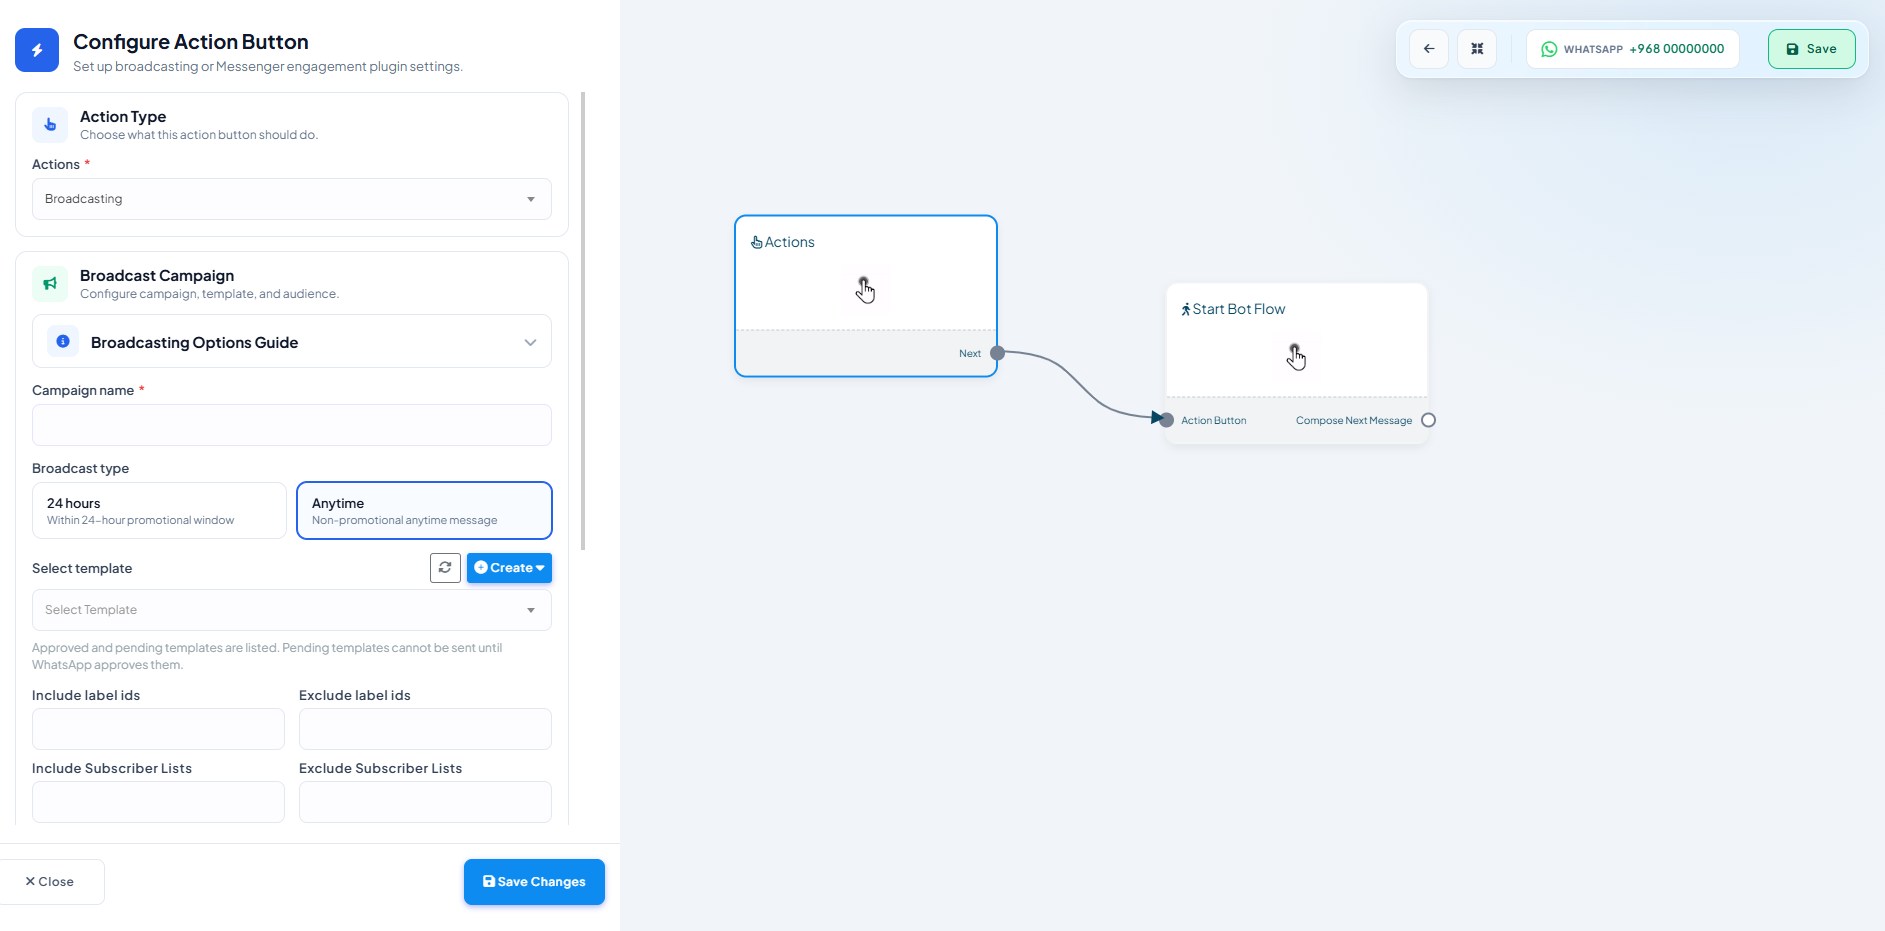
Click + Create Campaign. A new browser tab opens on the Flow Builder. The canvas holds two nodes — an Actions node connected to a Start Bot Flow node — and a drawer is already open on the left, headed Configure Action Button.
Leave Actions set to Broadcasting and scroll to the Broadcast Campaign section. It opens with a collapsible Broadcasting Options Guide.
Step 3: Name it and choose the broadcast type
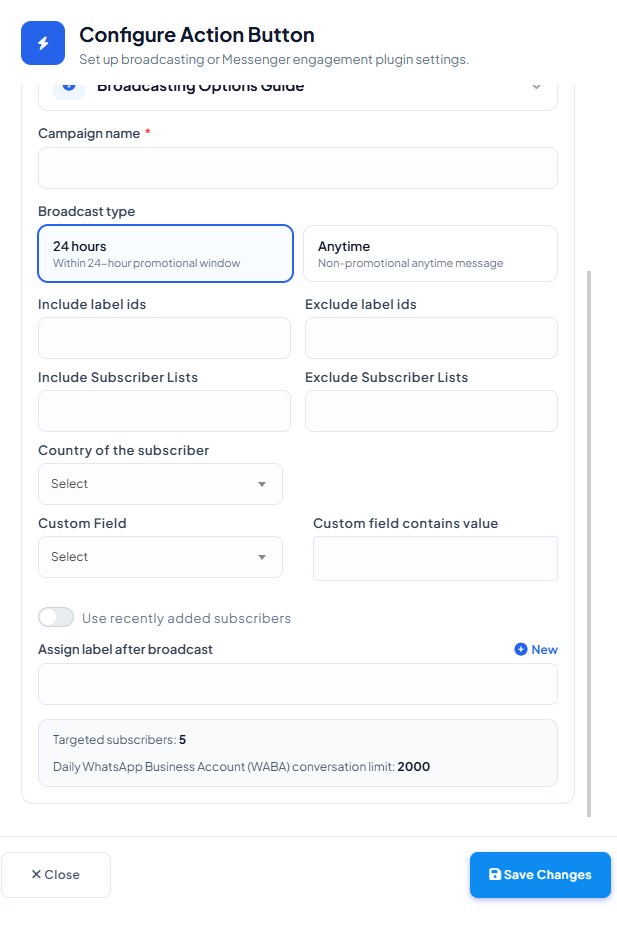
Campaign name * — how the campaign appears in the Broadcast Center table afterwards. Name it for a future reader: October price list — recent buyers, not test 3.
Broadcast type is a pair of cards:
Card | Sub-label | When to use it |
|---|---|---|
| "Within 24-hour promotional window" | Subscribers who messaged you in the last day. Free-form messages, no template needed. |
| "Non-promotional anytime message" | Everyone else. Requires an approved template. |
Most campaigns are Anytime, because most of your audience last messaged you more than a day ago. Pick 24 hours only for something tied to an active conversation. Switching between the two updates the Targeted subscribers figure at the bottom of the drawer, which is the quickest way to see how many people are currently inside their window.
Step 4: Select the template
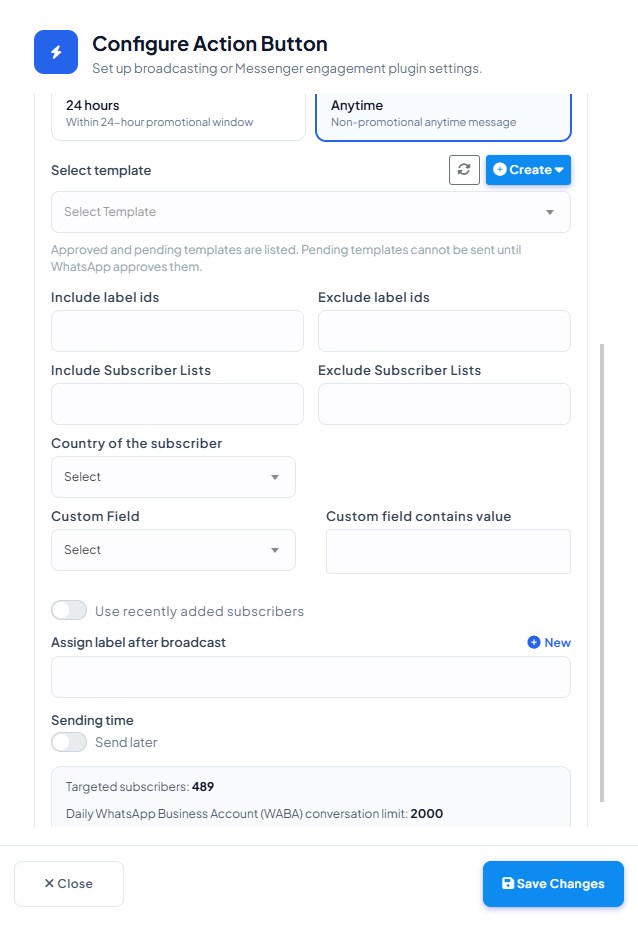
Select template is a dropdown with a refresh icon and a Create dropdown beside it, so you can build a template without leaving the campaign. Its helper text reads:
Approved and pending templates are listed. Pending templates cannot be sent until WhatsApp approves them.
Choosing a pending template fails at send time rather than here. Confirm the status shows Approved on the Message Templates page first.
Step 5: Choose the audience
Six controls narrow who receives the campaign, and they combine — each one makes the audience smaller.
Include label ids / Exclude label ids — the main segmentation tool. A promotion to buyers might include
recent_buyerand excludeunsubscribed_promo.Include Subscriber Lists / Exclude Subscriber Lists — the same logic applied to lists, which tend to be durable groupings where labels are behavioural.
Country of the subscriber — useful when an offer is valid in one market only, or when messaging costs make a staged send sensible.
Custom Field plus Custom field contains value — pick the field, then type the value it must contain. This targets imported data rather than labels: a
planfield containingtrial, say.
Two more settings sit below. Use recently added subscribers is a toggle restricting the send to your newest contacts. Assign label after broadcast, with a + New link, applies a label to everyone this campaign reaches — set it, because it is what lets the next campaign exclude the people this one already contacted.
Step 6: Check the two numbers
At the bottom of the drawer a summary box prints:
Targeted subscribers: 447 Daily WhatsApp Business Account (WABA) conversation limit: 2000
Read both, every time. Targeted subscribers tells you whether your filters did what you meant. The conversation limit is Meta's daily ceiling for the account, so a targeted count above it means the surplus is not delivered that day.
Step 7: Schedule, or don't
Sending time has a Send later toggle. Leave it off and the campaign goes out when you save; turn it on and set the date and time. Scheduling is the safer habit for anything non-urgent, because it gives you a window in which to notice a wrong label. Click Save Changes to close the drawer — Close discards it.
Step 8: Build the message flow
Double-click the Start Bot Flow node to name the flow, then use its Compose Next Message outlet to build what subscribers receive. Drag blocks from the palette; a WhatsApp bot offers:
MESSAGES— Text, Image, Audio, Video, File, Location, AI ReplyDATA COLLECTION— User Input Flow, Whatsapp FlowsINTERACTIVE— Interactive, Template Message, CTA URL ButtonFLOW CONTROL— Condition, New Sequence Campaign, Label Assign, Random Number GeneratorINTEGRATIONS(for developers) — HTTP API, Google Sheet Data Fetch
Three patterns are worth knowing. Buttons come from the Interactive block, not a separate quick-reply block. Every message block has a collapsed Delivery Options section holding Delay in reply and Typing on display, so a short pause between a text and an image makes the send feel less like a blast. And Label Assign tags people by how they respond, which is how the next campaign's segment gets built.
Click Save at the top right of the canvas. If you did not schedule, the campaign starts sending on save.
Broadcasting at scale
The daily conversation limit is your real ceiling. Split a very large audience across days, or across countries using the Country of the subscriber filter, rather than sending everything at once and discovering the tail was dropped.
Sends that get blocked lower your quality rating and can shrink your daily limit.
Message credits are consumed per send. The usage meters in the top bar show your position before a big campaign.
Clean the list between campaigns. Subscribers who repeatedly show as
UNREACHEDwill not start receiving messages, and removing them improves both delivery rate and quality rating.
Splitting one audience across several days is easiest with Assign label after broadcast set, so each run excludes the people already reached.
Watching it run
Go back to the Broadcast Center tab and refresh. Your campaign appears with a STATUS and running counts under PROCESSED, DELIVERED, OPENED and UNREACHED. Filter with the Select Status dropdown or search by name. WhatsApp Broadcast Analytics & Reporting covers what those numbers mean.
When it goes wrong
Nothing sends. Check the template status first — pending templates are selectable but not sendable.
Far fewer recipients than expected. An exclusion applied to the wrong label empties an audience quietly. Re-open the drawer and read Targeted subscribers.
The tail of a large send never arrives. Compare the targeted count against the daily conversation limit.
What to do next
Once the campaign completes, read WhatsApp Broadcast Analytics & Reporting to interpret the results before building the second one. To give each recipient different data inside the same message, Personalised Broadcasts From Google Sheets is the next step up.