
Personalised Broadcasts From Google Sheets
Send a WhatsApp broadcast where every recipient gets their own data: custom fields, imported spreadsheet columns, template variables, and the workflow that messages each new sheet row.
A personalised broadcast sends one campaign in which every recipient sees their own data — their balance, their order number, their due date. This article covers creating the fields, importing the spreadsheet and sending the campaign. There is also an automatic link: each new row added to a Google Sheet sends one message. That build is for developers and comes at the end.
Step 1: Create the custom fields
A custom field is a slot on a subscriber that holds one piece of your data. Create the fields before you import anything, because an import can only map a column to a field that already exists.
Open Subscriber Manager.
Click Manage and choose Custom Fields.
Create one field per column you intend to carry —
balance_due,due_date,order_reference— with the appropriate reply type on each.
Naming matters more than it looks. These names appear in template pickers, in the broadcast drawer's Custom Field dropdown and in condition rules, months from now.
Step 2: Get the data in
Prepare your sheet with one row per person, a column of phone numbers in full international format and one column per custom field. If a value formats oddly — a leading zero disappearing, a date turning into a serial number — set the cell format to text first.
In Subscriber Manager, click Export/Import and choose Import from CSV.
In the dialog, choose Import from Google Sheet (or upload a CSV). Import from Google Contacts is the third source.
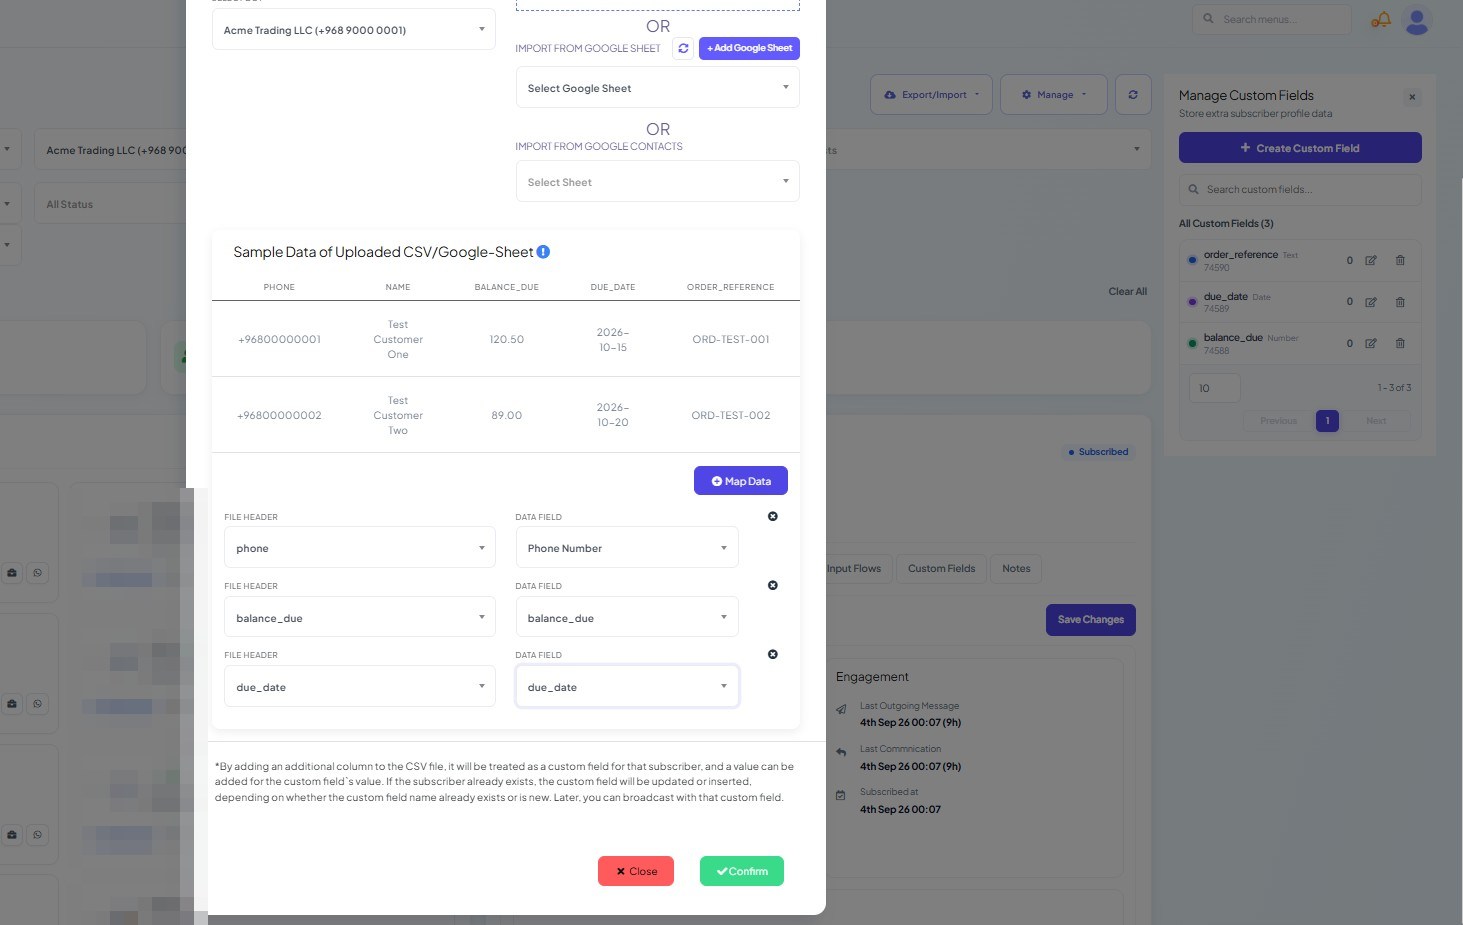
Review the sample records.
Map each column: pick the spreadsheet column under File Header and its destination under Data Field. Phone number and name map to the built-in fields; every other column maps to a custom field you created.
Assign a label during the import — something specific such as
oct_statement_run. That label is how you target the broadcast. Leaving it blank uses the file name instead.
Importing Contacts From Google Sheets & Google Contacts covers the import screens in detail.
Step 3: Build a template with variables
Go to Chatbot Manager → Automation → Message Templates and create a template as usual. In the MESSAGE BODY (1024)* field, type # to open the custom-field and name picker, or #! to open the variables list.
Write the message so it reads correctly for the shortest and longest values you might have. A body that assumes a two-digit number looks broken when a five-digit one arrives.
Save it, then click Sync Templates and read the STATUS column. It normally shows Pending at first — Meta's review takes minutes to a few hours — so re-sync after a wait and carry on once it reads Approved.
Step 4: Send the campaign
Open Broadcasting and confirm the Current bot: chip names the right account.
Click + Create Campaign. The Flow Builder opens in a new tab with the Configure Action Button drawer already showing.
Set Campaign name.
Choose the Anytime broadcast type, since a personalised statement almost always goes to people outside their 24-hour window.
Pick your template under Select template.
Put your import label into Include label ids.
Check the Targeted subscribers figure against the number of rows you imported.
A figure lower than your row count has three usual causes:
Rows whose phone numbers lacked a country code never landed.
People you already had were added but not updated or re-labelled.
The label, country and custom-field filters in this same drawer narrowed the count.
To narrow further you do not need a second spreadsheet. The Custom Field dropdown paired with Custom field contains value filters on the data you just imported — selecting plan and typing trial sends only to trial customers.
Save the drawer, build the message flow behind Start Bot Flow, and save the campaign. Running a WhatsApp Broadcast Campaign covers the rest of the drawer in full.
Getting personalisation right
Test with a deliberately awkward row. A long name, a missing value, an unusual date — send it to yourself before the real run.
Never leave a variable unfilled. A template with a missing variable is rejected rather than delivered with a gap, so exclude incomplete records from the audience.
A row in a spreadsheet is not an opt-in. Keep the sheet as the source of truth for data, not for consent.
Re-import to refresh values. Custom fields hold whatever the last import put there, and a balance from three months ago will send happily.
Message every new sheet row automatically
A workflow can watch a Google Sheet and message each new row as it appears — useful for form submissions, order records and bookings. Two rules apply to the sheet itself, whoever builds the link:
Fill the last column last. A part-filled row does not send while its final column is blank, so let that column be the "this row is ready" signal.
Do not insert columns in the middle afterwards. Values are read by position, so a new column changes what each field receives.
For developers: message every new Google Sheet row
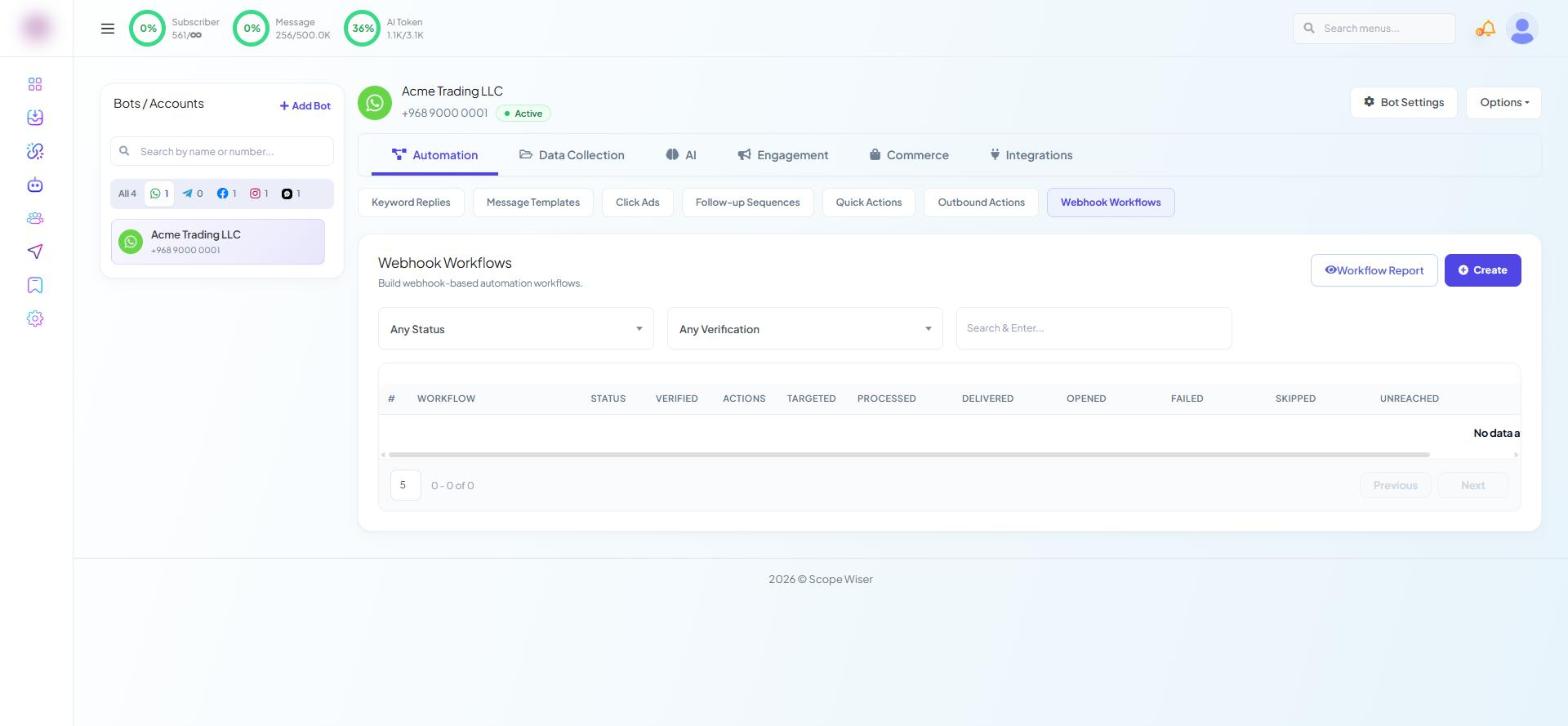
Go to Chatbot Manager → Automation → Webhook Workflows and click Create. If that sub-tab is missing, WHATSAPP - WEBHOOK WORKFLOW is its own toggle under Control Panel → User Permission.
Fill in WORKFLOW NAME * and choose your template under MESSAGE TEMPLATE *. A TEMPLATE INFO panel previews it.
Click Create Workflow; the remaining settings appear only after it is saved. An AI assistant panel can fill the mapping for you (optional).
On the saved workflow, the Configure Webhook Data section shows a read-only Webhook Callback URL for this workflow, and a Google Sheet Instruction button beside it.
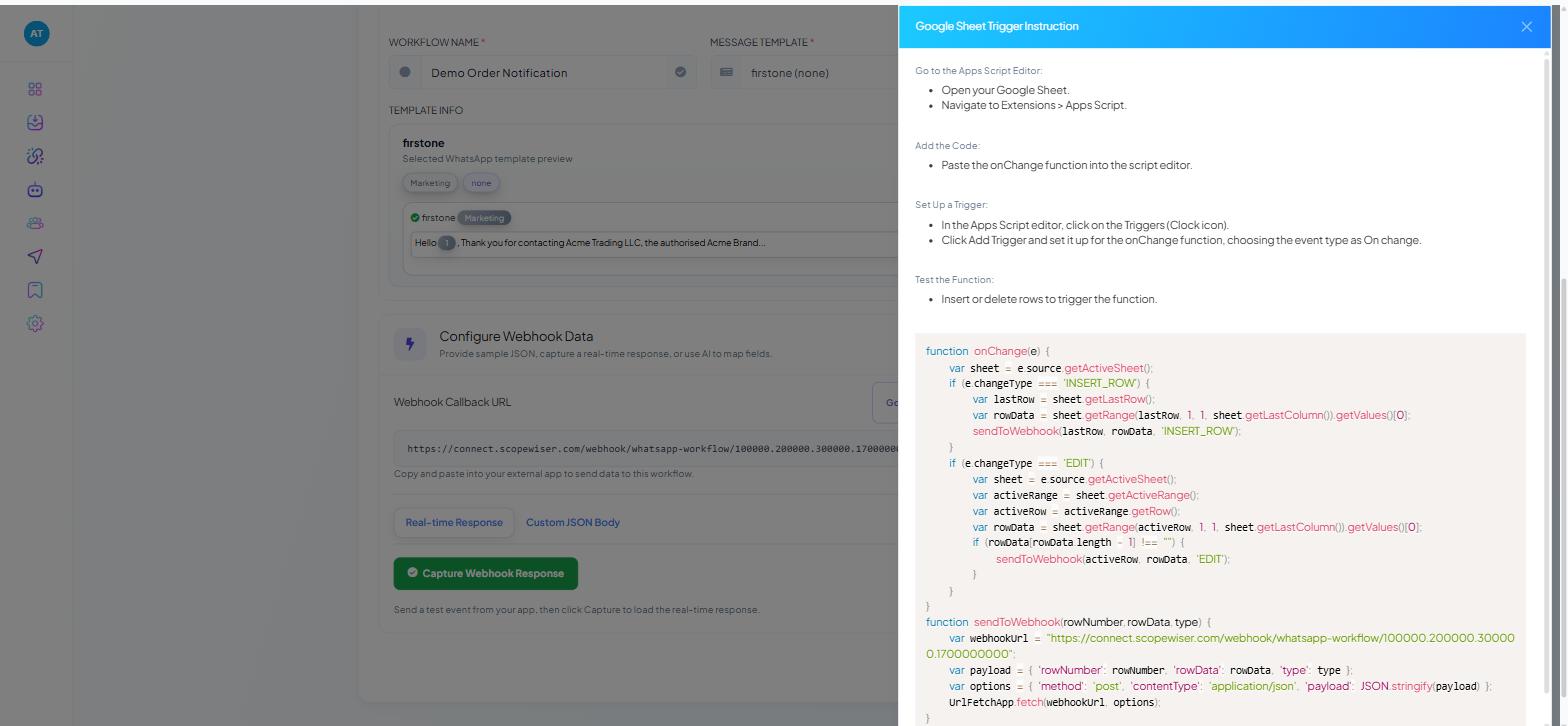
Click Google Sheet Instruction. A slide-over headed Google Sheet Trigger Instruction opens, carrying the setup steps and the complete Apps Script with your workflow's URL already substituted, plus a Copy button.
The panel's four steps are:
Go to the Apps Script Editor — open your Google Sheet, then Extensions > Apps Script.
Add the Code — paste the
onChangefunction into the script editor.Set Up a Trigger — click the Triggers (clock) icon, click Add Trigger, and set it up for the
onChangefunction with the event type On change.Test the Function — insert or delete rows to trigger the function.
Step three is the one people skip, and skipping it produces a sheet that looks connected and sends nothing. Pasted code only runs when a trigger calls it.
onChange handles INSERT_ROW (reads the row just added) and EDIT (reads the row you are working in, skipping it if the last cell is still empty). Both call sendToWebhook, which POSTs { rowNumber, rowData, type } to your workflow as JSON.
To map the incoming data, add a test row, then use the Real-time Response tab's green Capture Webhook Response button to load it. The Custom JSON Body tab takes a pasted payload instead, and Run Test loads the mapping fields from it with no external trigger. Tests are not free: a run registers on the workflow's TARGETED count and appears in the report alongside real sends.
The mapping table lists Phone Number and each template variable; next to each, pick the matching sheet column from the dropdown. If phone numbers start with +, choose the Trim Left formatter and enter +. Mapping is auto-populated and usually right; read it rather than trust it, since a wrong mapping delivers perfectly and says nothing useful.
Save the workflow. From then on, every new row sends a message. The workflow list reports on it with columns TARGETED, PROCESSED, DELIVERED, OPENED, FAILED, SKIPPED and UNREACHED, plus a Workflow Report button. To see exactly what one row sent, reopen the workflow and read the Raw Data panel.
What to do next
If the personalised campaign is one of a series, the ready-made sequences in WhatsApp Sequences With Template Messages stage follow-ups to the people who did and did not respond. To read the results of the send you just made, go to WhatsApp Broadcast Analytics & Reporting.