
Live Chat and the Shared Inbox: Complete Overview
One inbox for WhatsApp, Facebook, Instagram and Webchat conversations. The account fields to set first, the filter rail, the conversation list, the composer and every section of the Chat Actions panel.
The Shared Inbox is where the automation stops and a person starts. Every conversation your bots handle — WhatsApp, Facebook, Instagram and Webchat — arrives in the same list, and any agent with the right permission can read it, take it over and answer.
Set these on your account first
Four fields on your own account change what you see in every conversation. Open the profile menu at the top right, choose Account, and set them in the Update Account form:
TIMEZONE — every timestamp you read, and every follow-up you schedule, is shown against this.
LIVECHAT TRANSLATION LANGUAGE — the language incoming messages are translated into. It is not the same as APPLICATION LANGUAGE, which changes the interface.
SIGNATURE MESSAGE — your own line, sent when you join a conversation on a bot that has signature messages switched on.
Profile picture and NAME — how colleagues see you in the inbox. The picture must be 200KB, png/jpg/webp, Square Image.
Click Update to save. Each agent sets their own.
Opening the inbox
Click Shared Inbox in the sidebar. You can also reach it from the Dashboard quick action Open Inbox.
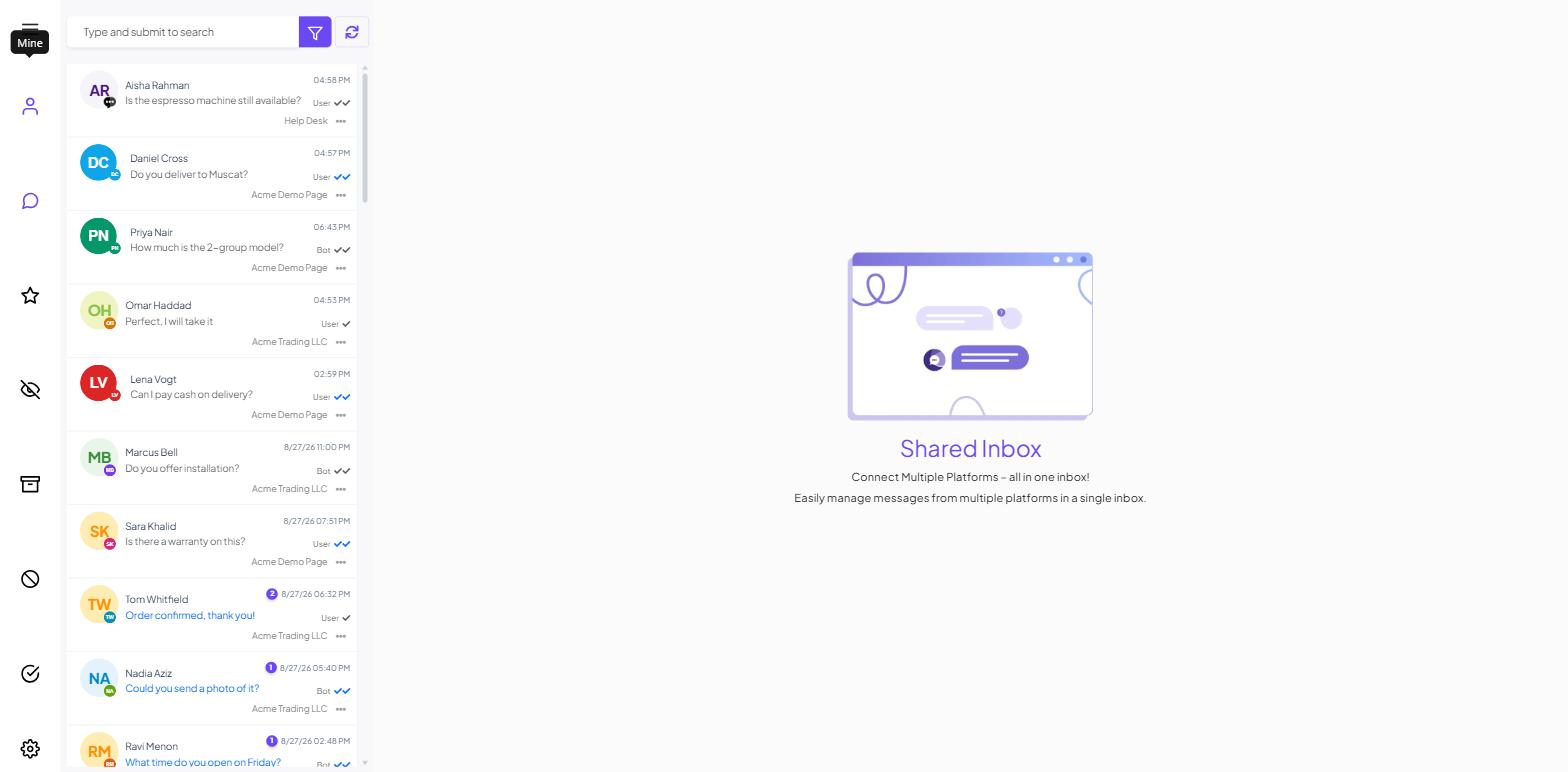
Before any channel is connected you see an empty state. There is nothing to switch on. Connect a channel and its conversations start appearing here on their own.
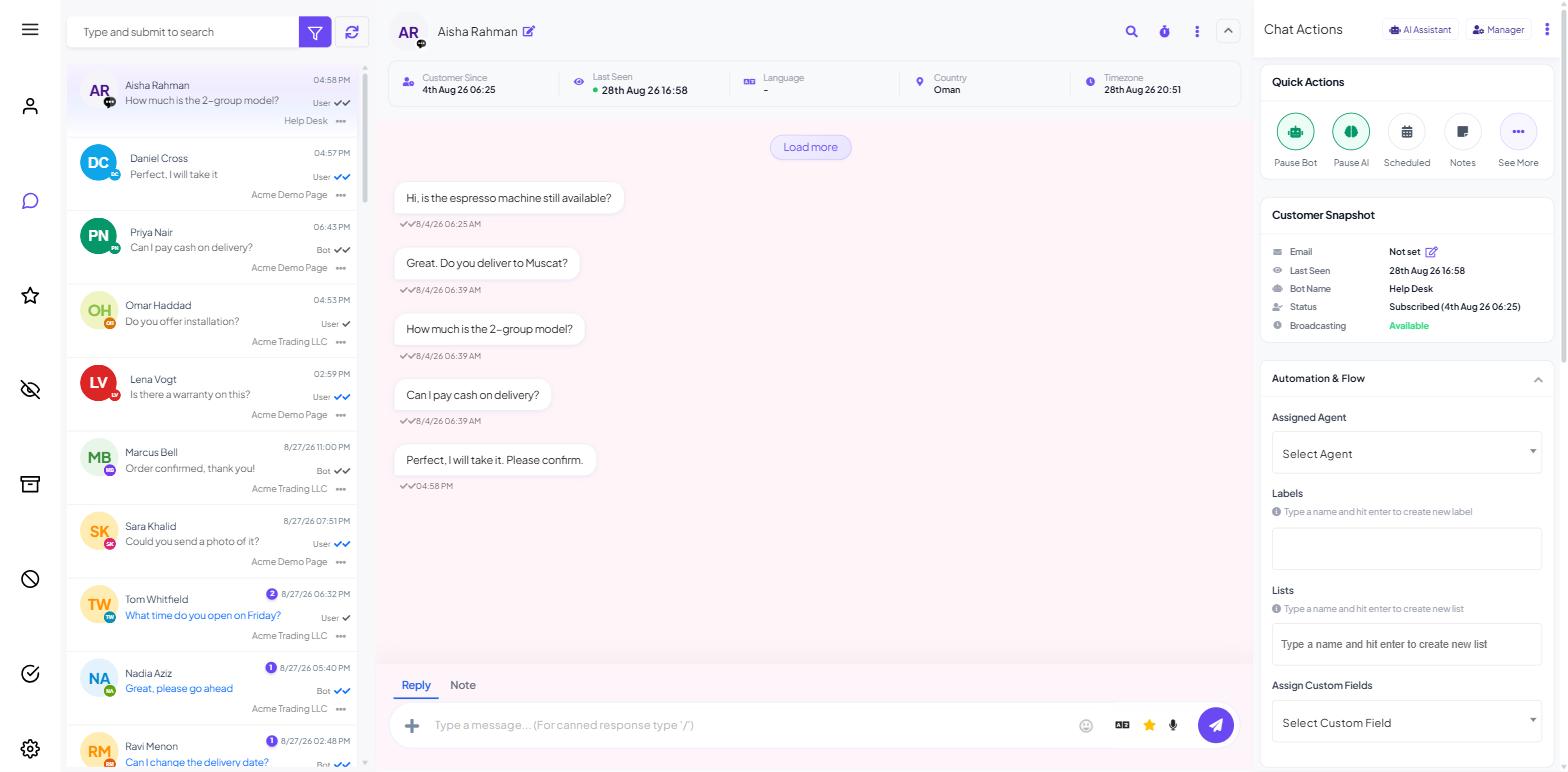
The screen has four regions, left to right: a narrow filter rail, the conversation list, the conversation itself, and the Chat Actions panel on the right. To give the conversation room, the main sidebar collapses to icons on this screen.
To work two conversations at once, open the inbox in a second browser tab.
The filter rail
Seven icons run down the far left, in this order:
Filter | What it shows |
|---|---|
Mine | Conversations assigned to you |
All | Every conversation you have permission to see |
Important | Conversations you have starred |
Unread | Anything nobody has opened yet |
Archived | Chats moved out of the working list |
Blocked | Contacts you have blocked |
Resolved | Conversations closed as finished |
A settings gear sits at the bottom of the rail.
For each agent, turn on Allow Only Assigned Chat in Livechat (Control Panel → User Manager → the person) so they see only their own chats; leave it off for supervisors.
Resolved and Archived are not the same thing. Resolved means the customer's problem is finished; Archived means the conversation is out of your way.
The conversation list
At the top of the list are a search box — "Type and submit to search" — a funnel filter button and a refresh button. The search runs on submit, so press Enter.
Each row shows:
The contact's avatar with a channel badge, so you can see which platform the message came from.
The name and a preview of the last message.
An unread count and a timestamp.
A sender tag — Bot, User or Admin — with delivery ticks. This tells you who spoke last. Bot means automation is still handling it; Admin means a person has replied.
The bot or account name the conversation belongs to, which matters as soon as you run more than one bot.
A "..." menu for row-level actions.
Scan for rows tagged User: the customer spoke last and nobody has answered.
The conversation
The header shows the contact's name with an edit (pencil) icon beside it, and their phone number — unless their role has LIVE CHAT - NUMBER MASK switched on, which hides it. To the right sit a search icon for finding messages within the thread, a timer icon, a kebab menu, a collapse chevron, and two buttons: AI Assistant and Manager.
Below the header runs a contact strip: Customer Since, Last Seen, Language, Country and Timezone.
Long threads load in pages, with a Load more control at the top.
Hovering an incoming message reveals three actions on the bubble itself: reply to quote it, translate it, and a react control. To translate a message or your reply, see Live Chat Translation.
Writing a reply
The composer at the bottom has two tabs, Reply and Note. Reply goes to the customer. Note does not — it is an internal message for whoever picks the conversation up next.
The reply field reads: "Type a message... (For canned response type '/')". Typing a forward slash brings up your saved replies, which is how you answer the twentieth delivery question of the morning without typing it out again.
The icon row alongside the field gives you an attachment button (+), emoji, translate, star, microphone and send.
The Chat Actions panel
The right-hand rail is headed Chat Actions. It is long, and it scrolls. In order:
Quick Actions — five buttons: Pause Bot, Pause AI, Scheduled, Notes and See More. Pause Bot stops the scripted automation for this contact; Pause AI stops the AI agent replying. An agent stepping into a live conversation normally wants both, otherwise the bot talks over them.
Customer Snapshot — Email (editable in place), Last Seen, Bot Name, Status, Messaging Window and OPT-IN Through.
Messaging Window is the row that decides whether you can reply at all. On WhatsApp it shows Inside 24H with a live countdown in hours, minutes and seconds, or a red Outside 24H Window. After 24 hours you can only send an approved template — see WhatsApp Rules You Must Know: 24-Hour Window & Template Messaging.
Automation & Flow — the automation currently attached to this contact.
Assigned Agent — a Select Agent dropdown. One agent holds a conversation at a time. People only appear in that list if they exist as team members whose role carries the LIVE CHAT permission, so on a single-login account the dropdown opens empty.
Labels — "Type a name and hit enter to create new label". Labels are the same objects you use for segmentation elsewhere, so anything you tag here is available when you build an audience later.
Lists — "Type a name and hit enter to create new list".
Message Sequence — put this contact into a follow-up sequence without leaving the conversation.
Assign Custom Fields — a Select Custom Field dropdown, then a value.
Custom Fields — what is already stored, or "No custom fields assigned".
Follow-up History (0) with an + Add button, or "No follow-up history".
Notes — or "No notes yet".
Below all of that sits the AI Assistant panel, with a Reasoning Effort setting, Analyze Customer Conversation and Help me to reply. See AI in the Shared Inbox.
Who can see what
Access is set in Control Panel → User Permission, where the inbox has its own group of toggles: LIVE CHAT, plus LIVE CHAT - WIDGET, LIVE CHAT - NUMBER MASK, LIVE CHAT - TRANSLATOR and LIVE CHAT - ADVANCED.
Turn LIVE CHAT - NUMBER MASK on if agents should not see customer phone numbers.
Restricting which bots a person can reach happens on their User Manager record, not in the role. Adding Team Members & Access Control covers both screens.
What to do next
Read Assigning Agents and Joining Conversations next — it covers who owns a conversation and how a person takes it off the bot. After that, the rest of this module takes one feature at a time: signature messages and handover, follow-up reminders, translation and the inbox settings.