
Autoresponders: Mailchimp, Brevo, ActiveCampaign, Mautic and MailWizz
Push chat subscribers into your email list automatically. Create an Auto Responder API profile, point each bot at the right list, and know which provider needs which credentials.
This sends every email address a bot collects straight into your mailing list.
Scope Wiser connects to five: Mailchimp, Brevo, ActiveCampaign, Mautic and MailWizz.
How the connection is put together
Two separate pieces, in two places. Missing the second is why most first attempts sync nothing.
Credentials are account-wide. One profile per provider account, held under Control Panel, shared by every bot.
The destination list is per bot. Each bot names the list its subscribers should go into, in the Bot Settings panel.
So one Mailchimp account can feed a different list from each bot.
Step 1: Create the Auto Responder API profile
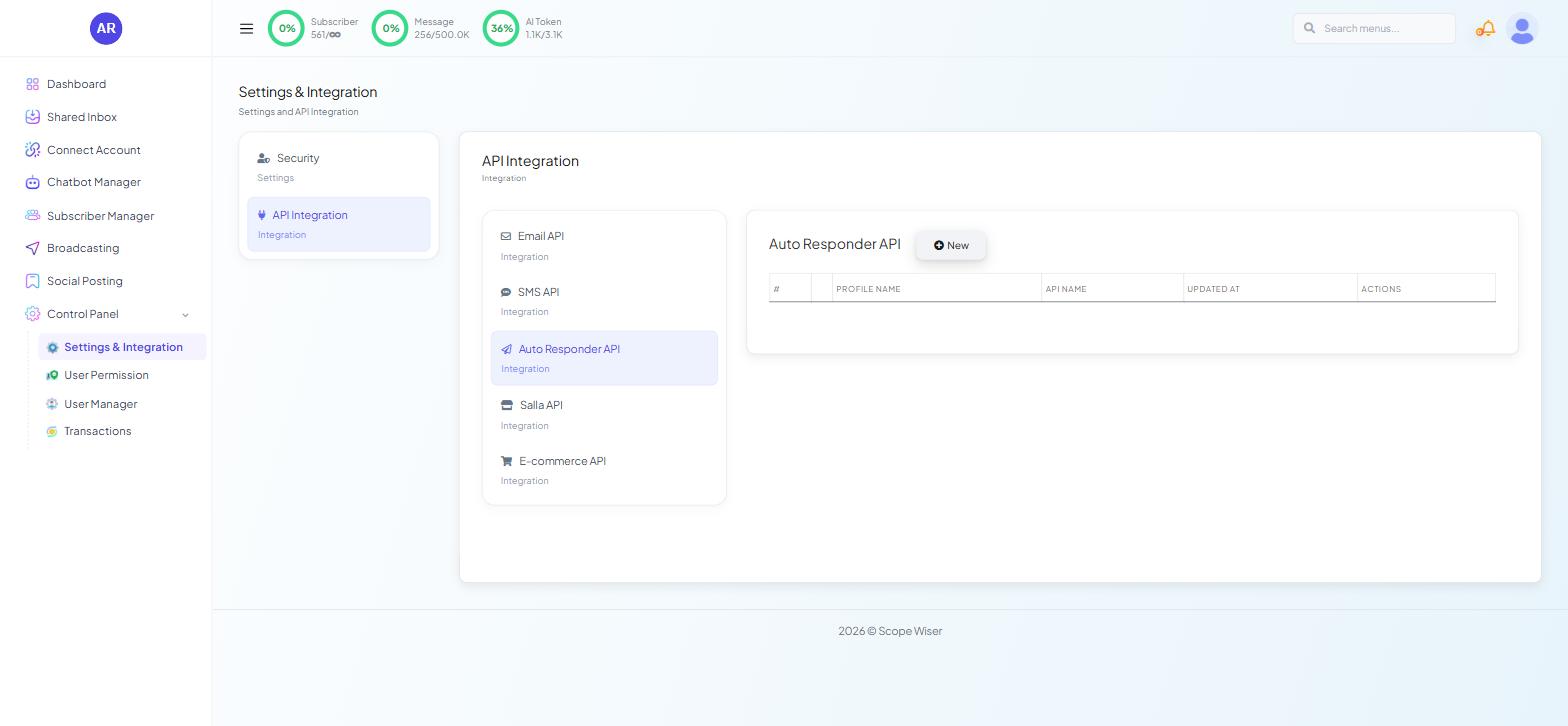
From the sidebar, open Control Panel → Settings & Integration. The page is headed Settings & Integration — "Settings and API Integration".
Choose the API Integration card, then Auto Responder API from the middle list. The panel on the right lists saved profiles with the columns #, PROFILE NAME, API NAME and ACTIONS, empty on a new account.
Click New. A drawer slides in from the right. Down its right-hand side is the provider picker: Mailchimp · Brevo · ActiveCampaign · Mautic. Mailchimp is selected by default, and choosing a different provider changes the fields on the left.
Fill in the fields. With Mailchimp selected there are two: PROFILE NAME * — placeholder "Any name to identify it later" — and API KEY *.
Click Save at the bottom of the drawer.
You can hold several profiles at once, including two of the same provider — useful when one account runs separate brands with separate mailing lists.
What each provider asks for
Copy each key the moment you create it — providers show it only once.
Mailchimp
A single API key, generated from the API keys section of your Mailchimp account settings. Available on the free plan, so you can test the whole chain without paying anything.
Mailchimp organises contacts into audiences, and each audience has an Audience ID — the value you will need in step 2.
Brevo (formerly Sendinblue)
A single API key, generated in the SMTP & API section of your Brevo account. Brevo's free tier includes API access.
Brevo calls its segments lists, each with a numeric list ID.
ActiveCampaign
Two values, both under the Developer section of ActiveCampaign's settings:
API key
API URL — account-specific, in the form
https://youraccount.api-us1.com
The URL is the part people forget. ActiveCampaign gives every account its own API endpoint, and a valid key against the wrong URL fails as though the key were wrong. API access requires a paid plan, though a trial will do for testing.
Mautic
Mautic is self-hosted, so you supply the location as well as the credentials:
Username and password for a Mautic user with API access
Base URL of your installation, for example
https://mautic.example.com/
Two prerequisites on the Mautic side, and both fail silently if missed. API access must be enabled in Mautic's own configuration — it is off by default. And the installation must be reachable over HTTPS from the public internet; an instance behind a VPN or on an internal network cannot be called.
Step 2: Point the bot at a list
The profile is now saved but nothing is flowing. Each bot needs to be told which list to write to.
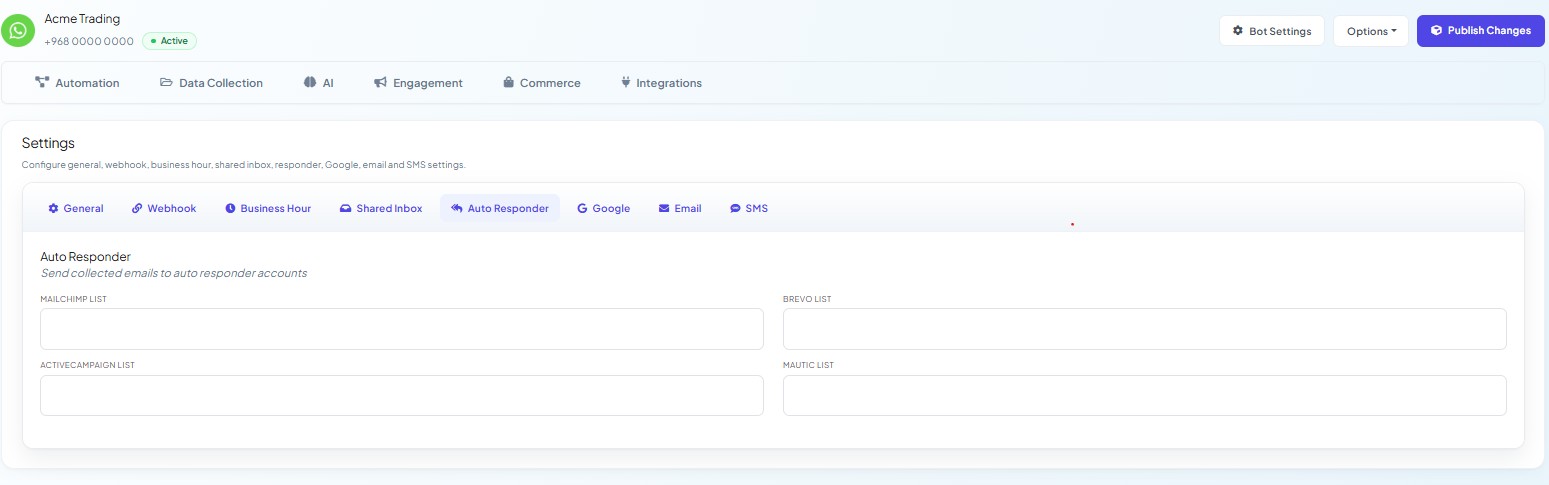
Open Chatbot Manager, select the bot, and click Bot Settings.
In the eight-tab panel, choose Auto Responder. The section reads "Auto Responder — Send collected emails to auto responder accounts" and holds four fields: MAILCHIMP LIST, BREVO LIST, ACTIVECAMPAIGN LIST and MAUTIC LIST. There is no MailWizz field here: MailWizz credentials can be saved on the account, but a bot cannot be pointed at a MailWizz list from this tab.
Enter the list or audience identifier from the relevant provider in its field. Fill in only the ones you use — a bot can feed more than one provider at a time, and each configured list receives the same subscriber.
Click Publish Changes at the top of the panel. Nothing in Bot Settings applies until you do.
Each bot also has an Autoresponder sub-tab under Chatbot Manager → Integrations.
Step 3: Collect the address
Sync only happens when a subscriber gives you an email address, which means a flow has to ask for one.
Build a User Input Flow — Chatbot Manager → Data Collection → User Input Flows → + Create, or drag the User Input Flow block onto the Flow Builder canvas from the DATA COLLECTION group. Ask the question, set the reply type so the answer is validated as an email address, and save it to the subscriber's email field.
Add a Text block after the question confirming the address was saved.
Testing it
Trigger the flow from your own device and enter an address you can check.
Open the provider and look at the audience or list. The contact should appear within seconds — the sync is immediate, not batched.
Confirm the contact landed in the right list. A wrong list ID stores the contact somewhere you will not find it, and reports success.
What to expect afterwards
Sync is one-way. Scope Wiser pushes new subscribers out. Unsubscribes, bounces and deletions in the autoresponder do not come back, so somebody who opts out of your email list stays a chat subscriber until you remove them here as well.
Only new subscribers are pushed. Turning the integration on does not backfill the people already in Subscriber Manager.
Name and phone number travel with the email where your flow has collected them.
Consent. If the list sends a newsletter, ask in the flow whether they agree to receive it.
When nothing syncs
Contacts never appear. The list field in Bot Settings is empty, or Publish Changes was not clicked.
Contacts appear in the wrong place. Wrong audience or list ID. Providers reuse similar-looking identifiers across audiences.
The profile saves but every sync fails. For ActiveCampaign, the API URL. For Mautic, API access disabled or the instance unreachable over HTTPS.
It worked and then stopped. A revoked or regenerated key. Generate a new one and edit the profile.
What to do next
If you also want the bot itself to send a message the moment an address arrives — a confirmation, a download link — set that up in Email Setup and SMTP Configuration, which uses the same collected address from a different tab.