
Website Forms to WhatsApp: WPForms, Elementor and Others
Send a WhatsApp message the moment a website form is submitted. The approved template, the Webhook Workflow that receives the data, mapping its fields from a sample payload, and how to wire up WPForms, Elementor Pro or any other form plugin.
This guide sends a WhatsApp message to the visitor within seconds of them submitting a form on your website. Three pieces make it work: an approved WhatsApp template, a Webhook Workflow in Scope Wiser that receives the submission, and a webhook setting on the form plugin pointing at it.
Before you start
A form plugin that can send a webhook. WPForms needs the Webhooks addon, which is Pro or higher. Elementor needs Elementor Pro. Contact Form 7 and Fluent Forms have their own settings.
A connected WhatsApp channel in Scope Wiser.
A phone field on the form, and a plan for how visitors will enter their country code.
Admin access to the WordPress site, so you can install the addon and republish the page.
Why the message has to be a template
WhatsApp only allows free-form messages to someone who has messaged you in the last 24 hours. A form submission is not a message. The first thing you send therefore has to be a pre-approved template, which is exactly what lets it reach a number that has never contacted you.
Open Chatbot Manager, select your WhatsApp bot, then Automation → Message Templates.
Click Create and choose General Template.
Set TEMPLATE CATEGORY *. A form acknowledgement belongs in Utility; an offer or a promotion belongs in Marketing. Categorising honestly is the single biggest factor in whether it gets approved.
In MESSAGE BODY (1024)*, type
#!where you want a variable the form will fill in, and a single#for a custom field or the subscriber's name.Save, then use Sync Templates and wait for the STATUS column to read approved.
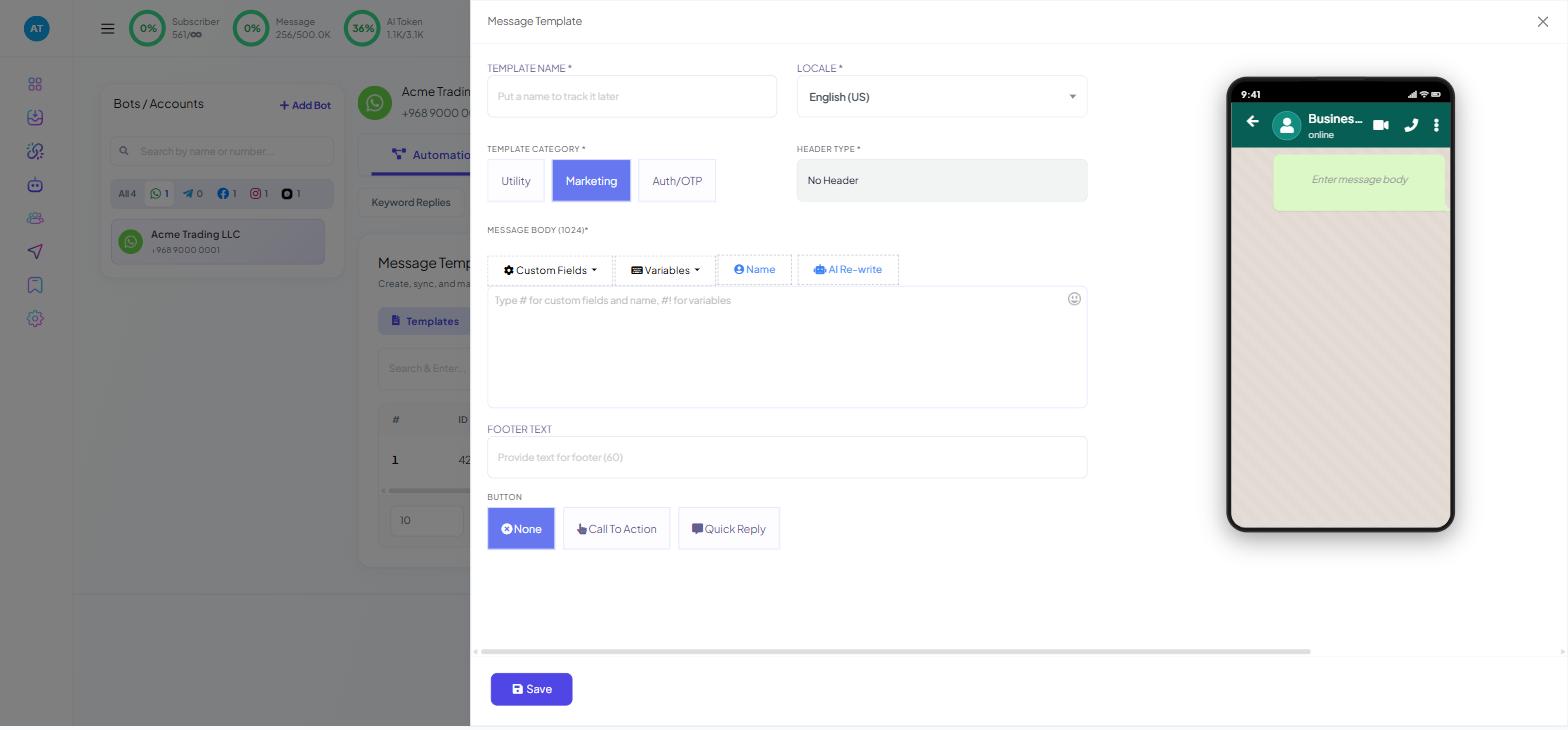
Creating & Getting WhatsApp Templates Approved covers the modal field by field, including why templates get rejected.
Step 1: create the Webhook Workflow
The workflow is the thing that listens for the submission.
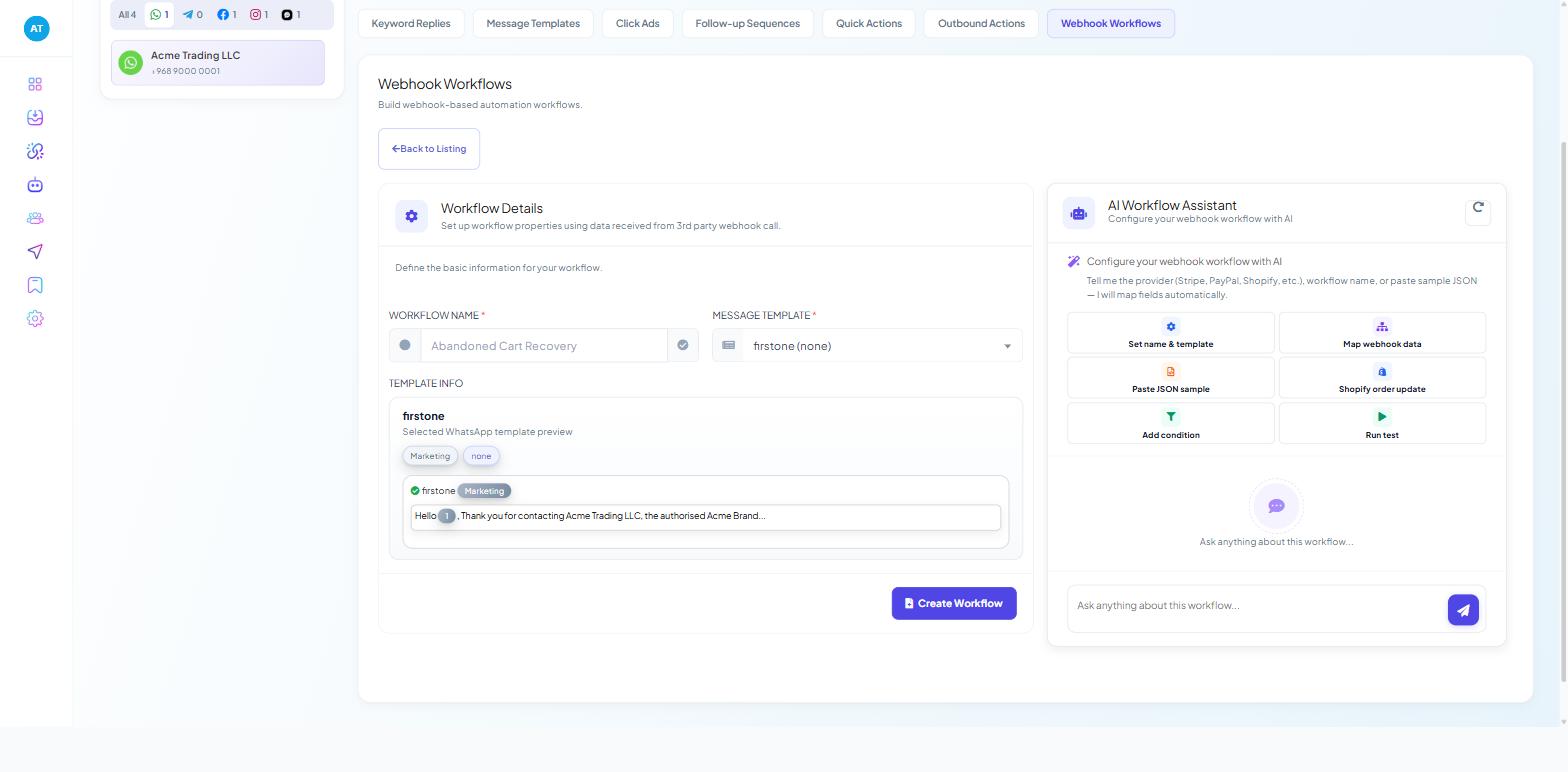
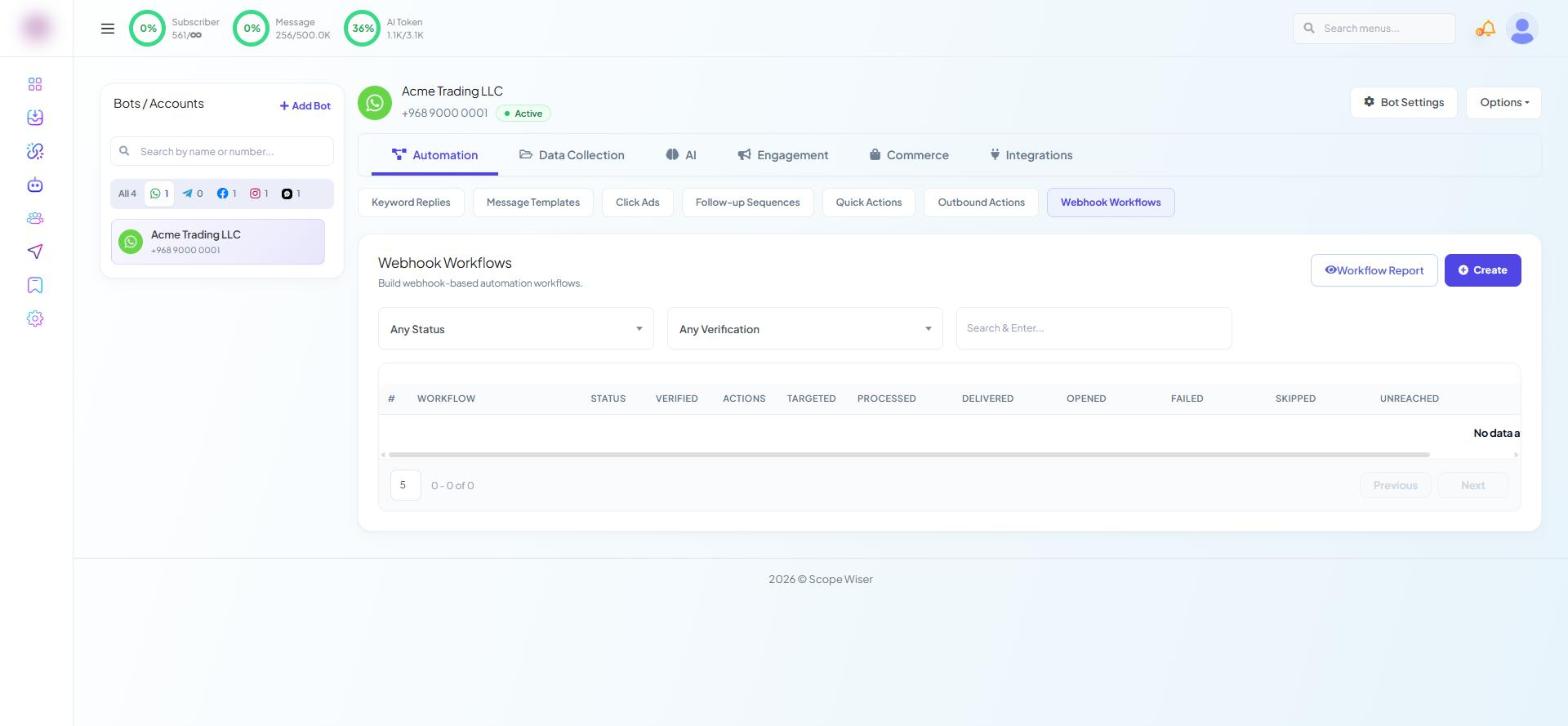
In Chatbot Manager → Automation, open the Webhook Workflows sub-tab — "Build webhook-based automation workflows." Click Create.
On the Workflow Details card — "Set up workflow properties using data received from 3rd party webhook call." — fill in WORKFLOW NAME * (placeholder "Abandoned Cart Recovery"; name it for the form, so "WPForms — quote request" rather than "webhook 2") and choose the approved template in MESSAGE TEMPLATE *.
Read the TEMPLATE INFO preview below. The variables visible in it are precisely the ones you will have to supply data for in a moment.
Click Create Workflow. Nothing below those two fields exists until you press it: the second stage, and with it the URL your form needs, only appears once the workflow has been saved.
The AI Workflow Assistant panel on the right will set the name and template, map the fields and run the test for you if you paste a sample payload into it.
Configure Webhook Data — "Provide sample JSON, capture a real-time response, or use AI to map fields." — then opens with a read-only box headed Webhook Callback URL and the helper "Copy and paste into your external app to send data to this workflow." Copy it now, or fetch it later from the kebab menu on the workflow's row, which carries Copy Webhook URL alongside Report, Resend All Failed Webhook, Download Report, Edit Connection and Delete.
Step 2: map the fields before the form sends anything
Two tabs sit under the URL. Real-time Response waits for a live call: submit the form, then press Capture Webhook Response. Custom JSON Body needs no live system at all — type a sample payload into the textarea, press Run Test, and the mapping fields load "without an external trigger".
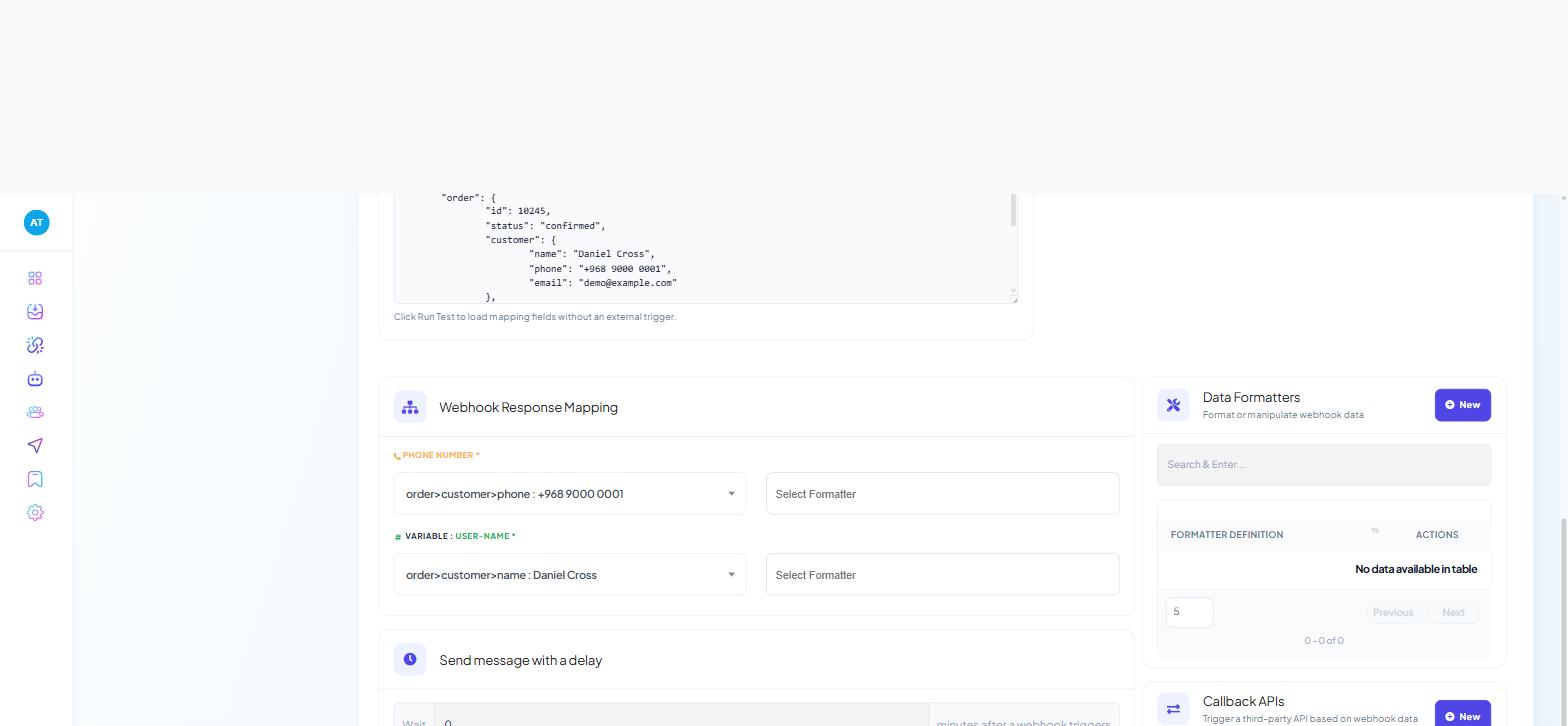
Use Custom JSON Body first, because you are the one about to write the request body. Paste this into the textarea:
{"name":"Demo","phone_number":"96890000001","email":"demo@example.com"}Then press Run Test. The mapping can now be built and checked before the form plugin is even installed. It is not quite free — after Run Test the workflow's TARGETED counter reads 1, so a test registers as a real record.
Webhook Response Mapping appears with one row per value the send needs: PHONE NUMBER *, then VARIABLE : * for each variable in the template. The rows arrive auto-populated wherever the payload made the match obvious — worth checking rather than trusting. Each dropdown lists your fields with a sample value; pick phone_number for PHONE NUMBER and name for the variable. << Static Value >> sits at the top for a value that never changes, and Select Formatter beside each row cleans the value on its way through.
Save the workflow, and its VERIFIED column turns to a green Yes. That is all verified means here: a sample payload has been captured.
Step 3: point WPForms at it
Install and activate the Webhooks addon from the WPForms addons screen.
Edit the form and open its settings, then the Webhooks section, and enable webhooks.
Add one webhook with these values:
What WPForms asks for | What to give it |
|---|---|
Request URL | The Webhook Callback URL from your workflow |
Request method |
|
Request format |
|
Request body: | The form's Name field |
Request body: | The form's Phone field |
Request body: | The form's Email field |
Save the form, and republish the page it sits on. A page that has not been republished still serves the old form, and "the webhook never fires" is almost always this.
WPForms identifies fields by a numeric field ID, so pair them by looking at the form, not by guessing from the label. Use the same three keys you typed into Custom JSON Body in step 2 — that is the point of having done it in that order.
Step 4: submit for real and read the counters
Now go to the live form and submit it yourself, with a number you can check.
If the real payload turns out to differ from the JSON you typed — a key spelled differently, a value nested deeper — reopen the workflow with Edit Connection on its row, press Capture Webhook Response on the Real-time Response tab, and remap against what actually arrived. The Raw Data panel on that screen — "The original webhook data received in raw format" — pretty-prints the captured payload, which is where you compare the two. It holds the most recent capture only; there is no archive of past calls.
The workflow's row in the Webhook Workflows table carries STATUS, VERIFIED, TARGETED, PROCESSED, DELIVERED, OPENED, FAILED, SKIPPED and UNREACHED. Three of those render under a different label: FAILED reads Error, SKIPPED reads Condition Failed — a message a rule filtered out, not a fault — and UNREACHED reads Failed.
Nothing targeted means the form never sent; Error is usually the phone number. See Form-to-WhatsApp Troubleshooting.
Workflow Report, above the table, goes further and lists every recipient individually: PHONE NUMBER, STATUS, SCHEDULED AT, DELIVERED AT, OPENED AT, FAILED AT and RESPONSE. The RESPONSE column carries the platform's own reply for that send, which is usually the fastest way to find out why one number failed while the rest went through.
Get the phone format right
Every number must carry its country code and nothing else. A visitor typing 9000 0001 produces a message to nobody, and neither WordPress nor Scope Wiser will warn you at the time.
Set the field's placeholder to show the format you expect, add a hint under it, and prefill the country code if the form serves one country. Numbers beginning with a national trunk prefix such as 0 will not route.
A leading + you can strip in the workflow rather than at the form:
Open the Data Formatters panel — "Format or manipulate webhook data".
Click + New and give the formatter a Name.
Set Action to Trim Left with
+as its Trim parameter.Choose that formatter in Select Formatter on the PHONE NUMBER row.
Test from a phone that has never messaged you. Your own number is usually inside a 24-hour window already, which hides exactly the template problems that will hit the first real visitor.
What to build with it
The mechanism is identical each time. Only the template text and the form change.
Lead qualification. The message asks one qualifying question, with buttons for the answers.
Booking and consultation confirmations. Send the date, time and address straight back.
Support and ticket acknowledgements. "We have your request, reference 4857."
Quote requests. Acknowledge, and ask the one extra thing you always end up asking.
Event and webinar registration. Confirm the signup; a follow-up sequence sends the reminder.
Job application receipts. A short confirmation with a realistic review timeline.
Other form plugins
Nothing above is specific to WPForms except the addon. Any WordPress form plugin that can post JSON to a URL — Contact Form 7, Fluent Forms, Elementor Pro — connects to the same workflow in the same way. Only the location of the webhook setting changes.
If you use Elementor Pro
Requires Elementor Pro — the free version has no Webhook action.
Edit the page holding the form and select the Form widget.
Set the fields up. At minimum you need a phone field and a name field. Change the default Email field to a Tel field if that is easier than adding one, and label it clearly — "WhatsApp number" tells the visitor what will happen next.
Open Actions After Submit in the form's settings and add the Webhook action.
Open the Webhook section that appears and paste the Webhook Callback URL from your Scope Wiser workflow.
Publish or Update the page.

What to do next
If the message does not arrive, or arrives with blanks where names should be, Form-to-WhatsApp Troubleshooting diagnoses the same chain. For a deeper understanding of what a workflow is and how it differs from Outbound Actions and the Bot Settings webhook, read Webhook Workflow: Complete Beginner's Guide.