
Adding a Chatbot to a WordPress Site
Put a Scope Wiser chat widget on a WordPress site: create and style the widget, get the embed code, and choose between site-wide and single-page placement in the block editor, a page builder or the theme.
The work is small: create a widget in Scope Wiser, copy one snippet, paste it into WordPress. What matters more is which pages the widget appears on and who answers when somebody uses it.
Which widget you are adding
Scope Wiser offers two things that both look like a chat button, and they behave differently.
The website chat widget opens a chat window inside your page. Conversations run on the Webchat channel, arrive in your Shared Inbox, and the visitor never leaves the site. This is the one this post installs.
The WhatsApp chat widget is a button that hands the visitor to WhatsApp. Useful, but a different screen and a different outcome — the person becomes a WhatsApp subscriber and the chat happens in their WhatsApp app. Website Chat Widget: Create, Embed & Manage covers both and explains when each is the right choice.
Step 1: create the widget
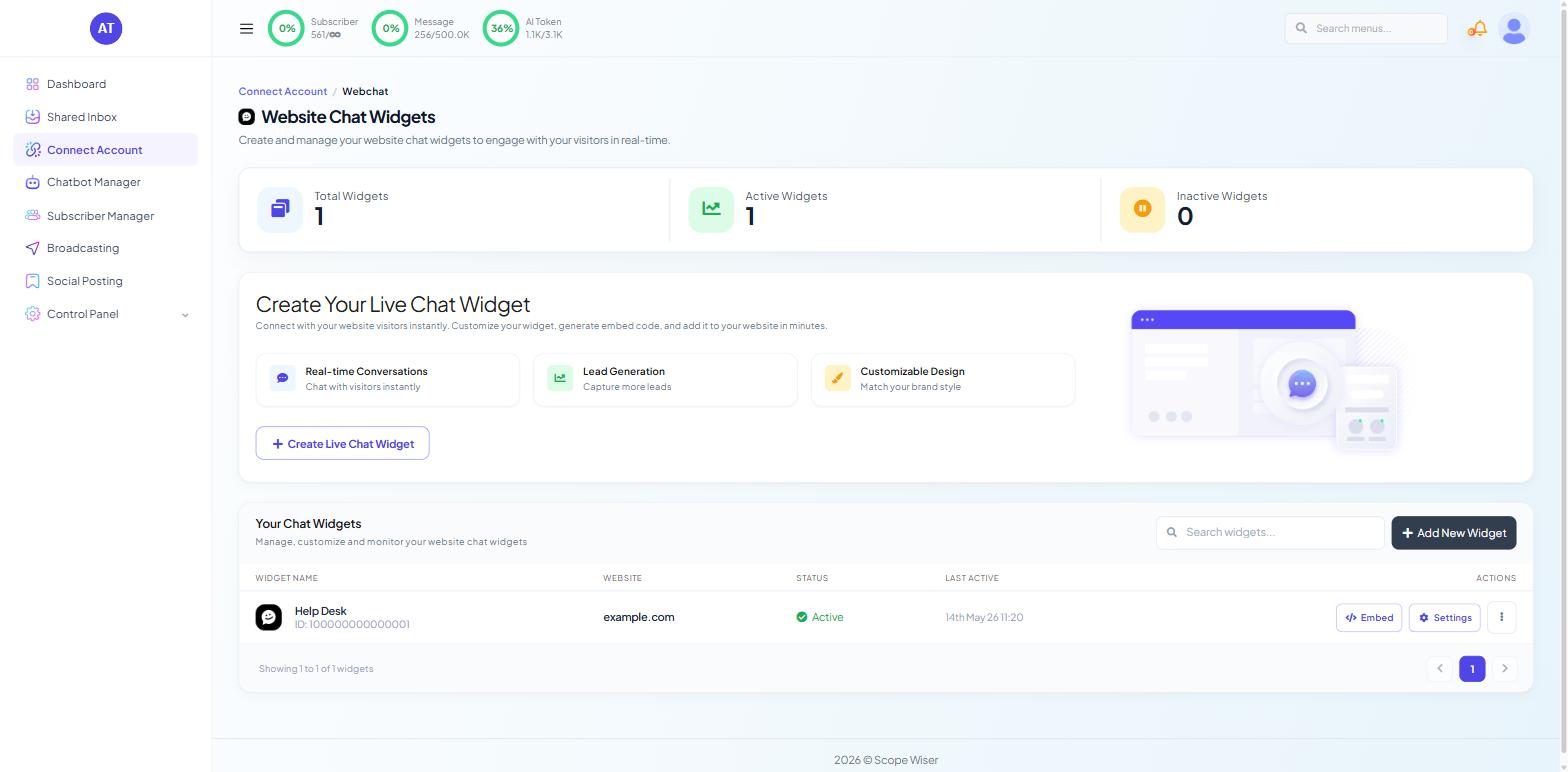
From the sidebar open Connect Account, then choose Webchat. You land on Website Chat Widgets — "Create and manage your website chat widgets to engage with your visitors in real-time." Three counters sit across the top: Total Widgets, Active Widgets and Inactive Widgets.
Click + Create Live Chat Widget — or + Add New Widget if you already have one. The setup drawer opens, headed Set Up Your Live Chat Widget.
Fill in its fields, in order:
Field | What to put in it |
|---|---|
Chatbox disaply title * (spelled this way on screen) | The name at the top of the chat window. Your business, not "Chatbot" |
Website URL * | The site the widget is allowed to run on |
Theme Background / Theme Text Color | Hex values with a swatch picker |
Chat Bubble Background / Chat Bubble Text Color | The bubble in the page corner |
Brand Logo / Chatbox Wallpaper | Upload buttons |
Chatbox Font | Dropdown |
Chatbox Position | Top-left, Bottom-left, Top-right or Bottom-right |
Stay Open on Startup | Stay open or Stay closed |
X-axis Offset (px) / Y-axis Offset (px) | Nudges the bubble away from other page furniture |
Loading Chatbox After N Second(s) | A slider |
Upload Media | An Enable toggle, letting visitors send files |
Save the widget.
Two of these are worth thinking about rather than accepting. Stay Open on Startup set to Stay open means every visitor arrives to an open chat window; on a mobile screen that covers the page. Choosing Stay closed, with a short delay on Loading Chatbox After, is the safer default. The X-axis Offset and Y-axis Offset exist for the very common case where the bubble sits on top of a cookie banner or a back-to-top button.
The saved widget appears in Your Chat Widgets — "Manage, customize and monitor your website chat widgets" — in a table with WIDGET NAME (and its ID), WEBSITE, STATUS, LAST ACTIVE and ACTIONS. The row actions are Embed, Settings and an overflow menu.
Step 2: copy the embed code
Click the Embed action on the widget's row and copy the snippet it gives you.
The widget only works on the URL you entered; make a second widget for a test site.
Step 3: paste it into WordPress
Where you put the snippet decides where the widget appears. Pick deliberately.
Site-wide (usual choice)
The widget belongs on every page for most businesses, which means the snippet belongs in the site's footer. Install a header/footer-scripts plugin (for example WPCode) → Footer box → paste → Save. Do not edit theme files.
One page only
If you want the widget on a landing page and nowhere else, edit that page and add the snippet inside a block that renders raw HTML — the block editor's Custom HTML block, or the equivalent HTML widget in whichever page builder you use. Elementor sites can use the HTML widget, dragged into any container.
Then Publish or Update the page. WordPress serves the previously published version until you do, so an unpublished change looks exactly like a broken snippet.

What not to do
Do not paste the snippet twice. Two copies on one page produce two widgets, or one widget that behaves strangely, and the cause is hard to see. Check the footer setting before adding it to a page.
Step 4: test it properly
Open the site in a private browsing window, so you are seeing what a visitor sees rather than a cached logged-in view. The bubble should appear in the position and after the delay you configured.
Send a message through it, including one of your bot's trigger keywords.
Open Shared Inbox and switch to the All filter — a fresh test conversation is not assigned to anyone, so it will not be under Mine.
Confirm the conversation is there on the Webchat channel. Webchat visitors are identified by their session rather than by a phone number or an email address, so a name only appears once your flow asks for one.
Can't see the chat? Ask the owner to give your role LIVE CHAT permission and untick Allow Only Assigned Chat in Control Panel → User Manager.
Bubble missing entirely? Work through this order: is the page republished, does the widget's Website URL match the domain you are on, is the widget's STATUS active, and is the snippet present in the page source.
Deciding what the widget says
An installed widget that answers nothing is worse than no widget. Before you publicise it, give the Webchat bot a greeting, two or three buttons for the questions you actually get, and a route to a human. Using AI on Your Website Chat Widget covers pointing your trained AI at the widget, which is usually a better first hour of work than writing dozens of keyword replies.
What to do next
Website Chat Widget: Create, Embed & Manage covers widget management, the WhatsApp button variant, and what to do when a widget stops appearing. To make sure someone sees the conversations the widget produces, read Live Chat and the Shared Inbox: Complete Overview. To have Scope Wiser call WordPress rather than the other way round, see HTTP API: The Complete Developer Guide.