
Pabbly Connect and Zoho Flow
Send chatbot data from Scope Wiser to Pabbly Connect or Zoho Flow and on to Gmail, a CRM or a spreadsheet: the outbound webhook, the HTTP API route for developers, and how to test the connection properly.
Pabbly Connect and Zoho Flow both accept an incoming webhook, so Scope Wiser can push what a conversation collects straight into an inbox, a CRM, a spreadsheet or a chat channel. There is no dedicated connector for either — a webhook URL on their side is all Scope Wiser needs.
What you need
A Pabbly Connect or Zoho Flow account.
A connected channel and a bot that collects something. What User Input Flows Are and When to Use Them covers building the questions if you have not yet.
Wherever you want the data to land — a mailbox, a CRM, a sheet — with credentials to hand.
Step 1: get the webhook URL
Create a workflow in Pabbly Connect, name it for what it does, and set its trigger to the webhook option. Pabbly generates a URL and shows it to you. Copy it, and leave the workflow open and waiting — it needs a real payload before you can build the rest of it.
That URL is everything Scope Wiser needs.
Step 2: send the data from Scope Wiser
The simplest route is an outbound webhook. Open Chatbot Manager → Automation → Outbound Actions, click Create, paste the URL into OUT-BOUND WEBHOOK URL *, switch on the trigger action and the data fields you want, and save. Zapier: Setup and Top Use Cases, Step 2, walks through that drawer field by field.
For developers
An HTTP API block sends at a chosen point in the conversation instead of on a generic bot event, and lets you decide exactly what the body contains.
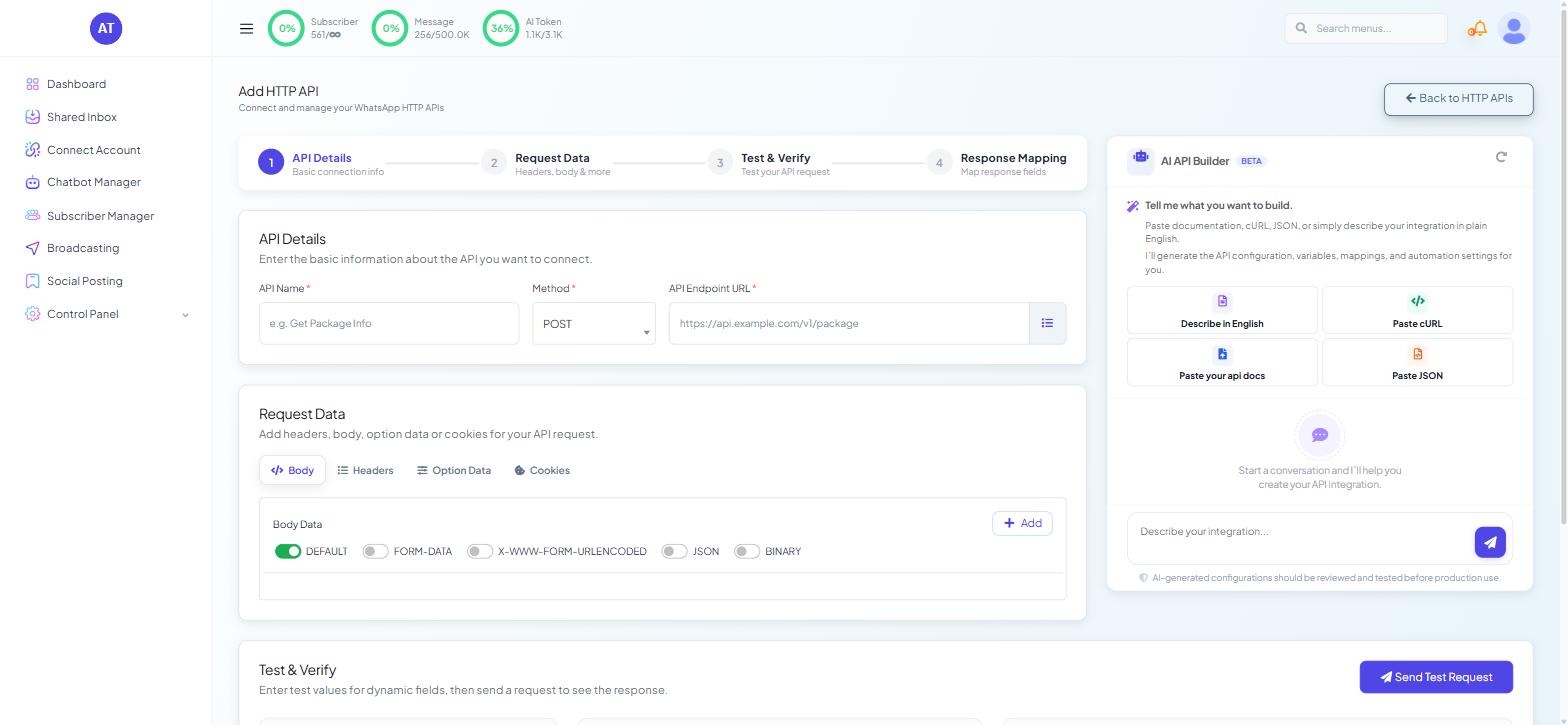
Open Chatbot Manager, select the bot, then the Integrations tab and the HTTP API sub-tab — "Connect and manage outbound HTTP APIs for flows and automations." Click Create. The Add HTTP API wizard opens as a full page with four numbered steps: API Details, Request Data, Test & Verify and Response Mapping.
In API Details, set API Name * (placeholder
e.g. Get Package Info; something likePabbly — new leadwill still make sense to you next year), Method * toPOST, and API Endpoint URL * to the webhook URL from step 1.In Request Data, open the Headers tab and add one row: key
Content-Type, valueapplication/json. Leave authentication headers empty unless the platform asked for one.On the Body tab, add one row per value you want to send — the subscriber's name and phone number, plus whichever custom fields the input flow filled in. Use dynamic values rather than static ones; a static body sends the same values for every subscriber.
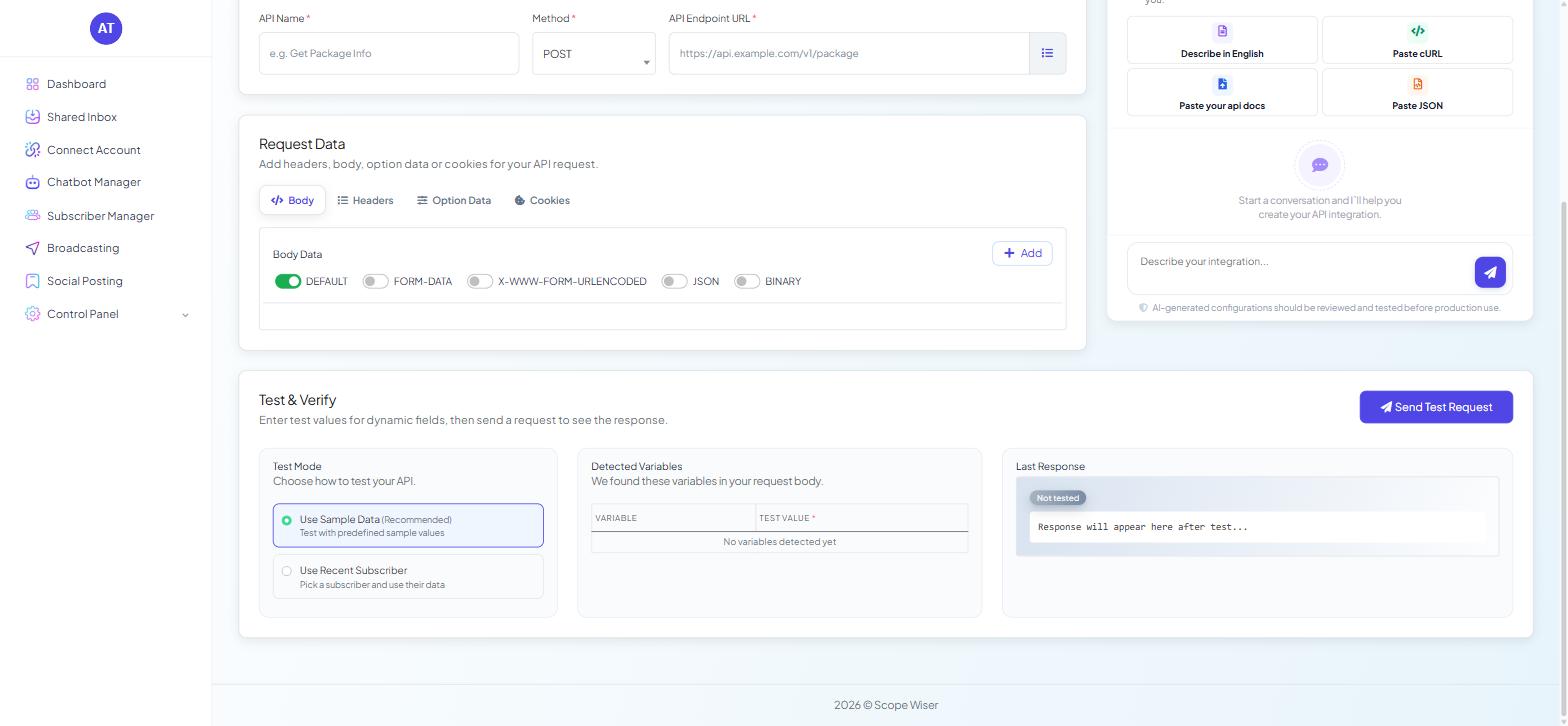
Scroll to Test & Verify — "Enter test values for dynamic fields, then send a request to see the response." Test Mode offers Use Sample Data (Recommended) — "Test with predefined sample values" — and Use Recent Subscriber — "Pick a subscriber and use their data." Use sample data first, and move to a real subscriber only once the request shape is right. Pick your own record rather than a customer's.
Check Detected Variables — "We found these variables in your request body." — which lists what the wizard found, with columns VARIABLE and TEST VALUE *. If it reads "No variables detected yet", your dynamic values are not being recognised as dynamic; fix that before continuing.
Press Send Test Request. Last Response carries a Not tested badge until a request has been sent, and shows the response afterwards. Save the API when the test succeeds.
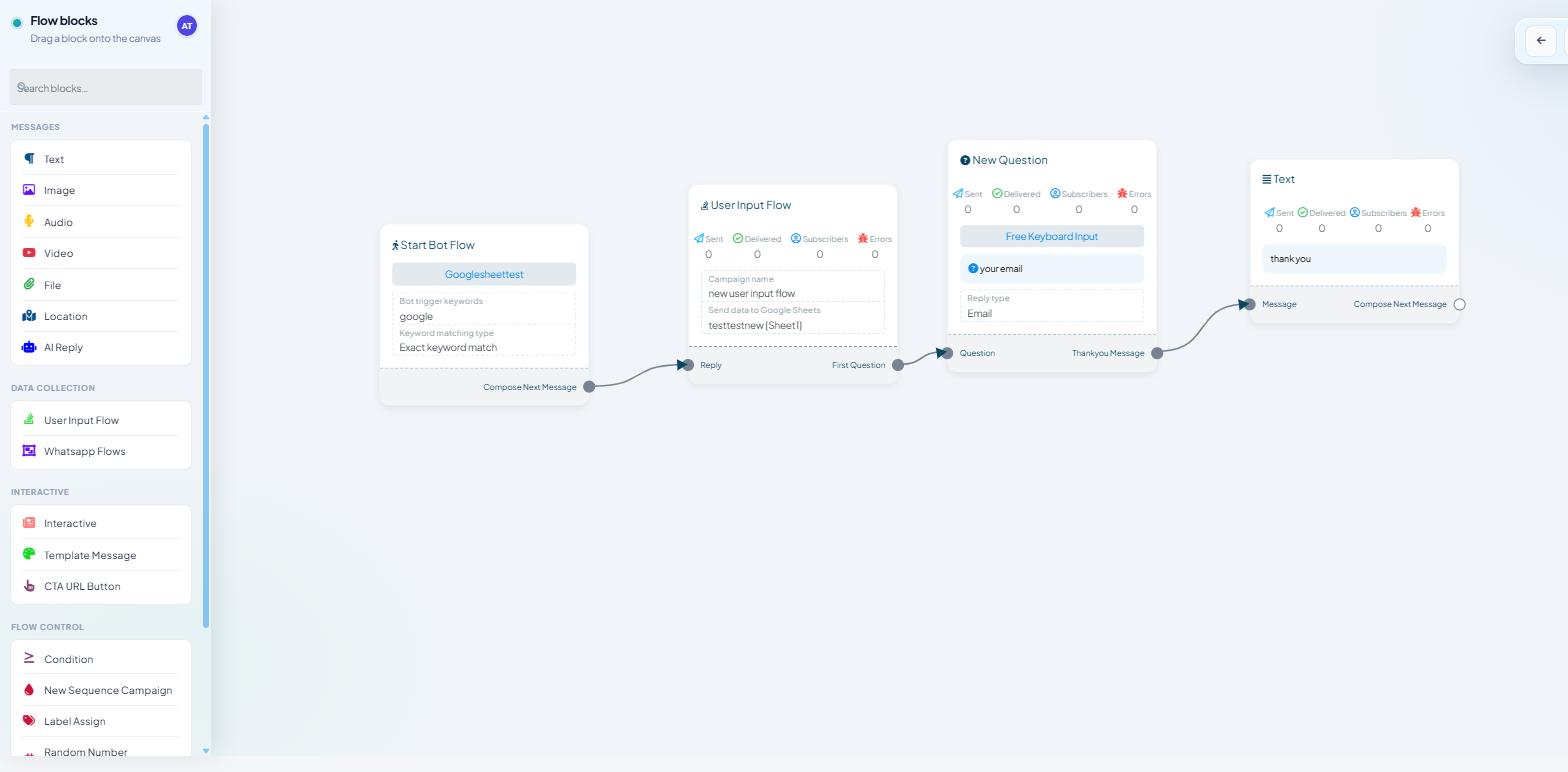
Open the flow in the Flow Builder and drag HTTP API from the INTEGRATIONS palette group onto the canvas, then choose your saved API. The block is available on all four channels.
Order decides whether it works:
Start Bot Flow with a trigger keyword.
User Input Flow asking for the details.
HTTP API posting to Pabbly or Zoho.
Text confirming to the person that their message is with your team.
An API block placed before the questions sends empty values, succeeds, and gives you no clue that anything is wrong. Save the flow when the order is right.
Step 3: capture the payload on the other side
Set the Pabbly workflow to capture its response, then trigger your bot from your own phone and complete the input flow with values you will recognise. The payload appears in Pabbly, and its fields become available to every step you add afterwards.
Now build the action. An email to yourself is the quickest way to prove the mapping — subject line naming the source, body containing the answers. Once it arrives correctly, swap it for whatever you actually want: a CRM contact, a spreadsheet row, a task, a team message.
Test the finished workflow once more end to end before you rely on it.
If you use Zoho Flow
Zoho Flow works the same way. Create a new flow, set its trigger app to Webhook and choose the incoming-webhook trigger. Zoho generates a URL — copy it, and use it everywhere this guide says the webhook URL. Everything on the Scope Wiser side is identical, and the payload maps onto whichever Zoho app comes next: a CRM lead, a Desk ticket, a Sheet row, a Campaigns contact.
Getting the other direction
Everything above pushes data out. To have Pabbly or Zoho Flow trigger a WhatsApp message — because a payment cleared or a CRM record changed — build a Webhook Workflow at Chatbot Manager → Automation → Webhook Workflows instead. It gives you a callback URL for the other platform to post to, and it sends an approved template rather than free text, because the recipient will not be inside a 24-hour window. Webhook Workflow: Complete Beginner's Guide covers that screen in full.
When it goes quiet
Nothing reaches Pabbly or Zoho. If you used the HTTP API route, check the HTTP API table's TOTAL CALL counter. Zero calls means the block is never reached — a flow problem. Calls with errors means the request itself is being rejected.
The payload arrives with blanks. A custom field was empty at the moment the block ran, usually because the block sits before the question that fills it.
It worked and then stopped. The workflow was turned off, or the webhook URL was regenerated. Both look identical from Scope Wiser.
Everything succeeds but no email arrives. That is the other platform's step, not Scope Wiser's. Its history log will say why.
What to do next
The same shape works for any no-code automation platform, and Zapier: Setup and Top Use Cases covers it in more depth — including Outbound Actions, which pushes data on a bot event without needing an HTTP API at all. For the wizard's authentication, response mapping and monitoring, read HTTP API: The Complete Developer Guide.