
Email Setup and SMTP Configuration
Connect your own sending address to Scope Wiser and make a bot email a subscriber the moment they share an address: the Email API profile, the Bot Settings Email tab and the flow that collects the address.
This guide connects your own email address to Scope Wiser so a bot can email a subscriber the moment they share an address — a welcome note, a confirmation, a coupon code or a download link.
What this is and is not
It is an instant, one-to-one email sent by a bot when a subscriber supplies an address.
It is not an email marketing platform. There is no campaign builder, no scheduling, no list management and no bulk send. If you want a newsletter, connect an autoresponder instead — see Autoresponders: Mailchimp, Brevo, ActiveCampaign and Mautic.
What you need before you start
An SMTP account — from your web host, your business email provider, or a dedicated sending service. You need its host, port, username and password.
A sending address on your own domain. Use an address on your own domain (hello@yourbusiness.com), not Gmail or Yahoo — those land in spam.
A bot flow that collects an email address. Step 3 shows how.
Step 1: Create the Email API profile
Credentials are held once for the whole account, not per bot.
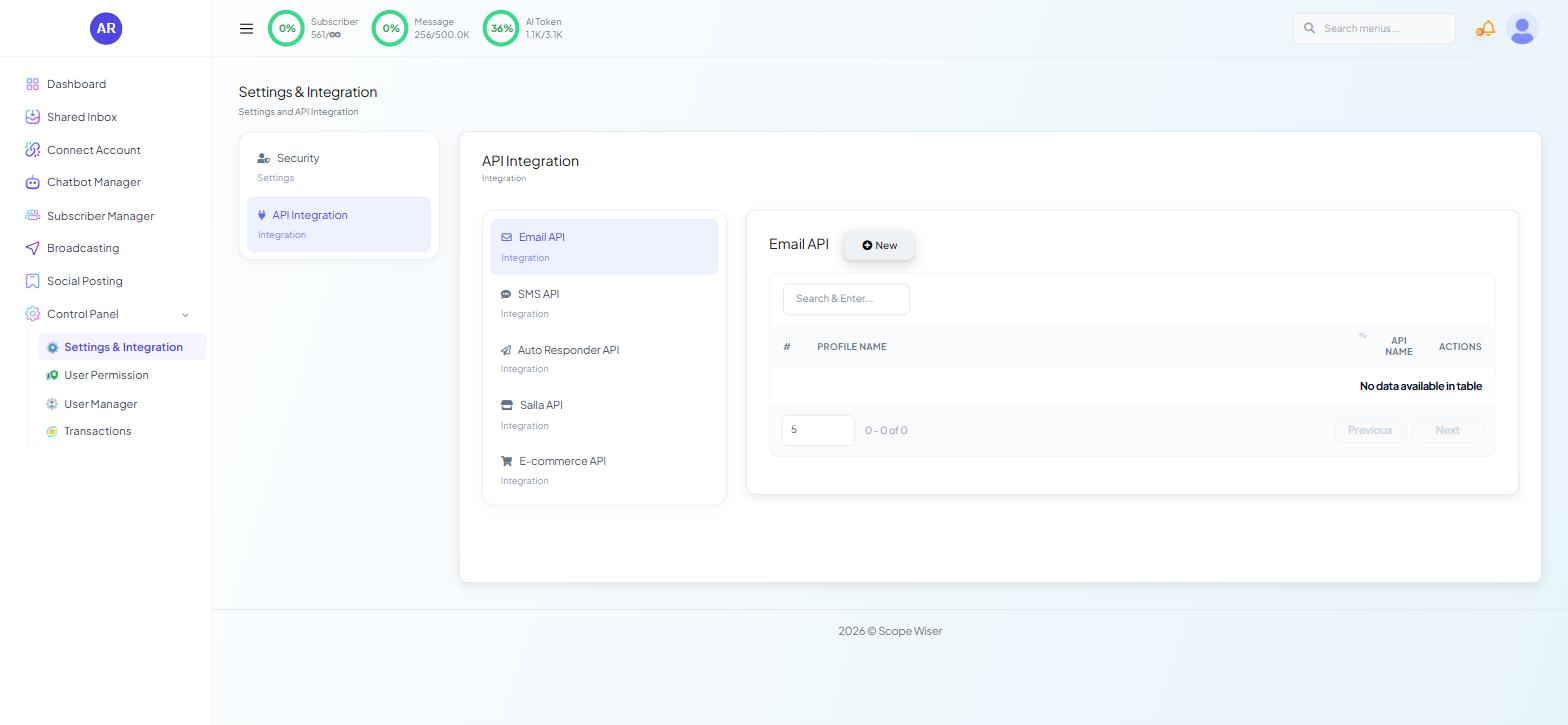
From the sidebar, open Control Panel → Settings & Integration.
Choose the API Integration card, then Email API from the list. The panel on the right lists saved profiles with the columns #, PROFILE NAME, API NAME and ACTIONS, and reads "No data available in table" until you add one.
Click New to open the profile form.
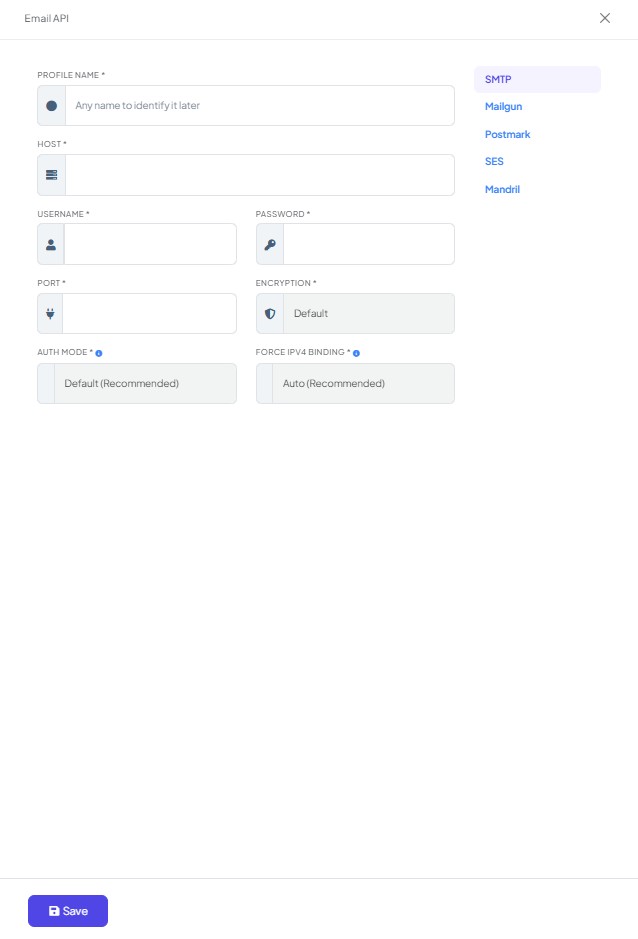
Choose how the mail will be sent. The form has a row of provider tabs: SMTP, Mailgun, Postmark, SES and Mandril. SMTP works with any provider that gives you a mail server; the other four talk to that service directly over its own API.
On the SMTP tab, fill in:
Field | Notes |
|---|---|
Profile Name | Any name to identify it later — this is what you pick from elsewhere in the product |
Host | Your provider's mail server, something like |
Username | Usually the full sending address |
Password | See below |
Port |
|
Encryption | Default, TLS or SSL — match it to the port |
Auth Mode | Leave on Default (Recommended) unless your provider asks for PLAIN, LOGIN or CRAM-MD5 |
Force IPv4 Binding | Leave on Auto (Recommended). Only change it if your host cannot reach the mail server over IPv6 |
Password: most providers refuse your normal mailbox password from third-party apps. Generate an app password in the provider's security settings and use that.
Port and encryption go together: port 587 = TLS, port 465 = SSL. A mismatch fails with a plain "connection failed".
On Mailgun the fields are different — Domain, Secret and an Endpoint that defaults to api.mailgun.net — and the other API tabs follow the same shape: the credentials that service issues, rather than a mail server.
Save the profile. It becomes selectable elsewhere in the product by its Profile Name.
Step 2: Tell a bot what to send
The profile alone sends nothing. Attach it to a bot.
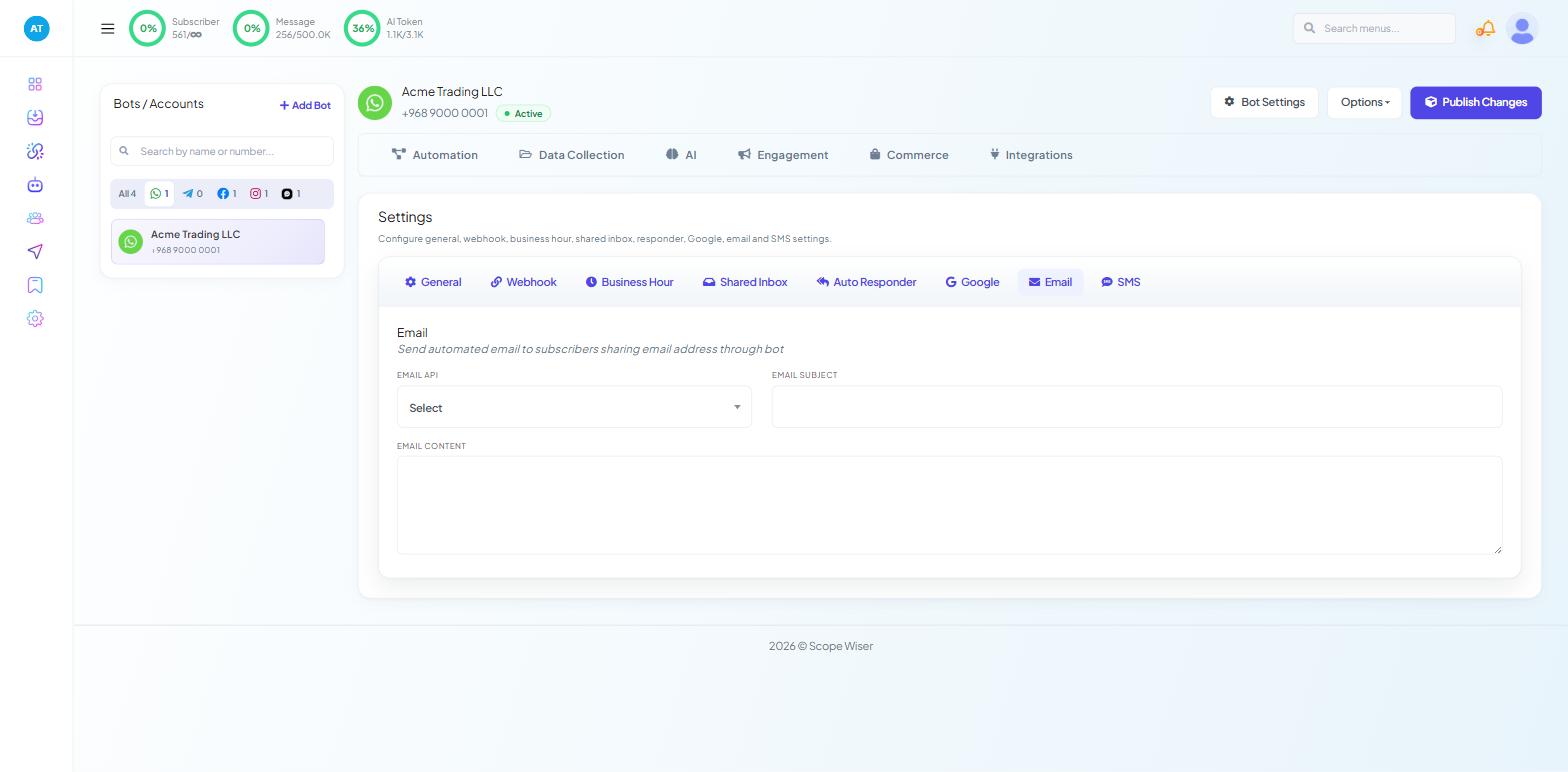
Open Chatbot Manager, select the bot and click Bot Settings.
Choose the Email tab. It holds three fields:
Field | What it does |
|---|---|
EMAIL API | Chooses which saved profile sends. Starts on Select |
EMAIL SUBJECT | The subject line |
EMAIL CONTENT | The body. Keep it short and put the useful detail — a reference number, a link — in the first line |
Click Publish Changes at the top of the panel. Settings that were entered and never published are the most common reason a correctly configured email never sends.
Step 3: Collect the address in a flow
Nothing sends until a subscriber gives you an email address. The tool for that is a User Input Flow.
Open Chatbot Manager → Data Collection → User Input Flows and click + Create, or drag the User Input Flow block onto the Flow Builder canvas from the DATA COLLECTION group.
Add a question asking for the email address.
Set that question's expected reply type to email, so the product checks the format before storing it.
Save the flow.
Ask for the email at a moment where the reason is obvious — after a booking, or in exchange for a document. Asking cold in the second message of a conversation gets you a lot of a@a.com.
Making sure it arrives
Ask your email provider for its SPF and DKIM records and add them at your domain host, or your mail goes to spam — see Email Providers: Mailgun, Postmark and Domain Verification.
Send a test to yourself at two different mailbox providers before you rely on it.
When email does not send
Nothing happens at all. Check Publish Changes was clicked, and that EMAIL API is not still on Select.
Connection failed on save. Host, port and encryption. Try the other port with its matching encryption before doubting the password.
Authentication rejected. You need an app password, not the mailbox password.
Sends, but arrives in spam. SPF and DKIM missing, or a free-mailbox sender address.
Only some recipients get it. Open the profile menu, choose Account, and read the API Usage Log panel — "Recent API calls for your account."
What to do next
For a dedicated sending service instead of your host's SMTP, and for the domain verification that makes it work, read Email Providers: Mailgun, Postmark and Domain Verification. If what you want is a mailing list and a welcome sequence, go to Autoresponders: Mailchimp, Brevo, ActiveCampaign and Mautic instead.